
In this article, we will configure the Captive Portal in Palo alto Next-Generation Firewall. Captive Portal is a type of web form with Username and Password field. Captive Portal granted the border access upon successful authentication. Palo Alto support redirect and transport mode of Captive Portal. So, let’s configure the Captive Portal.
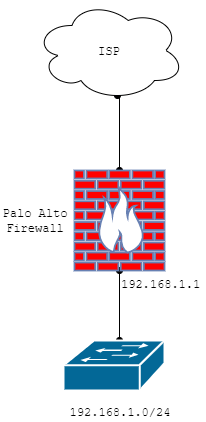
A scenario for Captive Portal Configuration in Palo Alto NG Firewall
In this example, I configured two zones, i.e. INTERNET and LAN. My LAN segment is 192.168.1.0/24. Before starting, I assume you have basic knowledge of the Palo Alto firewall. Also, please make sure you enable Response Pages in Network >> Interface Mgmt configuration. You must have to check the Enable User Identification option in Zone configuration (Network >> Zones). Gateway for the LAN segment is 192.168.1.1/24.
How to Configure Captive Portal on Palo Alto Firewall
We need a user database in order to configure the Captive Portal. You can use the Local User database as well as AD authentication for the Captive Portal authentication. In this example, I’will creates some local users on the firewall and they will prompt for Captive Portal. So, let’s configure the captive portal step by step.
1. Creating Users for Captive Portal Authentication
If you have already a user database or you have Active Directory in your environment, you can skip this step. Access the Palo Alto Firewall, Go to Devices >> Local User Database >> Users and click on Add.

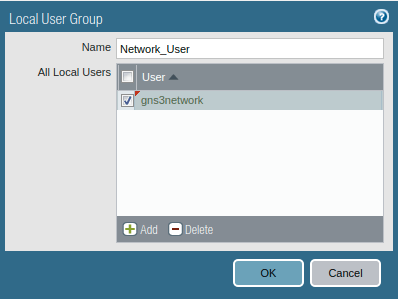
You can also configure Users Group under the Users.
If you want to configure the Users Group, Access the Device >> Local User Database >> User Groups and click on Add.
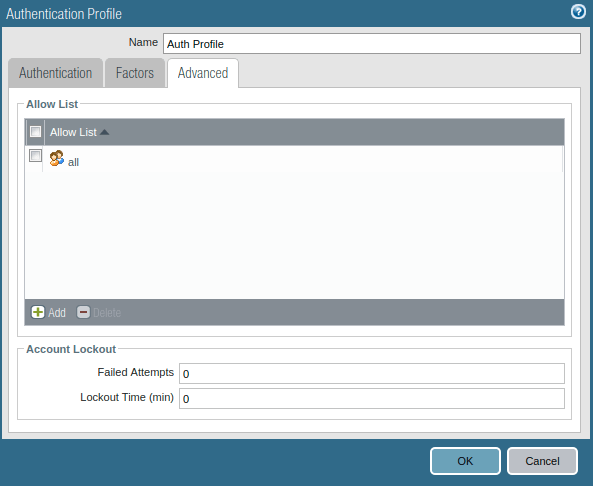
2. Creating an Authentication Profile for Captive Portal Users
Now, you need to configure the Authentication profile for the local users we created in step1. Access the Devices >> Authentication Profile and click on Add. Give a user-friendly name to this authentication profile. Since we are using Local Database for users, so select Local Database in the type field.
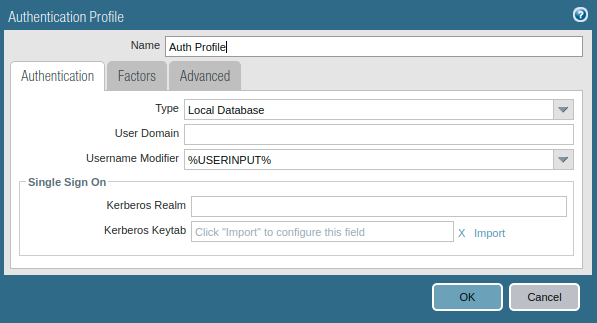
Now, click on Advanced Tab. Under the Allow List select the users/ users group you want to configure Captive Portal.
Note: If you want to use Palo Alto default certificate for captive portal, you can skip step 3 & 4!
3. Generating self-sign certificate for Captive Portal (Optional)
Now, we will generate a self-signed certificate for the captive portal. Although, you can also use default Palo Alto certificate for Captive Portal. However, if you want to install the self-signed certificate in LAN machines, you need to generate a self-signed certificate and later on export this certificate. In order to generate a self-signed certificate, access the Device >> Certificate Management >> Certificates and generate a self-signed certificate. In this example, I am creating two different certificates. The first one is the Root Certificate and another one is the Server Certificate.

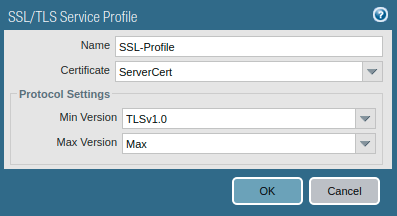
4. Creating the SSL TLS Service Profile (Optional)
This step is optional until you want to use your self-signed certificate fo the captive portal. If you want to use your self-signed certificate, then you must have to create SSL TLS Profile. Go to Device >> Certificate Management >> SSL/TLS Service Profile and click on Add. Now, you need to provide a user-friendly name to this profile and select the certificate you created in the previous step. Also, define the Min and Max versions in the Protocol Setting field.
If you are using Palo Alto default certificate / self-signed certificate, then you will see a warning page while accessing the Internet.
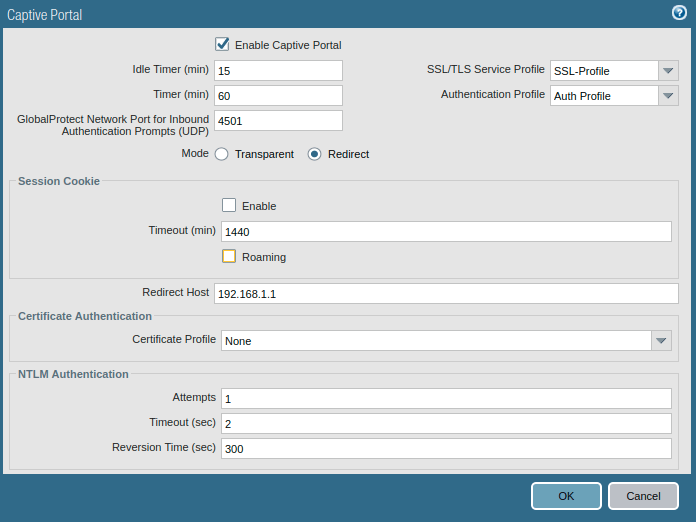
5. Configure the Captive Portal on Palo Alto Firewall
Now, we will configure the Captive Portal on Palo Alto NG Firewall. Go to Device >> User Identification >> Captive Portal Settings and click on the gear icon. Click on Enable Captive Portal. Define the Idel Timer out and Timer. Select the SSL TLS profile we created in the previous step. Next, select the authentication Profile, we created in step2.
You can configure the Captive Portal in two different modes, i.e. Transparent and Redirect. In Redirect Mode, you can define either the webserver IP address or an IP address that is created on the firewall itself. In this example, I am configuring the captive portal in Redirect Mode. I am using my LAN interface IP address i.e. 192.168.1.1 in Redirect Host, so the firewall will redirect any traffic to the LAN Gateway for Captive Portal login page. Leave the other settings to default.
6. Configuring the Authentication Policy for Captive Portal
Now, we need to create an Authentication Policy, which forces the LAN Users to authenticate before accessing the Internet. Go to Policies >> Authentication and click on Add. Give a name to this authentication Policy. In the Source tab, select the Source Zone and IP Addresses. In the User tab, select the unknown users for source users. Now, in the Destination tab, select the Destination Zone. You can also define the Destination Address as well. In this example, I am using LAN as a source zone and INTERNET as a destination zone. Now, access the Actions tab, and select default-web-form in the Authentication Enforcement field. You can also define the timeout for the web form, default is 60 minutes.

7. Creating SSL Decryption Rule for Captive Portal
If you want to redirect your https traffic to the captive portal login page, you must configure the SSL-decryption. However, if you do not configure the SSL Decryption, you can still redirect to the captive portal but only using HTTP traffic.
If you wants to configure the SSL Decryption, you must install the self-signed certificate to all machines which are the part of the decrption policy.
Now, in order to configure SSL Decryption, go to Policies >> Decryption and click on Add. Here, you need to configure two different rules, i.e. Decryption for unknown users and No Decryption of known users. Read our article How to configure SSL Decryption on Palo Alto Firewall to get started with SSL decryption.

8. Creating a Security Policy to allowing the DNS and Captive Portal Traffic
We have almost configured the captive portal configuration. But, for the Captive Portal, we need to allow DNS traffic, so whenever browser requests for a DNS query, the firewall will redirect the user to the authentication page. Go to the Policies >> Security and click Add. Create a Security Policy that allows the DNS traffic from LAN to the Internet.

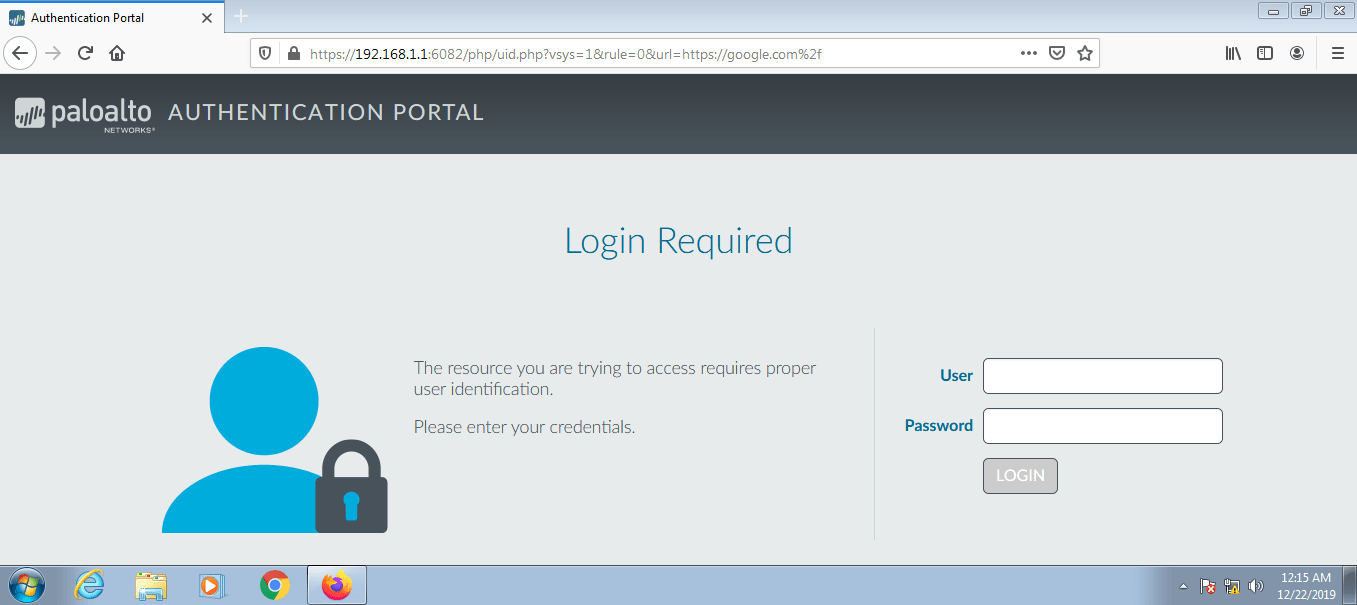
9. Verification of the configuration and Monitoring the Logs
Now, we will try to access the Internet from one of my LAN systems. If all the configuration is perfect you will see the Palo Alto Captive Portal page. You must log in using valid credentials in order to get internet access. The default captive portal page looks like the below image.
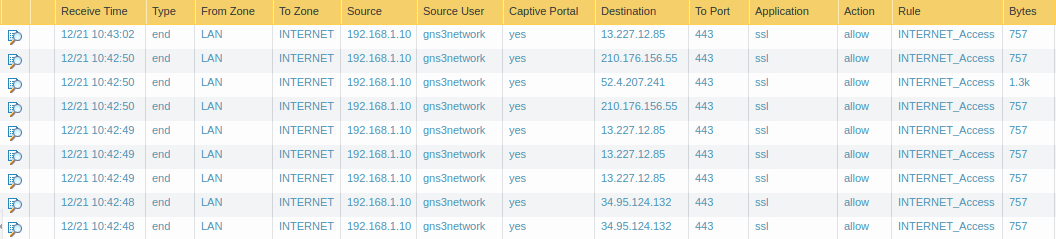
Access the Monitor Tab and see the Captive Portal logs
Now, access the monitor Tab, and you will find the captive portal logs which look like the below image.
You can modify the Palo Alto Captive Portal page. See How to modify Captive Portal Page in Palo Alto.
Related Artiles
- How to configure GRE Tunnel Between Palo Alto and Cisco Router
- How to configure UNAT in Palo Alto Firewall | U-Turn NAT
References
Summary
In this article, we configured the Captive Portal on Palo Alto Next-Generation Firewall. Captive Portal is a web form, which is used to authenticate the newly connected device. We used DNS redirecting method for the Captive Portal. Once the users get authenticated, they can access the Internet!
Did you like this article? Please comment in the comment box if you are facing any challenges regarding the Captive Portal Configuration!
There is no mention of the interface management profile that you have to create for the interface that you’re redirecting users to. From what I understand, you have to enable “response pages” and “user-id”.
Hi David, Please go through the first heading of this article, I have already mentioned both of the things. Thanks buddy!
How ton configure Multi-VLAN+Portail Captif for Palo-alto?
Thanck you!!