
In this article, we will perform the initial configuration of the Palo Alto Networks Firewall. We will configure the Palo Alto Management Interface using the CLI and GUI. Further, we will configure the Management interface configuration to access the firewall. We will also configure the DNS & NTP Servers, Idle timeout & Login banner. Later, we will activate the Palo Alto Networks Firewall by registering it on the Palo Alto Networks support portal. Finally, we will create Trust & Untrust Zone and assign the Layer 3 interfaces. We will also create a security policy to allow the traffic and a source nat rule to translate the private to public IP Addresses. Let’s start.
All of the Palo Alto Networks Firewalls come with dedicated management and data planes. By default, we can access the Palo Alto Networks Firewall using the Management port labeled as MGT or via the Console port labeled as CONSOLE.

For ease of access, the latest Palo Alto Networks Firewalls have a Micro USB port to access it without any serial to console converter.
By default, the Palo Alto Networks Next-Gen Firewalls use the MGT Port to retrieve the license and registration information. Thus, it’s important to provide Internet connectivity to the MGT Port with DNS Server configuration.
Although, we can change this default behavior by configuring the service route.
By default, Palo Alto Networks Firewalls are configured with the following IP Addresses and Credentials:
- Username: admin
- Password: admin
- MGT IP Address: 192.168.1.1
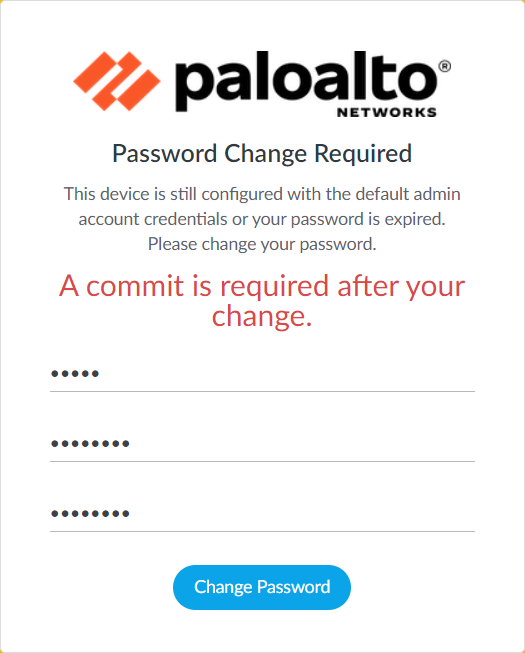
Starting with PANOS 9.1.0, we need to change the default credentials during the initial login process. To access the Palo Alto Networks firewalls, you need a Straight-through cable connected to MGT Port and your computer/laptop. Ensure you are using a static IP assignment in the 192.168.1.0/24 series.
Configure the Palo Alto Networks Firewall Management IP Address and Administrative Management Services
In this section, we will configure the Palo Alto Networks Firewall management IP Address and Administrative Management Services. It is important because we have to follow the IP schemes that are running in our environment. We will change the IP Address in the below easy steps:
Step1: Access the Palo Alto Networks Firewall using an Ethernet cable
Since we know the default IP Address of Palo Alto Networks Firewalls is 192.168.1.1/24. Ensure changing the IP Address of the Ethernet interface of your PC to 192.168.1.0/24 and IP 192.168.1.1 must NOT be used.
Step2: Open a Web browser and access the Palo Alto Firewall
Now, open the Web browser, such as Google Chrome, and access the firewall using https://192.168.1.1. Ensure to use HTTPS before the IP Address. Once the login page appears, enter the login credentials.
Step3: Changing the MGT IP Address of Palo Alto Networks Firewall
Navigate to Device > Setup > Interfaces and edit the Management Interface. Now, set the IP Address according to your network IP scheme.
By default, HTTPS, SSH, and PING (ICMP) Administrative services are enabled on the Palo Alto Networks firewall. You can also enable the HTTP, and TELNET services according to your requirements.
You can restrict the adminstrative services access using Permitted IP Addresses.
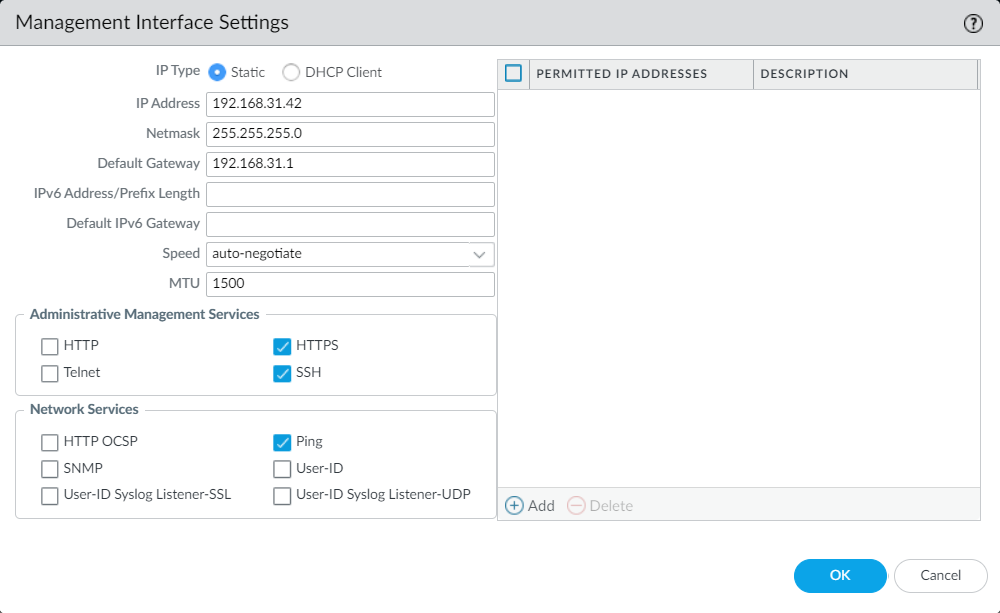
Once you modify the confirmation, Click on OK.
Step4: Commit the configuration on Palo Alto Networks Firewall
Finally, commit the configuration by navigating to Top Right > Commit to save the configuration to running confirmation.
Configure the Palo Alto Networks Firewall Administrator
In this section, we will configure the local administrator on Palo Alto Networks Firewall. By default, the admin is the only administrator available on the firewall. However, we need to change it to meet compliance requirements and protect the device from brute-force attacks.
Login to Palo Alto Networks Firewall and Navigate to the Device > Administrators. Now, click on New and define the new administrator and provide the required information.

You can also configure remote authentication such as LDAP, Radius, TACACS, SSO, etc.
Once you modify the configuration, Click on OK. Finally, commit the configuration by navigating to the Top Right Commit option to save the configuration to running confirmation.
Configure the DNS & NTP on Palo Alto Networks Firewall
In this section, we will configure the DNS & NTP on the Palo Alto Networks firewall. Palo Alto Networks firewall uses the DNS server information to download Security Updates such as Antivirus, Anti-Spyware, and IPS signatures. Device licensing & registration also uses the DNS information to resolve the FQDNs.
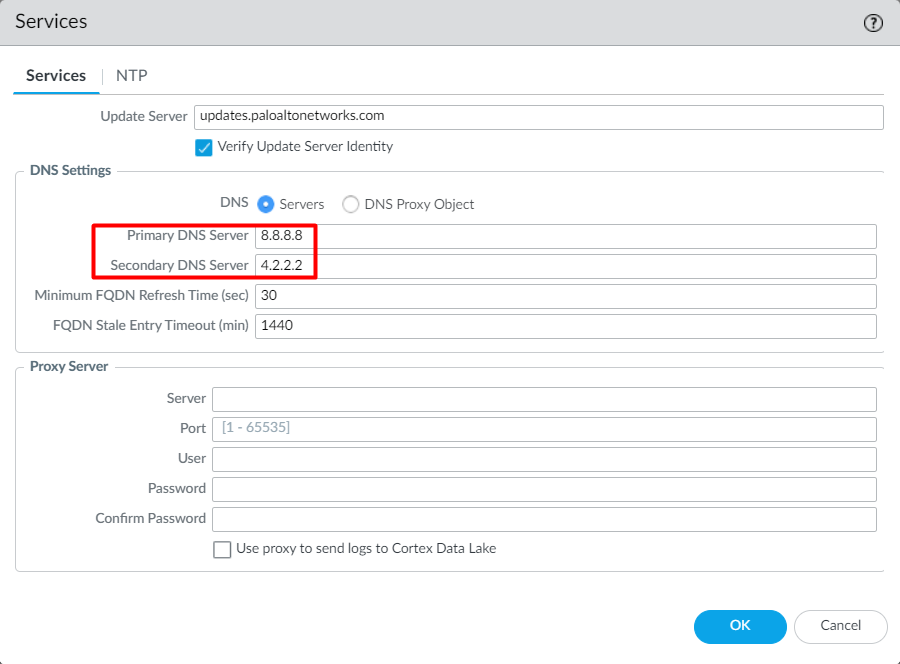
To configure the DNS and NTP on Palo Alto Networks Firewall, login to the firewall and navigate to Device > Setup > Services and click on the settings icon.
Now, define the Primary and Secondary DNS Servers.
Click on the NTP tab, and define the NTP Server’s information. Note that Authentication for NTP servers is optional.
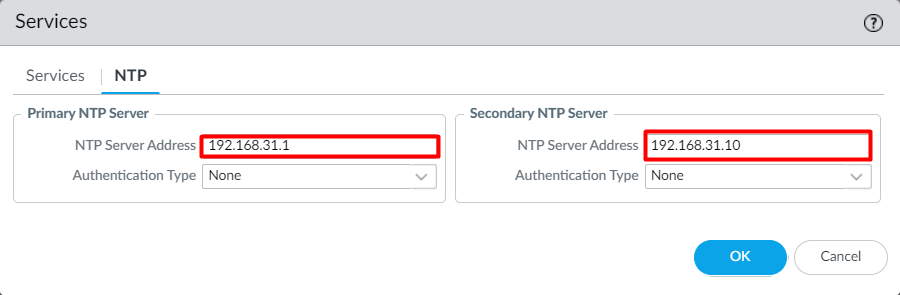
Once you are done with the configuration, Click on OK and then click on Commit to modify the running configuration.
Configure Palo Alto Networks Firewall MGT IP Address, DNS Servers, NTP Servers, and Administrative services using CLI
Palo Alto Networks Firewalls have a feature-rich GUI, which helps you manage almost everything on the firewall. You can perform the same level of tasks from the CLI as well. Although, the CLI interface is a bit challenging.
If you are managing the Cisco ASA firewalls from CLI, you can easily understand Palo Alto Networks Next-Gen firewall CLI. In this section, we will configure the Management IP Address, DNS Servers, NTP Servers, and Administrative services using the CLI.
You can get the CLI access either using SSH or directly connecting to the console port. Once you have the CLI access, use the below commands to configure the IP Address on Management Interface.
First, enter to the configuration mode using the below command:
|
1 2 3 4 |
admin@PA-850> configure Entering configuration mode [edit] admin@PA-850# |
Now, use the below command to set the management interface IP Address and DNS server configuration:
|
1 |
admin@PA-850# set deviceconfig system ip-address 192.168.31.42 netmask 255.255.255.0 default-gateway 192.168.31.1 dns-setting servers primary 8.8.8.8 secondary 4.4.2.2 |
Use the below command to set the NTP Server
|
1 |
admin@PA-850# set deviceconfig system ntp-servers primary-ntp-server ntp-server-address 192.168.31.1 authentication-type none |
Use the below command to set the Administrative services i.e., HTTPS, SSH, HTTP, TELNET, PING, etc.
|
1 2 3 4 |
admin@PA-850# set deviceconfig system service disable-icmp yes [edit] admin@PA-850# set deviceconfig system service disable-http no [edit] |
Don’t forget to commit the changes to save them in the running configuration.
|
1 2 3 4 5 6 7 |
admin@PA-850# commit Commit job 2 is in progress. Use Ctrl+C to return to command prompt ................55%.75%98%..............100% Configuration committed successfully |
Configure the Idle Timeout in Palo Alto Networks Firewall
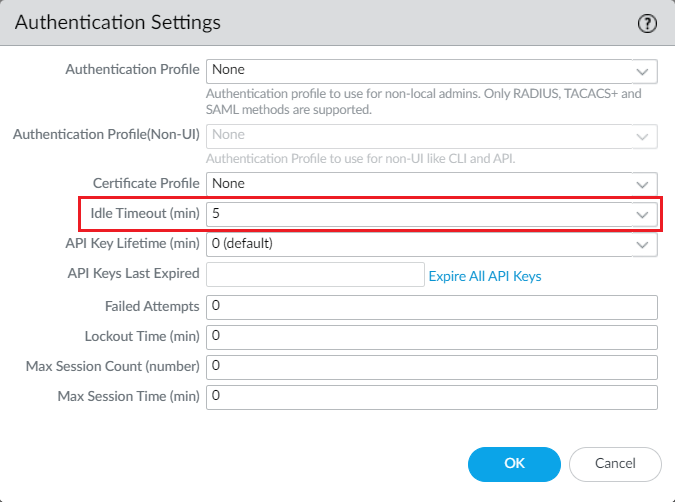
In this section, we will configure the administrator idle timeout in Palo Alto Networks Firewall. This is important to improve the security posture of the firewall and reduce the misuse of an active session.
Login to Palo Alto Networks firewall and navigate to Device > Setup > Management and click on Authentication Settings and set the idle timeout in minutes.
To change the Session Idle Timeout, you can use the below command in Palo Alto NGFW CLI:
|
1 2 3 4 5 6 7 8 9 10 |
admin@PA-850> configure Entering configuration mode [edit] admin@PA-850# set deviceconfig setting management idle-timeout 5 [edit] admin@PA-850# commit Commit job 2 is in progress. Use Ctrl+C to return to command prompt ................55%.75%98%..............100% Configuration committed successfully |
Change the login banner in Palo Alto Networks Firewall
In this section, we will configure a login banner in Palo Alto Networks Firewall. A login banner is important to make the device compliant.
Login to Palo Alto Networks Firewall and navigate to Device > Setup > Management and click on General Settings. Now, just navigate to the Login Banner field and define your approved login banner.

Registration & Activation of Palo Alto Networks Firewall using serial and/or auth key
I hope you have modified the recommended configuration by following the above setups. In this section, we will register the Palo Alto Networks Firewall using the serial and/or auth key provided by the sales engineer. Follow the below steps to register and activate the Palo Alto Networks Firewall:
Step1: Retrieve the Order ID, Customer ID, and Authorization key from the sales team
Firstly, you need to retrieve the Order ID or Customer ID along with the Authorization key. Generally, it will be available after placing the purchase order.
For the hardware devices, you will get the device serial number, which is required to register the device on Support Portal.
Step2: Create a support account on Palo Alto Support Portal
To retrieve the licensing information on the device, First, we need to create a support account at https://support.paloaltonetworks.com. During the signup process, you need to provide the details from step 1.
Once the account is successfully created, log in to https://support.paloaltonetworks.com and register your assets.
Step3: Activation of Palo Alto Networks Hardware & VM Series Firewalls
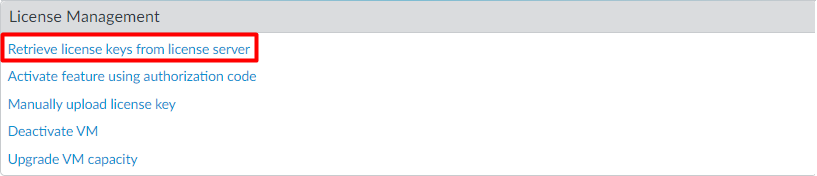
Finally, after creating a support account, we will retrieve the license information on the device. Log in to the device and navigate to Device > Licenses, and click on Retrieve license keys from the license server.
Alternatively, you can activate the features by clicking Activate feature using authorization code.

If you don’t have active internet connectivity on the firewall, you can download the license key file from the support portal and choose Manually upload license key.
Getting started with Palo Alto Networks Firewall – Configuring the Security Zone, Layer-3 Interfaces, Security Policy, and NAT Policy
In this section, I’ll demonstrate the basic configuration that is required to pass the traffic from the data plane interfaces. First, we will create the security zones, i.e., Trust & Untrust on Palo Alto Networks Firewall. Further, we will create two Layer 3 Interfaces and assign the security zones and IP Addresses. Once we are ready with the interfaces, we will create a simple security policy to allow the traffic from Trust to Untrust Zone. We will also configure the Source NAT rule to translate our Private IP Addresses to Public IP Addresses.
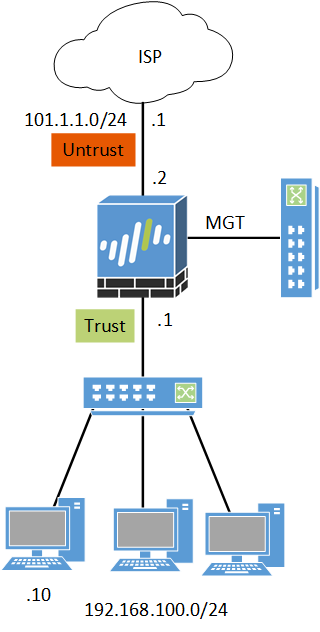
Before starting with the configuration, please have a look at the below scenario. Ethernet1/1 is configured with an IP 101.1.1.2/29 and connected with ISP and has Untrust Zone. Similarly, Ethernet1/2 is configured with an IP 192.168.100.1/24 and connected with Trust Zone. A Windows machine is connected behind the Trust Zone and with an IP Address 192.168.100.10.
Creating the Security Zone on the Palo Alto Networks Firewall
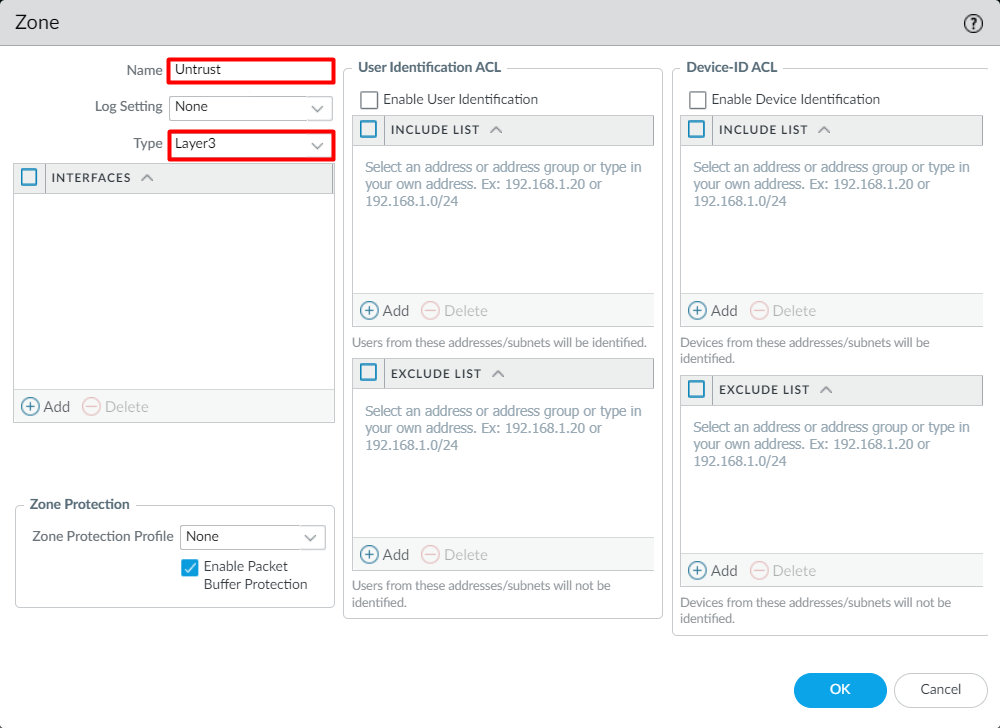
To create the Layer-3 Security Zone, login to the device and navigate to Network > Zones and click on Add. Now, provide the Name of the Security Zone, i.e., Untrust, and select the type to Layer3.
Similarly, Create a new security zone, i.e., Trust.
Creating the Layer-3 Interfaces on the Palo Alto Networks Firewall
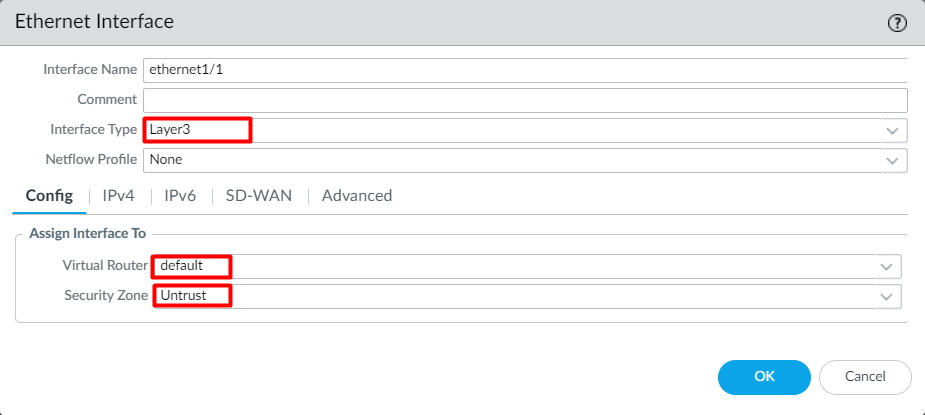
Now, we will create the Layer-3 data plane interfaces and assign the security zone. Navigate to Network > Interfaces > Ethernet and select ethernet1/1. Select the Interface Type to Layer 3, Virtual Router to default, and Security Zone to Untrust (created in the previous step).
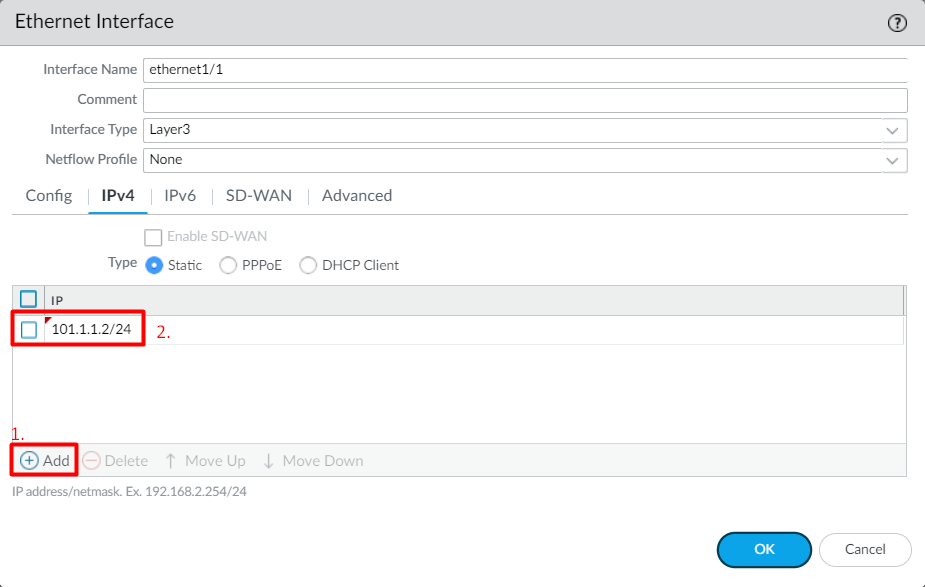
Click on the IPv4 Tab, define the IP Address, 101.1.1.2/24, and click on OK.
Similarly, define interface ethernet1/2 with Trust security zone. Your configuration should look like the below configuration:

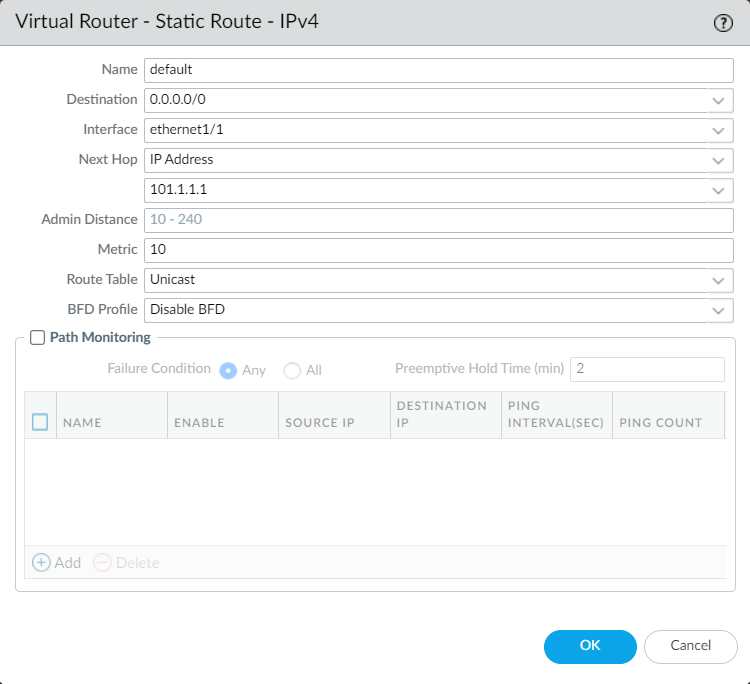
We have done the interface configurations. At this point, we need to configure a default route toward our ISP. You can navigate to Network > Virtual Routers and click on the virtual router, i.e., default to configure a default route.
Creating the Security Policy on Palo Alto Networks Firewall
In previous steps, we have configured the security zones, layer-3 interfaces, and a default route toward the ISP. In this section, we will configure the security policy to allow the traffic from Trust to Untrust Zone.
Navigate to Policy > Security and click on Add. Define the Policy Name, i.e., Trust-to-Untrust. Click on the Source Tab, and define Source Zone Trust and Source Address 192.168.100.10. Now, click on Destination Tab, and define Destination zone to Untrust and Destination Address to Any. For this example, we will use the ANY application and application-default in service, which means everything between the defined source and destination will be allowed. By default, the action is set to Allow and Log Setting is set Log at Session End. Once you are done with the configuration, click on OK.
Log at Session End means that the firewall will show a log entery under Monitor > Traffic once the session end.
Your security rule will look like the below screenshot:

Creating the Source NAT Policy on the Paloalto Networks Firewall
In this section, we will configure the Source NAT to modify the Private IP Address before leaving the firewall. Navigate to Policy > NAT and click on Add. Now, define the name on the NAT Policy. For Example, SNAT-Trust.
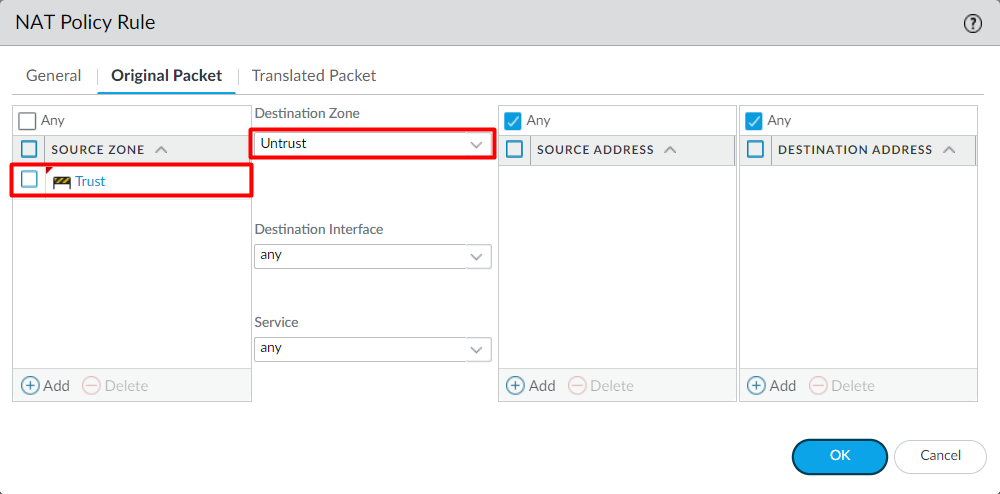
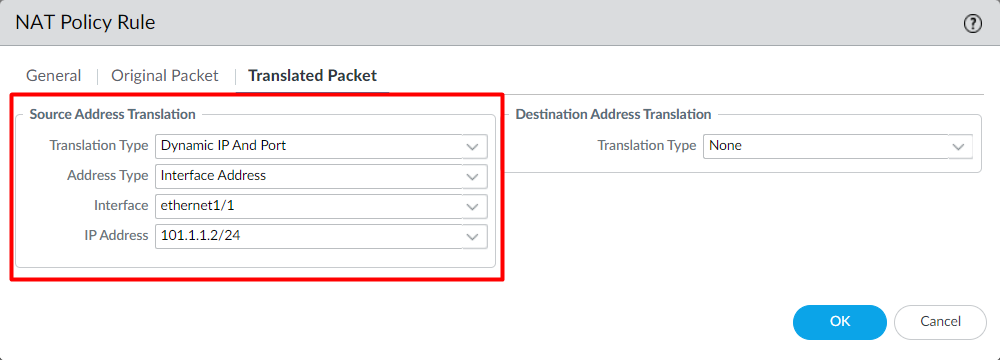
Since we want to translate the entire Trust subnet, we will not modify the Source Address, Destination Address, and Service fields of the Orignal Packet Tab. Just select Source Zone Trust and the Destination Zone to Untrust.
Now, in Translated Packet tab, navigate to Source Address Translation, and set Translation Type to Dynamic IP And Port, Address Type Interface Address, Interface to ethernet1/1, and IP Address to 101.1.1.2/24.
Once you did the configuration, please navigate to the right corner and click on Commit.
Verifying the allowed traffic using the Security and NAT Rule
Finally, navigate to Monitor > Traffic and analyze the latest traffic logs we received from the 192.168.100.10 host. You will notice that the PING and DNS traffic is successfully allowed from the firewall.
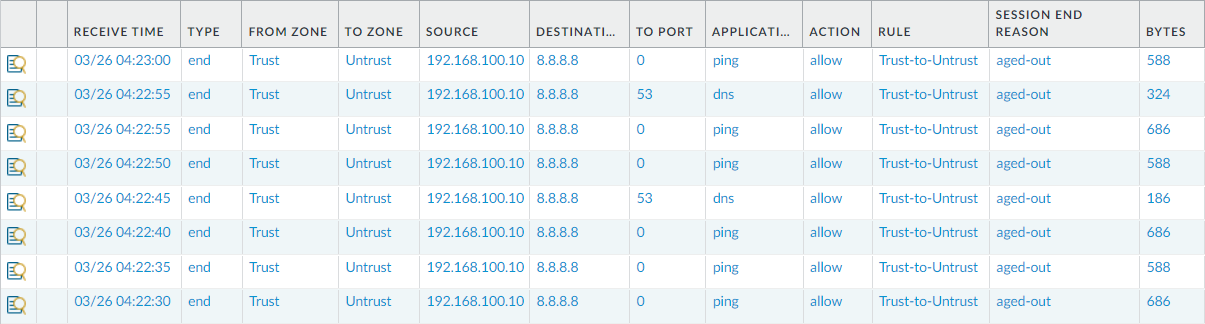
Note:- We only allowed the traffic for source IP 192.168.100.10. If you need to allow the traffic for the entire Trust Zone, keep the Source Address to ANY in the security policy.
Related Articles
- Palo Alto Networks Deployment Modes
- How to Configure Static Route on Palo Alto Firewall
- Destination NAT in Palo Alto Networks Firewall
- How to configure UNAT in Palo Alto Firewall | U-Turn NAT
- SSL Decryption on Palo Alto Next-Generation Firewall
- How to configure IPSec VPN between Palo Alto and FortiGate Firewall
Summary
In this article, we have successfully performed the initial configuration such as MGT Interface, Administrators, Idel Timeout, and Login Banner on Palo Alto Networks Firewall. Finally, we configured Security Zone, Interfaces, Security Policy, and NAT policy to pass the traffic from Palo Alto Networks Firewall.
I hope you like this detailed article :). Please share it on social media platforms and shows us some love.