
In this article, we will configure EDL (External Dynamic List) on Palo Alto Networks Firewall. EDL allows you to fetch the feeds from a text file hosted on a web server. It simplifies your task to configure the malicious IP Address on the firewall. You can also allow the number of IP addresses through the security policies and EDLs. You can configure the Web Server on Microsoft Windows or Linux platforms such as Ubuntu, and CentOS. Let’s Start!
How to configure External Dynamic List on Palo Alto Networks Firewall
As we discussed, we require a text file that is hosted on a web server. So, the prerequisite is having a Web Server that is reachable from the Palo Alto Networks Firewall. Let’s understand the EDL configuration in several easy steps.
Step 1: Preparing a web server for Palo Alto Networks EDL
This step is optional if you are already having a running Web Server with you. If you don’t have a webserver with you, you can simply deploy an open-source Web Server such as Apache or Microsoft IIS.
If you are new to the webservers, I recommend you download and install the Ubuntu Operating System and follow the web server installation guide.
Alternatively, we can host the Web Page for you, and you can update the IP Addresses into it in less than a minute. You will get the SSL Certificate as well. It will be free of cost for the first month. After the first month, pay 1$ USD per month. Contact Us for more information.
Once the Web Server is ready get the IP Address details using the below command:
|
1 2 3 4 5 6 7 8 9 |
gns3network@ubuntu:~$ <strong>ifconfig</strong> ens33: flags=4163<UP,BROADCAST,RUNNING,MULTICAST> mtu 1500 inet 192.168.31.49 netmask 255.255.255.0 broadcast 192.168.31.255 inet6 fe80::3700:c984:67a2:c8c2 prefixlen 64 scopeid 0x20<link> ether 00:0c:29:60:fd:94 txqueuelen 1000 (Ethernet) RX packets 42044 bytes 61381359 (61.3 MB) RX errors 0 dropped 0 overruns 0 frame 0 TX packets 9204 bytes 647811 (647.8 KB) TX errors 0 dropped 0 overruns 0 carrier 0 collisions 0 |
open an SSH session of ubuntu, and create the text files containing IP Addresses using the below commands:
|
1 |
sudo touch /var/www/html/blocklist.txt |
|
1 |
sudo echo "104.227.185.171" > /var/www/html/blocklist.txt |
The above commands will create a text file in the apache server directory with an IP Address, i.e., 104.227.185.171. Don’t worry, I will explain to you the easiest way to update this file at the end of this article.
Step 2: Configure EDL on Palo Alto Networks Firewall
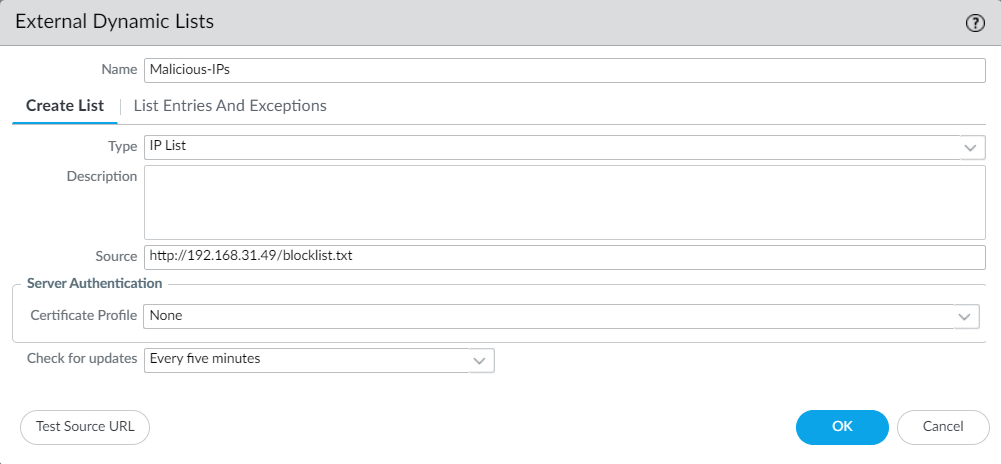
Now, we need to configure the EDL on the Palo Alto Networks Firewall. Just need to log in to the GUI of Palo Alto Firewall and navigate to Objects > External Dynamic Lists. Now, click on Add.
Enter the name of the EDL and then select the Type of the EDL to IP List. In the Source, enter the full address of the text file where we are going to retrieve the IP fields. In this example, my Web Server IP Address is 192.168.31.49 and the file name is blocklist.txt, so the feed text file will be on http://192.168.31.49/blocklist.txt. Click on OK.
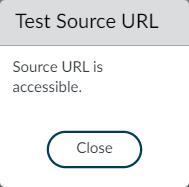
Now, click on the test connectivity. If the Palo Alto Firewall connectivity to the Web Server is fine, you will get the below information.
Step 3: Creating a security policy with EDL
Finally, we need to create a security policy on Palo Alto Networks Firewall to allow or block the traffic based on EDL. Navigate to Policies > Security and click on Add.
Based on your requirement, add the EDL entry either in the source and/or in the destination. In this example, I’m using the blocklist in the destination field.
Once the Security Policy is created, your security policy will look like the below image.

Important: Commit the changes that you have made till now.
Step 4: Verifying the IP Addresses are newly created EDL
We are ready with the configuration of the External Dynamic List & the security policy on the Palo Alto Firewall. Now, let’s verify the IP Addresses inside the EDL.
Navigate to Objects > External Dynamic Lists and select the EDL entry that you created, i.e., Malicious-IPs, and click on the Import Now option present on the bottom pane.
This will fetch the latest entries from the text file we have created.

Now, click on EDL entry, i.e., Malicious-IPs, and click on the List Entries And Exceptions sub tab. You will get the current IP Addresses that are available on the web server.
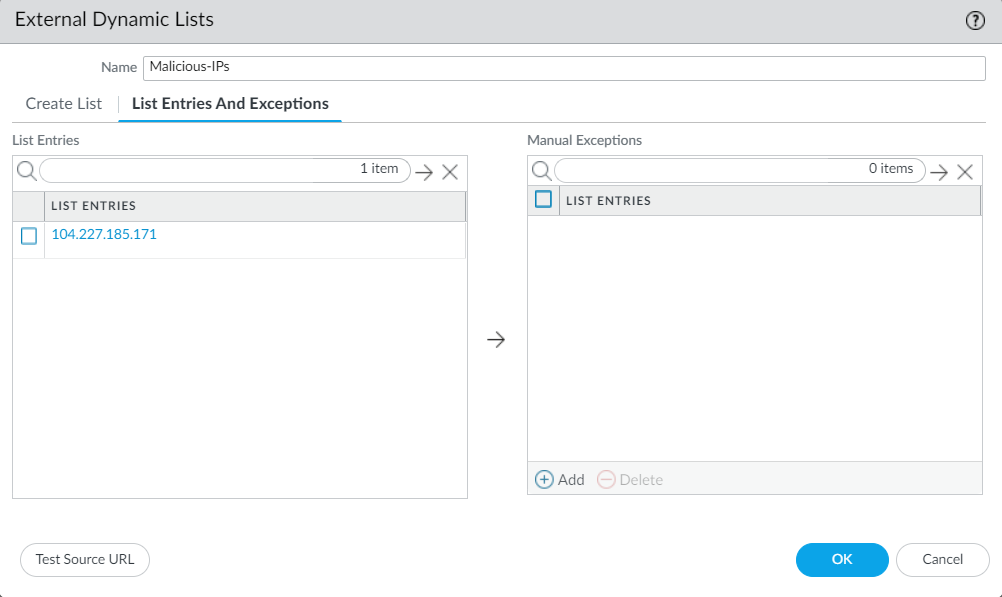
If required, you may create exceptions for a few IP Address lists.
Step 5: Bulk upload the IP Addresses in the text file
Well, finally, we need to bulk upload the IP Addresses in our EDL text file, i.e., blocklist.txt. We can use SCP clients such as WinSCP to upload the files to the Apache web server directory.
Now, open a new session using your Web Server IP Address. Navigate to /var/www/html/ directory and right-click on blocklist.txt. Edit this file with your favorite editor such as Notepad++ and save it with updated entries. Palo Alto Firewall will fetch these entries according to the defined time on EDL configuration.
Related Articles
- Palo Alto Networks Deployment Modes
- How to Configure DHCP Relay on Palo Alto Firewall
- How to Configure Static Route on Palo Alto Firewall
- How to configure Palo Alto Networks Firewall as a DHCP Server
- How to configure Netflow Server in Palo Alto Firewall
- How to Configure GlobalProtect VPN on Palo Alto Firewall
- How to configure UNAT in Palo Alto Firewall | U-Turn NAT
Summary
In this article, we have configured the External Dynamic List for IP Address feeds on Palo Alto Networks Firewall. EDL allows you to fetch the IP Addresses/URLs feed from a web server. In this example, we discussed the Apache Web server which is an open-source server with great features.
I hope you like this article. Please share it on social media platforms and shows us some love 🙂
Great Article and it made it easy to setup the first step. I’ll see i can build on what you did for a SSl connection and other parts of the EDL