
In this article, we will configure Destination NAT in Palo Alto Networks Firewall. Destination NAT is usually configured to translate the public IP Address to the Private IP Address.
Here, we will access an internal Linux server using the public IP Address. If you need to access any different service, just replace the service. Before starting with the DNAT configuration, ensure you have permission to modify the configuration.
If you are new to Palo Alto Networks devices, I’ll highly recommend checking Palo Alto Networks – Initial Configuration from CLI & GUI.
Let’s start!
Destination NAT in Palo Alto Networks Firewall
Before moving to the configuration directly, let’s have a look at the topology that we are using to configure DNAT. I have a Palo Alto Networks Firewall with a Public IP Address, i.e., 101.1.1.0/29, and the Linux server is configured in the DMZ with an IP Address 192.168.10.10.

Linux server currently running both HTTP and SSH services. We will use a single Public IP Address to access both services hosted on the Linux server.
We will first configure the Destination NAT rules to allow HTTP and SSH from outside. Further, we will configure the security policy to allow traffic from the INTERNET to DMZ Zone.
Destination NAT rule configuration on Palo Alto Firewall
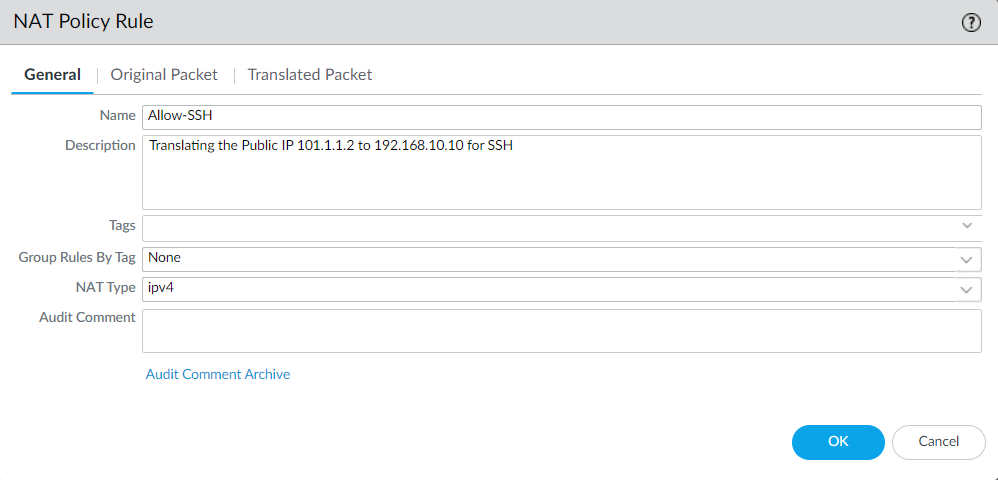
To configure the Destination NAT rule, login to Palo Alto Firewall and navigate to Policies > NAT > Add. Now, configure the NAT rule name and description (optional).
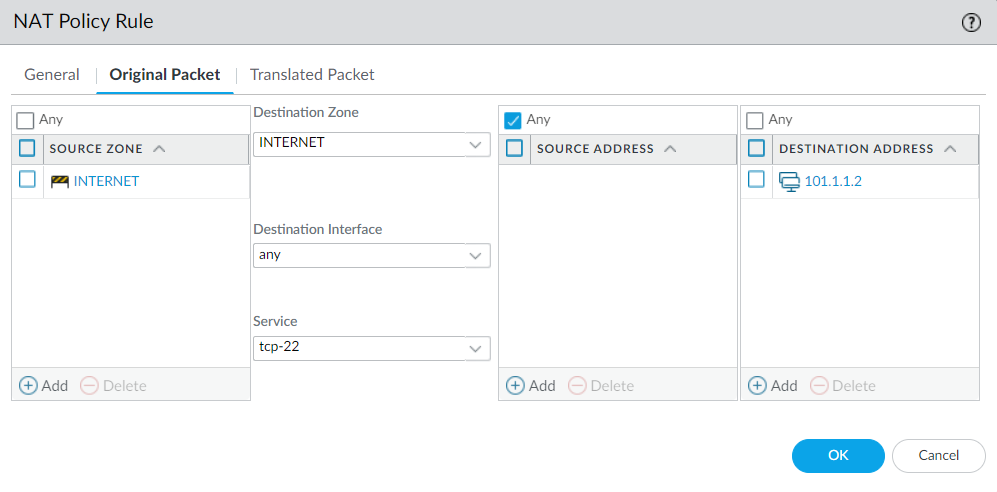
Further, In the Original Packet tab, select the source and destination zones. In the case of DNAT, you need to select the Public facing security zone in both the source and destination.
Select the original service that the user will try to access from the outside, i.e., SSH.
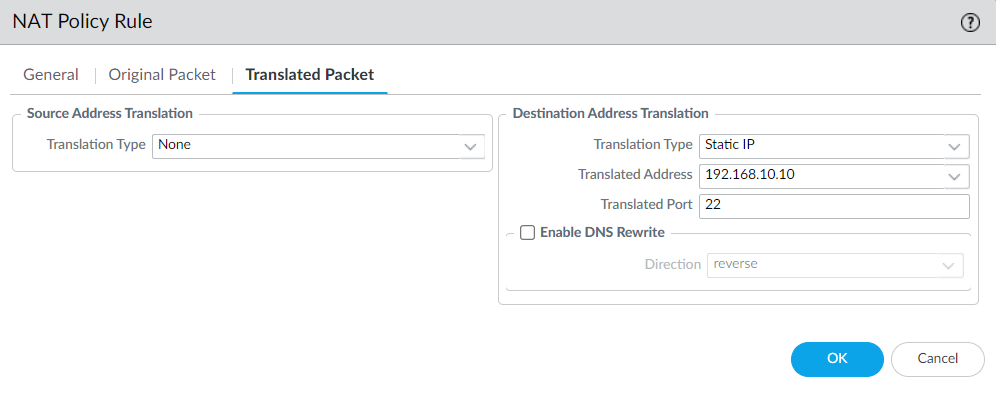
Finally, in Translated Packet, we need to configure the Private IP Address and service that we want to translate from the Public IP Address. Navigate to Destination Address Translation, and select Translation Type to Static IP, Translated Address to the private IP Address, i.e, 192.168.10.10, and TRranslated Port to original service that is running on the server, i.e., 22.
Now, click on OK.
Once you have done the above configuration, the NAT rule will look like the below screenshot:

Click here to open the large image in a new tab
Similarly, we need to configure another NAT rule to translate the Public to Private IP Address for HTTP access.

Click here to open the large image in a new tab
We have done with the NAT rule configuration.
Security Policy configuration for Destination NAT (DNAT) traffic in Palo Alto Networks Firewall
In this section, we will create a security policy to allow traffic from the INTERNET to the DMZ. Navigate to Policies > Security > Add. Now, define the security policy.
Define the security policy exactly as shown below.
Note: We need to define the Public IP Address in the security rule.

Click here to open the large image in a new tab
Validation of Destination NAT configuration
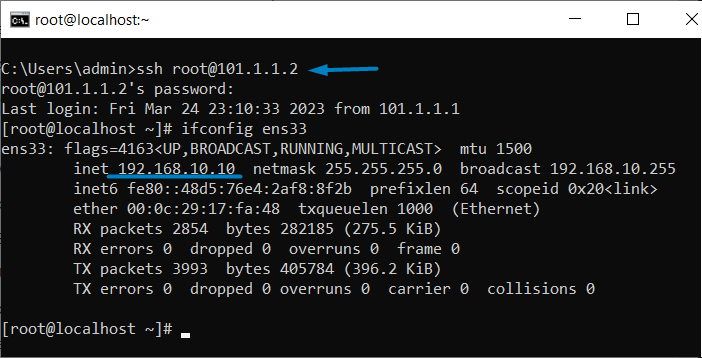
Here, we will validate all of the configurations that we did in the previous steps. First, I’ll try to access the Linux server using the associated Public IP Address. i.e., 101.1.1.2.
You can refer to the below screenshot that we have access to the SSH session using the Public IP Address and the Private IP Address on the Linux server is 192.168.10.10.
Now, I will try to access the internal backup application using its public IP Address, i.e., 101.1.1.2.
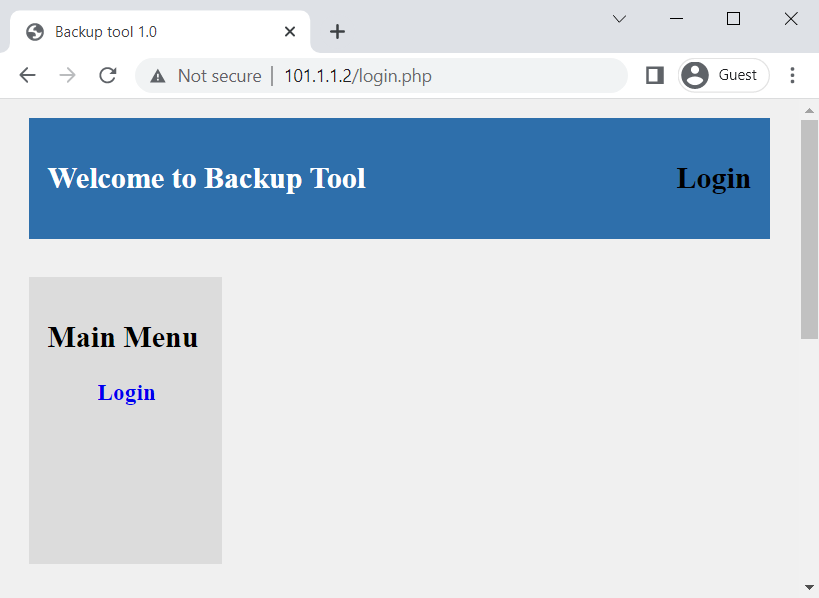
I can successfully access both of the Linux services, i.e., HTTP & SSH.
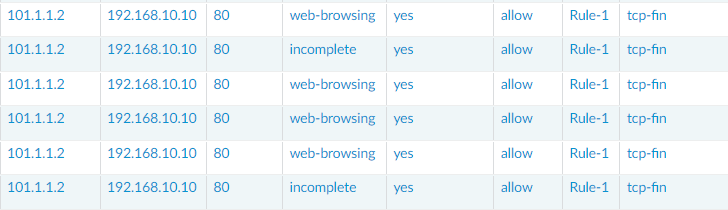
Finally, we will check the traffic logs on the Palo Alto Networks Firewall, and we can see that the IP Address is 101.1.1.2 and successfully translated to 192.168.10.10.
Allowing RDP from Internet to Internal Network using Destination NAT (DNAT)
Now, we will take another example, where we will access the Microsoft Windows Server from outside. I have a Microsoft server, i.e., 192.168.10.20 and I’ll configure NAT and Security rules to access this from outside.
You need to follow the previous steps and configure the NAT and Security rules as below:

Click here to open the large image in a new tab

Click here to open the large image in a new tab
In case, if you have any issues while configuring the DNAT, just comment in the comment box.
Related Articles
- How to Configure DHCP Relay on Palo Alto Firewall
- How to Configure Static Route on Palo Alto Firewall
- Top Palo Alto Networks Firewall Interview Questions
- How to configure IPSec Tunnel between Palo Alto and SonicWall Firewall
- How to configure UNAT in Palo Alto Firewall | U-Turn NAT
- SSL Decryption on Palo Alto Next-Generation Firewall
Summary
In this article, we have configured and verified the Destination NAT on Palo Alto Networks Firewall. NAT allows us to translate the IP Addresses. First, we have configured the DNAT & Security rules to access the HTTP and SSH. Further, we have configured the NAT & Security rules to access Microsoft RDP.
I hope you like this article. Please share it on social media platforms and shows us some love 🙂