
In this article, we will configure DHCP Relay on Palo Alto Networks Firewall. DHCP Relay helps the DHCP Client to reach DHCP Server configured on a different network. Both DHCP Request and DHCP Reply messages will be passed through the Firewall. I am assuming that you have already configured the zones and network interfaces. Let’s start the configuration!
How to configure DHCP Relay on Palo Alto Networks Firewall
First, let’s understand the topology. We have a DHCP Server on DMZ Zone on Palo Alto Interface ethernet1/2. We have LAN Zone on Palo Alto interface ethernet1/3. DHCP Server IP address is 10.10.10.90. The LAN subnet is 192.168.50.0/24. Refer to the below topology.

Configure the Network Interface acting as DHCP Relay – ethernet1/3 (LAN) on Palo Alto
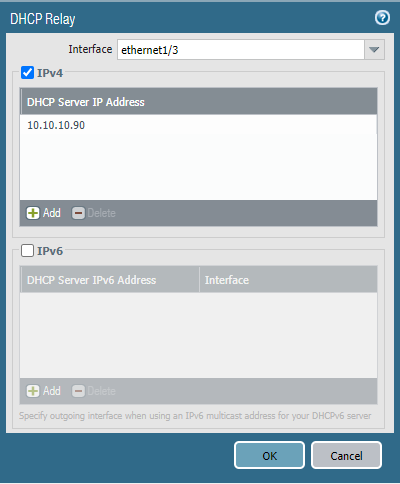
We need to configure a DHCP Relay interface. In this example, the LAN interface, i.e. ethernet 1/3 will be acting as DHCP Relay. Navigate to Network > DHCP > DHCP Relay and click on Add. Select the ethernet1/3 interface and configure the DHCP Server IP Address, i.e, 10.10.10.90.
Understanding the Traffic flow of DHCP
DHCP uses the DORA Process to allocate an IP Address to a DHCP Client. It has Discover, Offer, Request & Acknowledgement messages. Since the broadcast generated by the client hits the Palo Alto network interface, it should be allowed. Further, the DHCP Request from LAN to DMZ also needs to be allowed. Therefore, we need to create the security rule accordingly, i.e, from LAN to LAN and from LAN to DMZ.
Communication between DHCP Server and DHCP Relay interace is unicast.
Configure Security Rules to allow DHCP Traffic between different zones
Now, we need to configure the security rules to allow traffic between different zones, i.e, LAN & DMZ. Navigate to Policies > Security and click on Add. Your security rule will look like the below image.

Commit the changes and test the DHCP Relay on Palo Alto
Now, make sure to commit the changes on the Palo Alto Networks firewall. Once you have committed the changes, you can now check the DHCP clients whether they are getting an IP Address from DHCP Server or not.
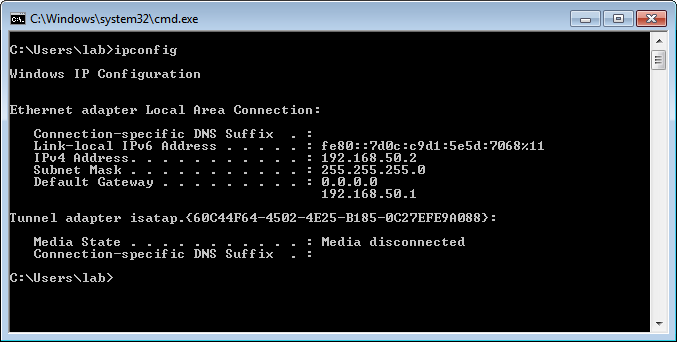
Simply, disable and re-enable the network interfaces under the network connection in the control panel. Alternatively, you can use the below commands to force a windows machine to renew the IP Address.
- ipconfig /release
- ipconfig /renew
You can see the IP Address on the Windows machine, which is provided from the DHCP Server.
Note: Your DHCP Server must have either a default route or a static route of the DHCP Lease Network towards Palo Alto Networks Firewall. Otherwise, your DHCP clients might not get an IP Address from DHCP Server due to asymmetric routing.
Related Articles
- DORA Process in DHCP – Explained in detail
- How to configure Palo Alto Networks Firewall as a DHCP Server
Summary
In this article, we have configured DHCP Server on Palo Alto Firewall. First, we configured DHCP Relay then we configured the security policy to allow DHCP Traffic. Finally, we tested the DHCP Relay just by enabling and disabling the network interface on Windows 7 machine. In brief, DHCP Relay helps us to reach the DHCP Server on a different network.