
In this article, we will discuss and configure the static route on Palo Alto Firewall. Routing is essential for a firewall that is deployed in layer 3 mode. Palo Alto Firewall supports static as well as dynamic routing such as RIP, OSPF, BGP. You can configure static routes using CLI as well as GUI. So, let’s start!
Topology: Static Routes configuration on Palo Alto Firewall
Before configuring a static route, let’s have a look at the below topology. Here, we have Palo Alto Firewall with three zones, i.e. Internet, LAN, and DMZ. Ethernet1/1 is connected with ISP. Ethernet1/2 is connected with DMZ. Finally,ethernet1/3 is connected with an internal core switch where we have three different VLANs.

So, here we need to configure a default route towards ISP. Similarly, we need to configure static routes for each VLAN that are configured on Core Switch.
Configure a static Route on Palo Alto Firewall
I am assuming that you have already configured interfaces and virtual router configuration. I’ve configured the default virtual router.
Check the Virtual Router Name. In this example, I am configuring default virtual router.
Now, navigate to Network > Virtual Routers > default.
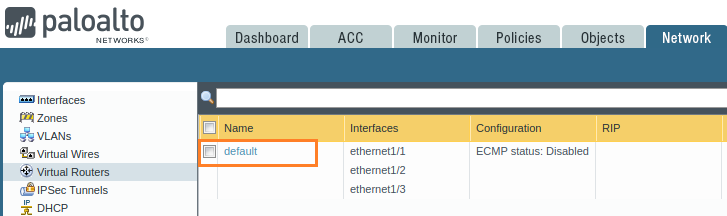
Select the Static Routes tab and click on Add.

First, you need to define a name for this route. Then you need to tell the firewall about the destination, exit interface, and next-hop IP address.
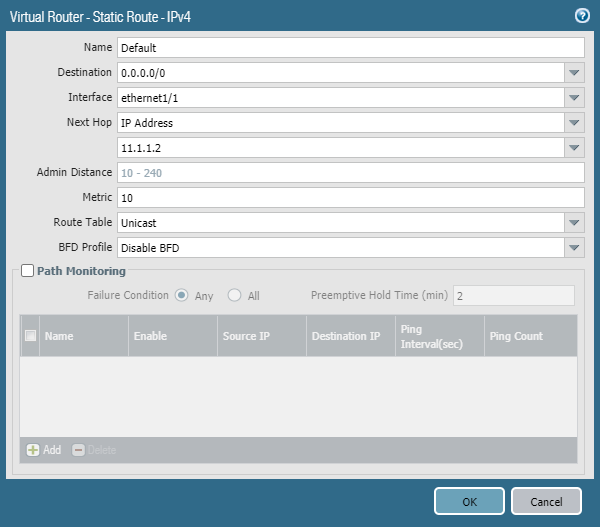
By default, the static route metric is 10. However, you can change it as per your requirements. Now, just click ok Ok twice and commit the changes.
Similarly, you can define routes towards the internal Core switch for each VLAN. Once, you finish the configuration, you can check all routes by navigating Network > Virtual Router > More Runtime Stats. You will be found that all routes are in an active state.
That’s all! We have successfully configured static routes on Palo Alto Firewall. In the next session, we will configure static routes using CLI.
Static Routes on Palo Alto Firewall using CLI
Well, in case you want to configure the static routes using the command-line interface you can do it two ways. You can either use XML format or you can use SET format. Well, first we will use the XML format.
Well, you need to execute your command in the below syntax.
[simterm]set network virtual-router <vr-name> routing-table ip static-route <route-name> destination <destination-network> interface <exit-interface> nexthop ip-address <next-hop-ip>[/simterm]
You just need to change the values such as <vr-name>, <route-name>, <destination-network>, <exit-interface>, and <next-hop-ip>.
So, the complete command to add a route in Palo Alto will be
[simterm]##red##admin@PA-220>configure
admin@PA-220#set network virtual-router default routing-table ip static-route Default-1 destination 0.0.0.0/0 interface ethernet1/1 nexthop ip-address 11.1.1.2[/simterm]
Another way to configure the static route using CLI in Palo Alto is using SET format output. First, we need to configure the SET format in CLI. After this, we need to configure the route parameters. So, let’s start the configuration.
[simterm]admin@PA-220>set cli config-output-format set[/simterm]
Now, you need to go into configuration mode using the configuration command.
[simterm]admin@PA-220>configure[/simterm]
Well, finally we need to define the route by defining route parameters one by one.
[simterm]admin@PA-220#set network virtual-router default routing-table ip static-route Default destination 0.0.0.0/0
ẫdmin@PA-220#set network virtual-router default routing-table ip static-route Default interface ethernet1/1
admin@PA-220#set network virtual-router default routing-table ip static-route Default nexthop ip-address 11.1.1.2
admin@PA-220#set network virtual-router default routing-table ip static-route Default metric 10[/simterm]
Finally, you need to do a commit job to apply your changes. To check the routing table on Palo Alto Firewall, you can run the below command.
[simterm]admin@PA-220> show routing fib[/simterm]
In case, you just want to verify the static routes using cli, you just need to execute the below command.
[simterm]admin@PA-220> show routing route type static[/simterm]
That’s it! We have configured static routing using GUI as well as CLI.
Related Articles
Summary
In this article, we have configured static routes on Palo Alto Next-Gen Firewall. Routing is essential in Layer 3 mode. To configure a static route on Palo Alto, we need a destination network, next-hop, and exit interface. First, provide the name of the route then you need to provide other parameters such as Destination Network, Next-Hop, and Interface. We have configured static routing using GUI as well as CLI.
Did you like this article helpful? Please share it on social platforms using below buttons!