
In this article, we will configure the GRE Tunnel between Palo Alo Firewall and Cisco Router. GRE stands for (Generic Routing Encapsulation). It was developed by CISCO but supported by different devices. To configure the GRE tunnel, you need two static Public IP, one for Cisco Router and the other one is for Palo Alto Firewall. So, let’s configure the GRE Tunnel!
Scenario
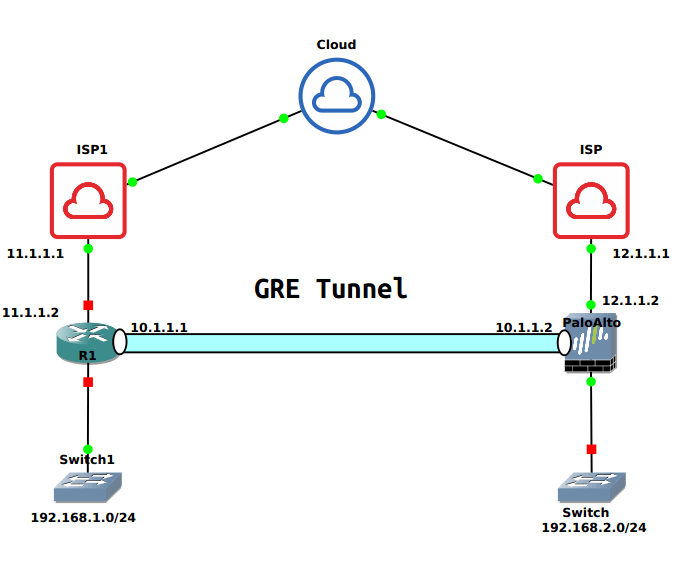
In this article, we have one Cisco Router which has Public IP 11.1.1.2 and LAN Subnet 192.168.1.0/24. On the other hand, we have Palo Alto Firewall which has PANOS 9.0.4 and has public IP 12.1.1.2 and LAN Subnet 192.168.2.0/24. We will use any different subnet for GRE Tunnel Interface.
Before starting, let’s confirm the connectivity between both the devices. Open the Palo Alto CLI and run following command:
[terminal]admin@gns3-LAB>ping source 12.1.1.2 host 11.1.1.2[/terminal]
Configuring the GRE Tunnel on Cisco Router
First, we will configure the GRE tunnel on the Cisco Router. To configure the GRE tunnel on the Cisco Router, you need to follow the given steps:
Configuring the Cisco Router Interfaces
First, we will configure the Network Interfaces which are connected to ISP and LAN Network. As already discussed in this article, our Public IP is 11.1.1.2/30 and LAN Subnet is 192.168.1.0/24. You can configure the interfaces from the global configuration mode.
[terminal]interface FastEthernet0/0
ip address 11.1.1.2 255.255.255.252
no shutdown[/terminal]
[terminal]interface FastEthernet1/0
ip address 192.168.1.1 255.255.255.0
no shutdown[/terminal]
Configuring the GRE Tunnel on Cisco Router
Now, we will configure the GRE Tunnel on Cisco Router. Go to router global configuration mode and configure the GRE tunnel using the below commands.
[terminal]interface Tunnel100
ip address 10.1.1.1 255.255.255.252
tunnel source 11.1.1.2
tunnel destination 12.1.1.2[/terminal]
You can choose tunnel interface between 0-2147483647 depends on your router capacity.
Configuring the static Routes for GRE Tunnel
This is the final step for configuring the GRE Tunnel. We need to configure the route for the destination network i.e. 192.168.2.0/24. So, we will configure the static route, in which we will use the tunnel100 interface as an exit interface. In the given routes, the first route will be the default route, which is pointing to the ISP.
You can also configure Dynamic routing between two GRE peers.
[terminal]ip route 0.0.0.0 0.0.0.0 11.1.1.1
ip route 192.168.2.0 255.255.255.0 Tunnel100[/terminal]
Configuring the GRE Tunnel on Palo Alto Firewall
Now, let’s configure the GRE tunnel on Palo Alto Firewall. I have PANOS 9.0.4 on my Palo Alto Firewall. Follow the following steps to create a GRE tunnel on Palo Alto Firewall:
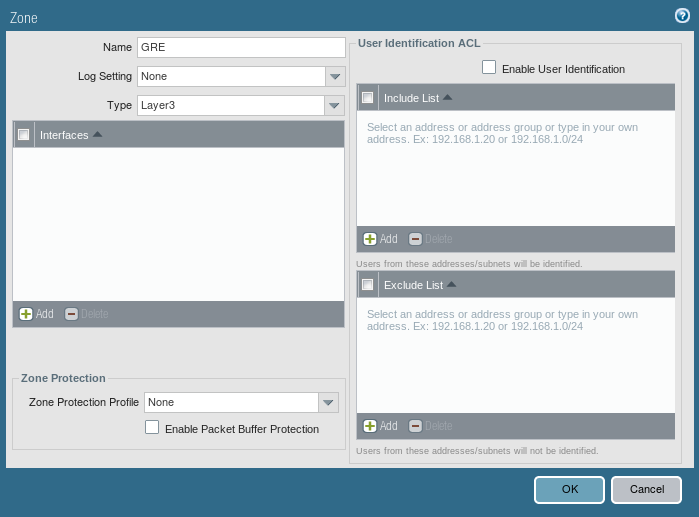
Creating a Zone for Tunnel Interface
Likewise IPSec VPN, you need to define a Network Zone for GRE Tunnel. If you do not want to create a new zone, you can assign the existing zone to Tunnel Interface. But, it is highly recommended to create a new zone for this tunnel interface. Go to Network >> Zones and click on Add. Just, enter a user-friendly name and select Type Layer3.
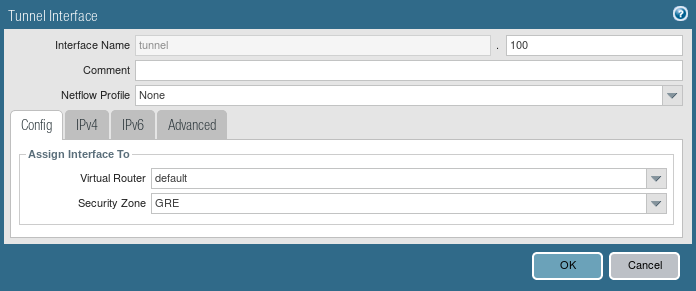
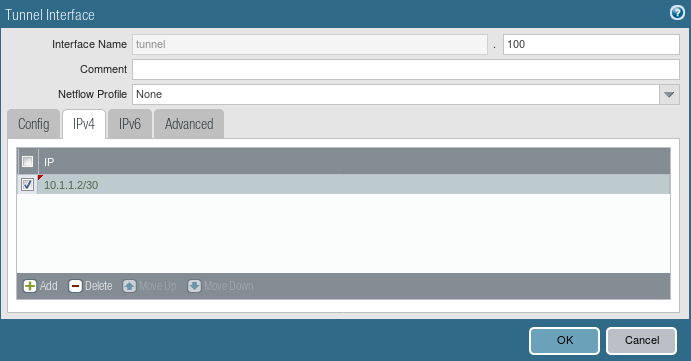
Creating a Tunnel Interface
Now, you need to configure the Tunnel interface. Go to Network >> Interfaces >> Tunnel and click Add. Unlike the IPSec tunnel, here you need to configure an IP address for the tunnel interface.
You can attach the management profile as per your requirement.
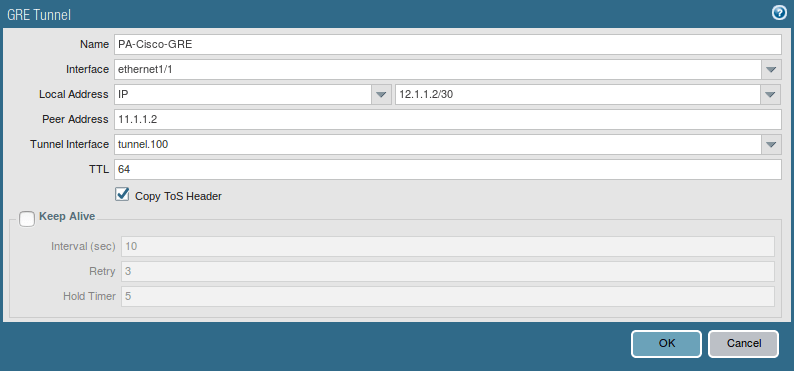
Creating a GRE Tunnel
Now, we will configure the GRE Tunnel on Palo Alto Firewall. Go to Network >> GRE Tunnel and click Add. Define a user-friendly name for this GRE Tunnel, select the interface on which you have your Public IP. Configure the Local Address and Peer Address (i.e. 12.1.1.2 and 11.1.1.2 respectively). Select the Copy ToS Header.
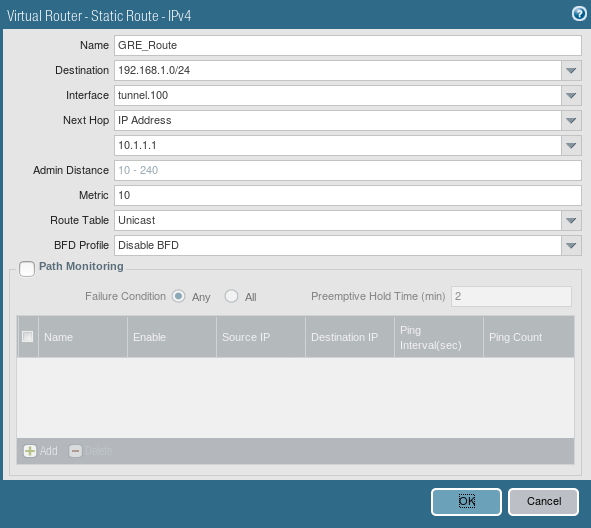
Creating the default route for the destination network
Now, we need to configure the static route for the destination network. To configure a default route, go to Network >> Virtual Routers >> Default >> Static Route and click on Add. Just define a user-friendly name for this route. Next, define the destination network for the peer end (i.e. 192.168.1.0/24 in this example).
Configuring Security Policy for GRE Tunnel
As per your needs you need to configure the security policy on your Palo Alto Firewall. In this scenario, we created a security policy for LAN TO GRE and GRE TO LAN. To create a security policy, you need to Policies >> Security and click on Add.
Commit the Configuration
We have finished the configuration of the GRE tunnel on the Palo Alto Firewall. Let’s commit the changes to copy the configuration from the candidate configuration to running configuration.
Verify the configuration of GRE Tunnel
As we finished the GRE configuration on both Cisco Router and Palo Alto Firewall. Now, we will verify the configuration and go through some troubleshooting commands.
Gathering the details of GRE Tunnel
As you created Tunnel Interface in both Cisco Router and Palo Alto Firewall. You can gather details like GRE tunnel status by using the following commands.
On the Cisco Router
[terminal]R1#show interfaces tunnel 100[/terminal]
On Palo Alto Firewall
[terminal]admin@gns3-LAB>show interface tunnel.100[/terminal]
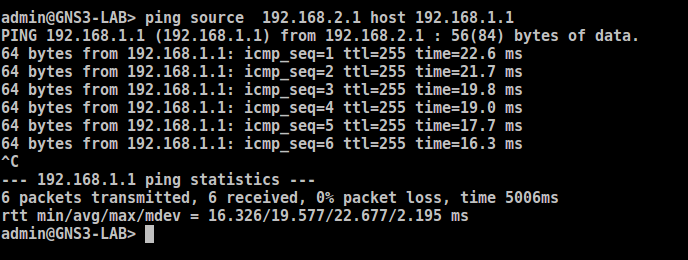
Access the Palo Alto CLI and test the configuration by ping from Local LAN to Peer LAN Network:
[terminal]admin@gns3-LAB>ping source 192.168.2.1 host 192.168.1.1[/terminal]
Monitor the Logs on Palo Alto Firewall
You can monitor the logs once you have successfully configured the GRE Tunnel between two peers. To view the logs on the Palo Alto firewall, access the Monitor >> Traffic. If your configuration is perfect, you will find the logs for GRE Tunnel.

Related Articles
- How to configure GRE Tunnel between Cisco Routers
- IPSec VPN between Palo Alto and FortiGate Firewall
- How to configure GlobalProtect VPN on Palo Alto Firewall
- IPv4: Private and Public IP Address
References
Summary
In this article, we have configured the GRE Tunnel between Cisco Router and Palo Alto Firewall. You must need reachability between both the devices using static Public IP address. For the destination network, you must configure the route on both the devices. However, the communication between two GRE peers is in plain text. So, you can configure the IPSec tunnel if both the peers support the IPSec VPN functionality.
Did you find this article helpful? If you are facing any channge in configuring the GRE tunnel, please let me know in the comment box!