
In this article, we will configure DHCP on the Palo Alto Next-Generation firewall. DHCP stands for Dynamic Host Configuration Protocol. DHCP works on UDP Port 67/68. Basically, DHCP used to provide automatic IP addresses to the connected Hosts. DHCP used the DORA process. Palo Alto firewall can be configured as DCHP Server. So, let’s start our configuration.

How to Configure DHCP Server on Palo Alto Firewall
As you already know, the Palo Alto firewall can act as a DHCP Server. It can provide IP addresses to the end machines. Basically, we need to configure the firewall to accept the DHCP Broadcast request. In this example, I’m using PANOS 8.1.10. However, the configuration is the same for different PANOS versions too. You just need to follow the below steps to configure DHCP on Palo Alto Firewall.
Step 1: Add a DHCP Server on Palo Alto Firewall
Access the Network >> DHCP >> DHCP Server Tab and click on Add. You need to specify the interface on which you want to receive the DHCP Requests. You can configure DHCP Server on Layer 3 interfaces include sub interfaces. Also, leave the Mode to auto.
Step 2: Configure the DHCP Lease on Palo Alto Firewall
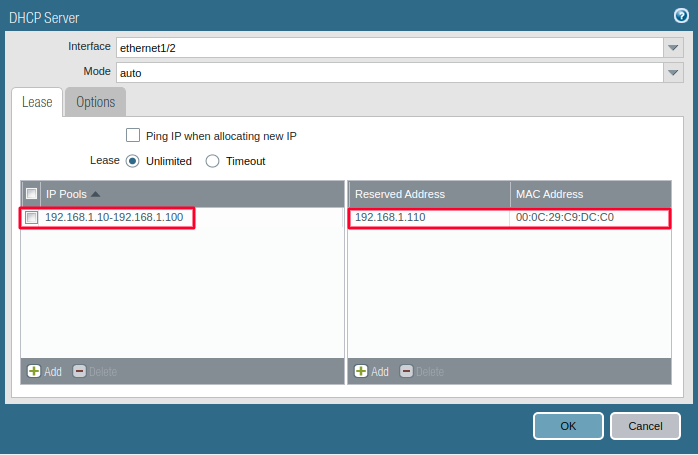
In DHCP Lease options, you have to define the DHCP Server Pool. Optionally, you can also define the Reserved IP Addresses for some special hosts.
Step 2.1: Configure the IP Pools for the DHCP Server on Palo Alto
IP Pools is the range of IP address which is used by DHCP Server. DHCP Server will allocate the IP addresses to the hosts from the IP Pool. So, here, you need to define the range of the IP address by clicking on the Add button.
Note: You can also define more than one IP Pool Ranges.
Step 2.2: Configure the Reserved Address for your hosts (Optional)
If you want to allocate some reserved IP addresses to some hosts, you can define the IP address and the MAC address of particular hosts.
Note: Reserved IP address must be different than IP Pool range.
In this example, my pool range is 192.168.1.10-192.168.1.100. You can notice, that the reserved IP address is 192.168.1.110 and the MAC address is 00:0C:29:C9:DC:C0.
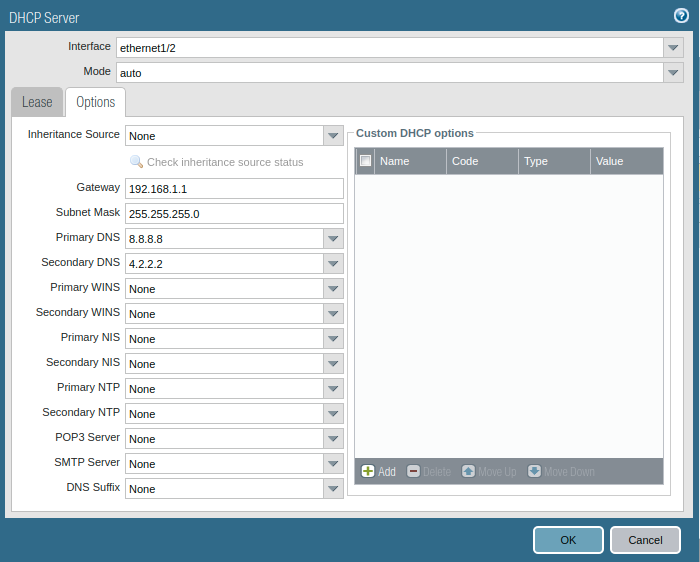
Step 3: Configure the DHCP Options on Palo Alto Firewall
Now, we need to configure additional DHCP Options on the DHCP Options tab. Here, you can define the subnet mask, Primary and Secondary DNS Server, NTP Servers, etc. I am using Public DNS Server in this example. So, configure the DHCP Options as per your requirements.
Step 4: Commit the changes on Palo Alto Firewall
Finally, we need to commit to our change. On the top right corner, you will find the commit option, just commit the changes by clicking on that option.
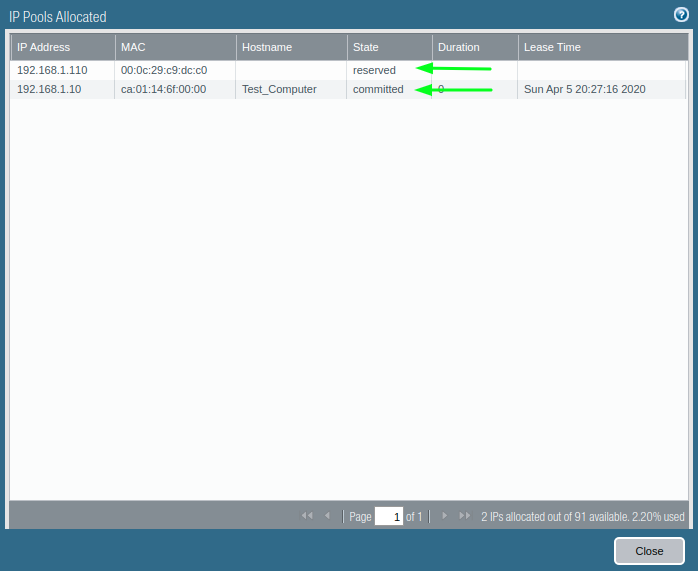
Step 5: Verify the configuration and monitor the DHCP Server on the Palo Alto Firewall
Now, we have done all the configuration on the Palo Alto firewall. Now, we need to verify our configuration. Basically, Palo Alto Networks Firewall allows you to check the leased IP address on the Firewall GUI itself. But, before that make sure DHCP Icons is enabled on a particular interface’s. Navigate to Network >> Interface. If you did the configuration properly, you will find the DHCP icon on the interface, and it will be looks like the below image.

Now, navigate to Network >> DHCP and click on View Allocation. It will show the allocated IP address to the end machines.

That’s it! We successfully configured the DHCP server on the Palo Alto Next-Generation firewall.
Related Articles
- What is the DORA process in DHCP?
- How to configure Syslog Server for Logs Forwarding in Palo Alto Firewall
- How to configure Netflow Server in Palo Alto Firewall
References
Summary
In this article, we configured the DHCP Server on the Palo Alto Networks Next-Generation Firewall. We enabled the DHCP Server on the ehternet1/2 interface. We also configured and verify Reserved IP addresses on Palo Alto DHCP Server. After committing our changes, we also checked the allocated IP address by the Palo Alto Firewall.
Did you found this article helpful? Please comment in the comment box if you are facing any challange.