
In this article, we will configure the Syslog Server in Palo Alto Next-Generation Firewall. As you already know a Syslog server can collect the logs from various Network & Network devices. So, In this article, we will configure a Syslog Server on the Palo Alto Firewall and Forward the Logs to the Syslog Server. Please ensure you have the proper privileges to make changes to the Firewall. So, let’s start!
How to configure Syslog Server and forward Logs to Syslog Server in Palo Alto Firewall
In Palo Alto Next-Generation Firewall you can configure Syslog Server to forward different types of logs. We can forward Traffic (Authentication, Data, Threat, Traffic, Tunnel, URL & WildFire) and System logs to different types of log collection solutions, i.e. Syslog, Panorama, etc. You just need to follow the following steps to configure logs forwarding to the Syslog Server.
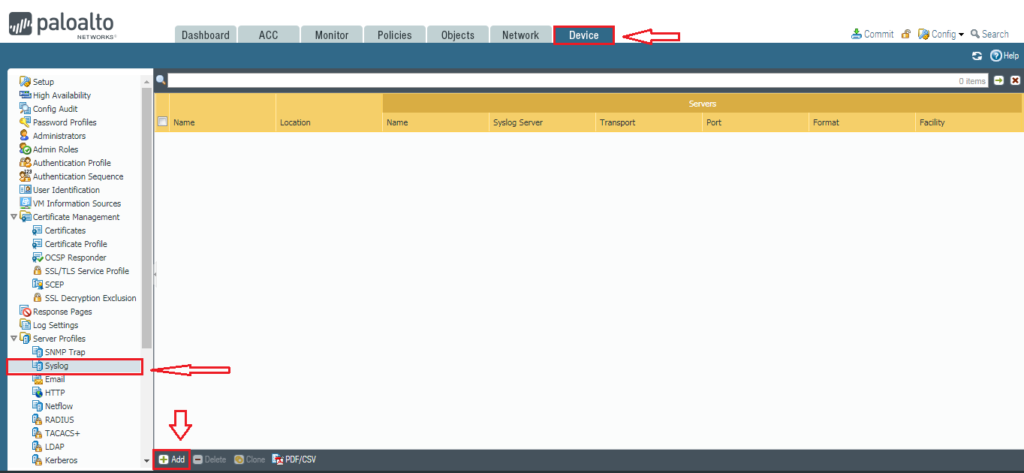
Step 1: Configure the Syslog Server Profile in Palo Alto Firewall
First, we need to configure the Syslog Server Profile in Palo Alto Firewall. Navigate to Device >> Server Profiles >> Syslog and click on Add. Here, you need to configure the Name for the Syslog Profile, i.e. Syslog_Profile. It must be unique from other Syslog Server profiles. In the Server tab, click Add. Here, you need to configure the following details:
In this example, the Syslog Server Name is SyslogGNS3_LAB & it is configured on 10.10.10.100. All the other fields are the default for now. I’ve added the Screenshot for your reference.
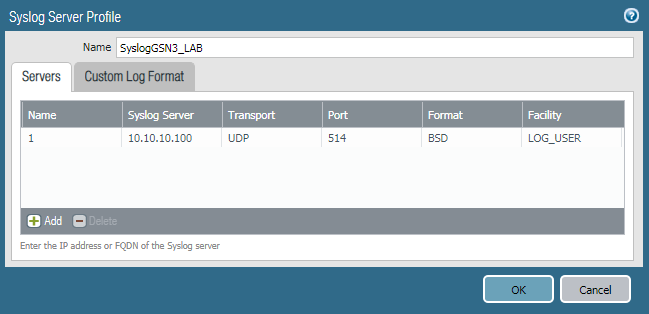
- Name: It is the Name of the Syslog Server. It can be anything as per your choice but must be less than 31 characters.
- Syslog Server: Here, you need to define the IP address or FQDN of the Syslog Server.
- Transport: It can be UDP, TCP or SSL. The default is UDP.
- Port: Port filed is for the port number on which Destination Server works. The default is 514 for UDP. However, it will change if you want to forwards the logs over TCP or SSL.
- Format: BSD or IETF. You can read further on BSD (rfc3164) or IETF (rfc5424).
- Facility: The default field is LOG_USER. However, this depends on the destination Syslog server, i.e. How to destination Syslog server manages logs.
Note: You can define multiple Syslog Servers in the same Syslog Profile.
Step 2: Configure the Custom Log Format for Syslog Server
Today, many vendors offer the Syslog Server Solution. However, they store the logs in their way. So, Palo Alto Next-Generation allows you to configure the Custom Log Format. Depending on your Syslog Solution, you need to configure the Syslog Custom Logs. If you are just testing you your configuration with any one of the open-source software you can skip this step. However, if you are using Syslog Solution that requires the Common Event Format (CEF) format, then you need to configure Custom logs as configured below.
Custom Syslog Log Format for Common Event Format (CEF) on Palo Alto Firewall
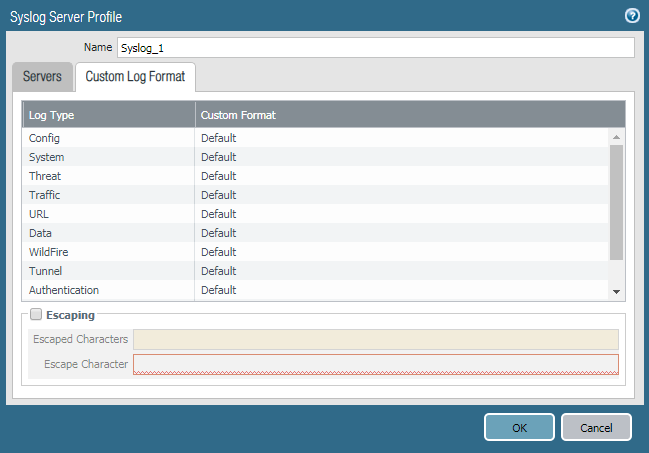
Here, you need to define the custom log format for Config, System, Threat, Traffic, URL, Data, WildFire, Tunnel, Authentication, User-ID and HIP Match. You can read more about Common Event Format (CEF) Format here.
Warrning: Common Event Format (CEF) custom log format only works for PANOS 8 and Higher!
Step3: Configure The Log Forwarding Profile for Syslog in Palo Alto Firewall
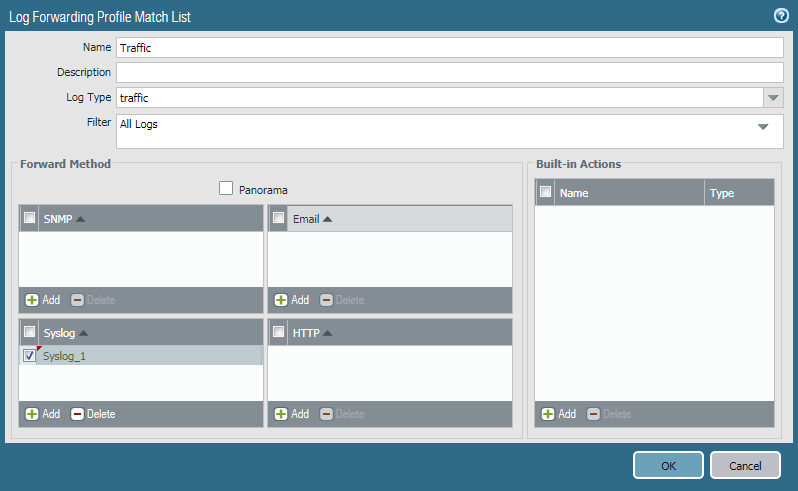
Now, we need to configure the Log Forwarding Profile in Palo Alto Firewall. A Log Forwarding profile helps us to forwards the traffic logs to the different log collection solutions. To configure Log Forwarding Profile, Navigate to Objects >> Log Forwarding and click on Add. Provide the Name of this Profile, i.e. GNS3Network_Log_Profile. Now, In this log Forwarding Profile, you need to define various types of Logs. In this example, I’m using Traffic, Auth, Threat and Data Logs. You need to configure it as shown below:

Step 4: Applying the Log Forwarding Profile to the Security Policies
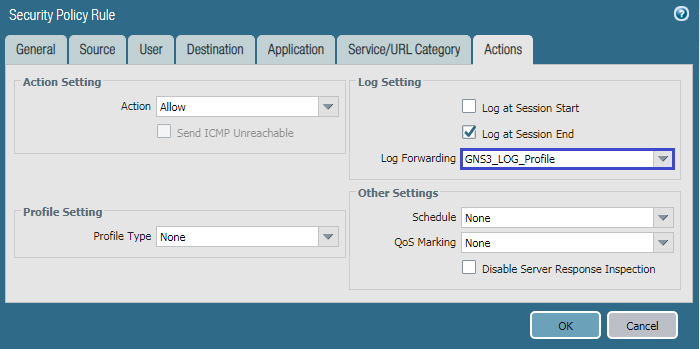
Now, we need to apply the Log Forwarding Profile to the Security Policies. All the traffic which hits the Security Policy on which you applied the Log Forwarding Profile, the traffic logs will be sent to all the destinations, you defined in Log Forwarding Profile. In this example, I defined our Syslog Server for Log Forwarding, So, all logs will be forwarded to the destination server. To configure Log Forwarding Profile in Security Policy, Just Select the Security Policy and go to the Action Tab. In Log Forwarding Field, select the profile we created in the previous step.
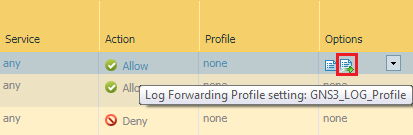
Once you applied the Log Forwarding Profile to a security policy, the Log Forwarding Icon will be visible there.
Step 5: Configuring the Service Route on Palo Alto Firewall
Here, you need to identify, how firewall communicates with the Syslog Server. If the Firewall communicated with Syslog Server using Management Interface itself, then you do not need to make the default changes. However, if the Syslog server is communicated with any other data plane interfaces, you need to specify the service route. You can configure the service route by navigating Devices >> Service >> Service Route Configuration. Then select the interface on which Firewall is communicated with the Server.
Note: In this example, my service route is default, i.e. Management Interface!
Step 6: Commit the changes
This is the final step. Just commit all the changes, we had done. To commit, locate the Commit Button/Link on the top right corner. If you getting any error, you need to re-verify all of our configurations.
Step 7: Verifying the configuration
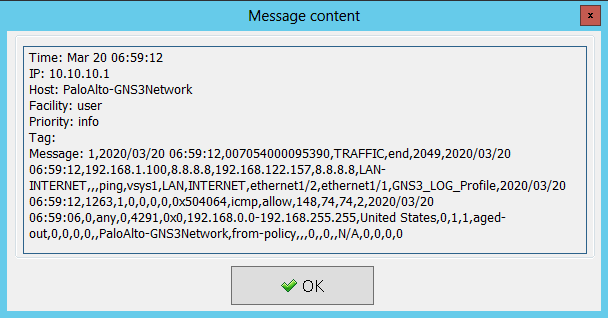
I’ve set-up the Syslog Server for log collection. My Syslog Server is 10.10.10.100. All the traffic which hits the security rule on which configured Log Forwarding will send the logs to the Syslog Server. So, let’s check the logs on the Syslog Server.
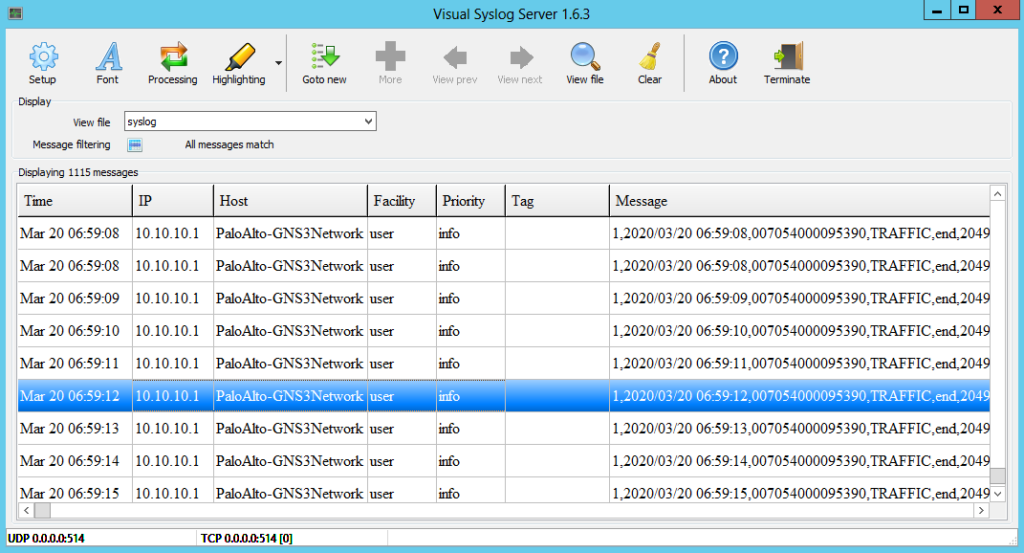
If you double click to one of the logs, you will find the detailed information for the log!
References
Related Articles
- How to configure the Captive Portal in Palo Alto Firewall
- How to configure IPSec VPN between Palo Alto and FortiGate Firewall
- GRE Tunnel Between Palo Alto and Cisco Router
- How to deploy the Palo Alto Firewall directly in GNS3
Summary
In this article, we configured and verified the Syslog Server Configuration on Palo Alto Next-Generation Firewall. Syslog Server helps us to store the historical logs gathered from the Network & Network Security devices. We configured Syslog Server Profile. After, we configured Log Forwarding Profile for log forwarding to the Syslog server. Finally, we applied the Log Forwarding profile to the security Policy and commit all changes. At last, we checked the same on the open-source Visual Syslog Server. We can find all the logs on the Syslog Server. That’s it! We have done all the configuration of the Syslog Server.
Did you like this article? If you getting any challange, please let me know in the comment box!