
In this article, we will deploy the Palo Alto Next-Generation Virtual Firewall directly in GNS3. In the previous article, we deploy the Palo Alto Firewall in VMWare Workstation. As you already know that the GNS3 Network Simulator allows you to directly run KVM machines. So, we will download the Palo Alto KVM Image from the support portal and deploy it in GNS3. So, let’s get started.

How to deploy the Palo Alto Firewall in GNS3
As we already discussed, we need to download the Palo Alto KVM Firewall from the support portal. KVM stands for (Kernel-Based Virtualization Machine). KVM allows you to run the .qcow file format directly on it. You need to follow the following steps to deploy the Palo Alto KVM on GNS3:
Step 1: Download the Palo Alto KVM Virtual Firewall from the Support Portal
First of all, you need to download the Palo Alto KVM Firewall from the Palo Alto support portal. Visit the support portal by clicking here. Now, navigate to Update > Software Update. Now select PAN-OS for VM-Series KVM Base Images. In this example, I am downloading the PANOS version 8.1.3. Now, just click on PA-VM-KVM-8.1.3.qcow2 to download the Firewall. You can refer to the below image for downloading the Palo Alto KVM.
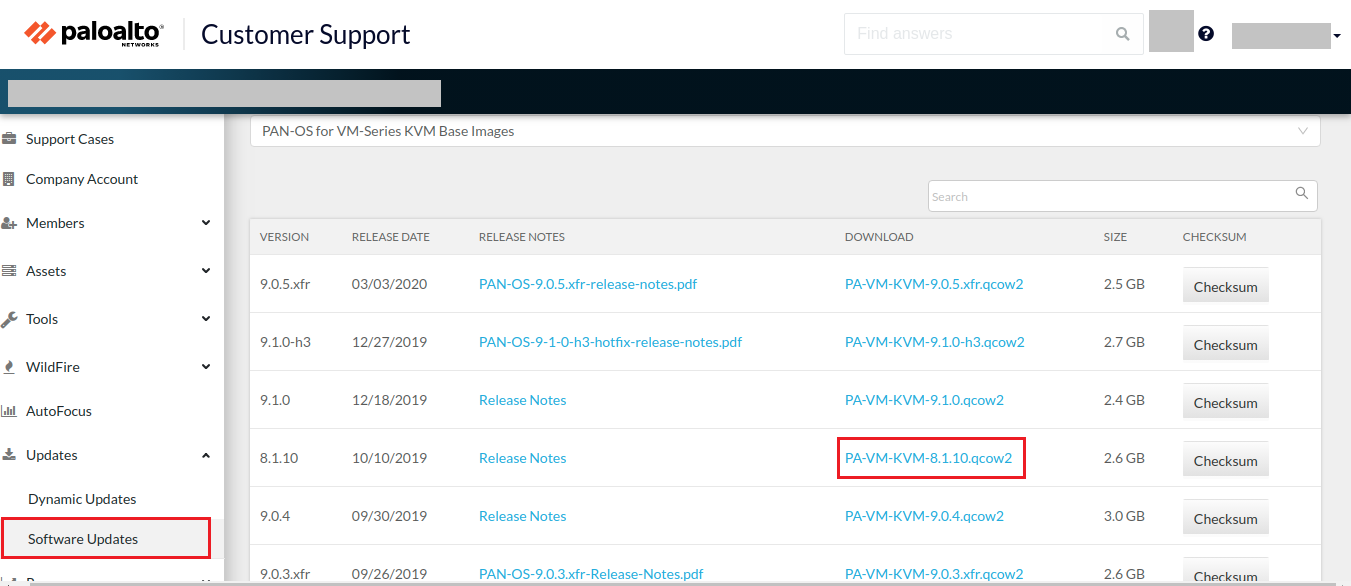
Image Source: Palo Alto Networks
After downloading the .qcow file of the Palo Alto KVM Firewall, you need to follow the below steps to successfully deploy the Palo Alto in GNS3.
Step 2: Download & Install the GNS3 on your machine
I hope you already aware or you already install the GNS3 on your machine. If not, you can refer to the following links to understand & download the GNS3 Network Simulator for Windows or Linux machines. Basically, GNS3 is a Great Network Simulator tool on which you can run many Network & Network Security appliances.
- GNS3 Quick Overview
- Download GNS3 for Windows (Direct Link)
- Download & Install GNS3 on Ubuntu Complete Guide
Step 3: Deploying the Palo Alto VM Image in GNS3
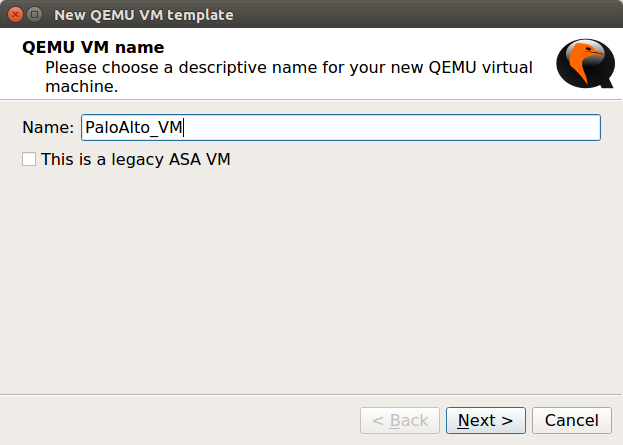
Now, we are ready to deploy the Palo Alto KVM Image in the GNS3 simulator. Currently, I’m using GNS3 2.1.21, although, the KVM deployment is the same on other GNS3 versions too. Open the GNS3 and, Navigate to Edit >> Preferences >> QEMU >> Qemu VMs and click on New. Now, give the friendly name to this VM, i.e. PaloAlto_VM, and click on Next.
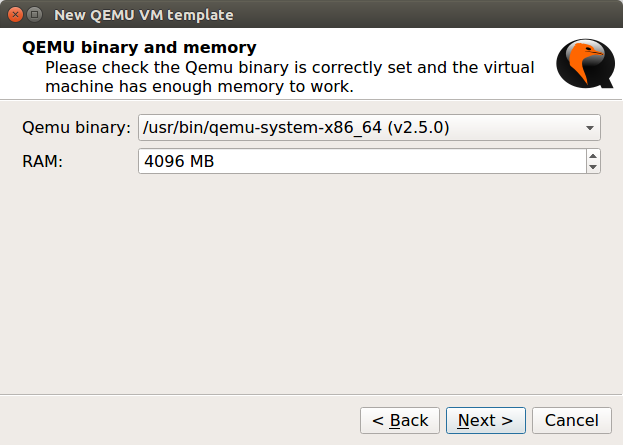
Now, give the RAM to the Palo Alto VM Firewall. In this example, I am giving 4 GB RAM to the VM Image and Click on Next.
Note: Minimum requirement for Palo Alto VM Firewall is 4 GB Ram & 2 CPU Core!
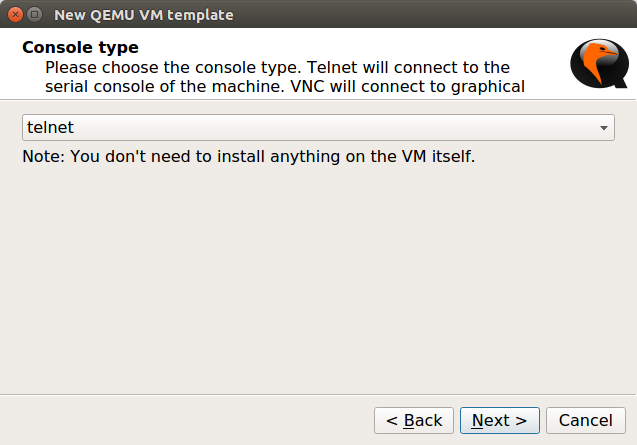
Now, you need to select the Console Type. In KVM we can get the Firewall CLI just by double-clicking. So, here, I’m selecting telnet. However, if you have a vnc application installed on your machine, you can select the vnc and click on Next.
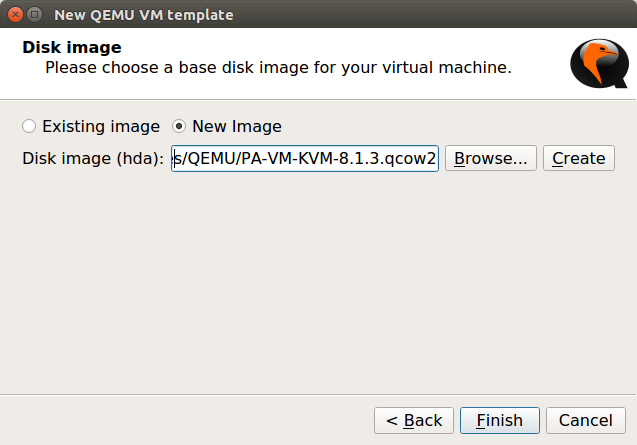
Now, In the last step, you need to select the image file you downloaded in Step 1. It will prompt you to copy that file in the GNS3 default directory, so you can copy it on the gns3 default directory, it’s recommended. Now, click on Finish.
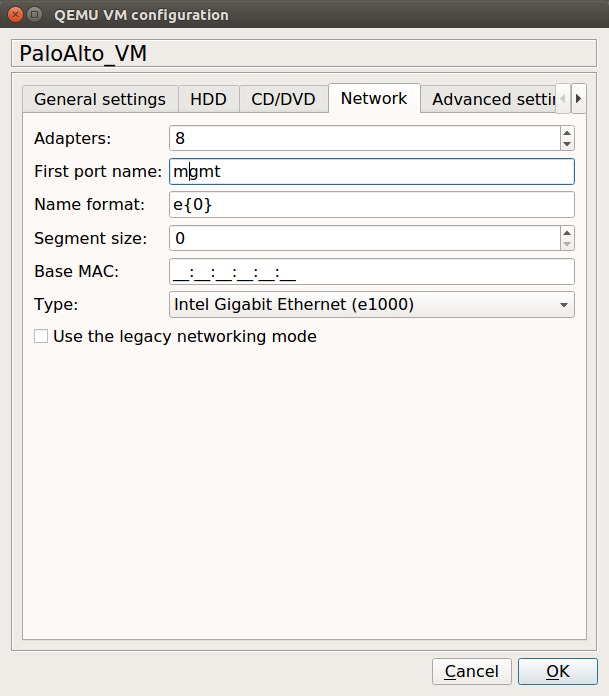
Now, before applying your changes, you need to change the Interfaces of the VM Firewall. In this example, I am using 8 different Interfaces on the VM Firewall. However, you can change it according to your requirements. To change it, navigate to Edit >> Network (you can refer to the given image). Optionally, you can select a Palo Alto icon, for this VM Image. I’ve one .svg file for Palo Alto, so I am choosing the same here.
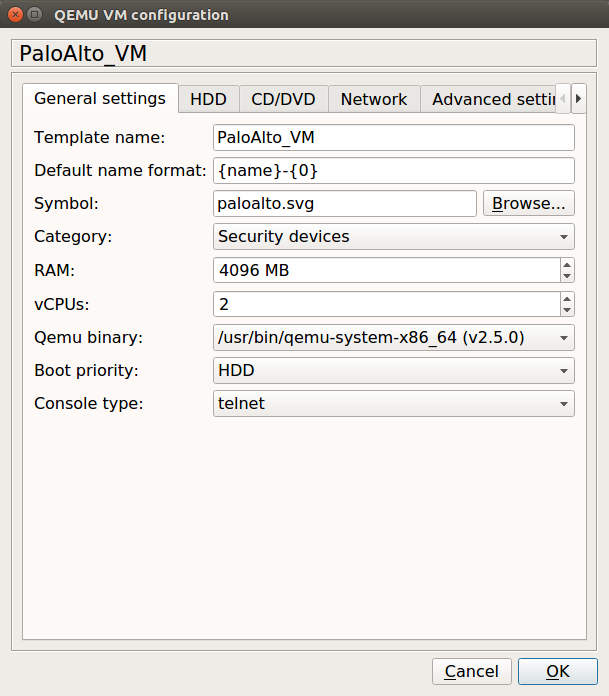
By default, only 1 CPU Core is configured for PA VM. So, access the General Setting Tab on the same opened window, and configure 2 CPU Core for the Palo Alto Firewall. You can refer to the below image for this configuration.
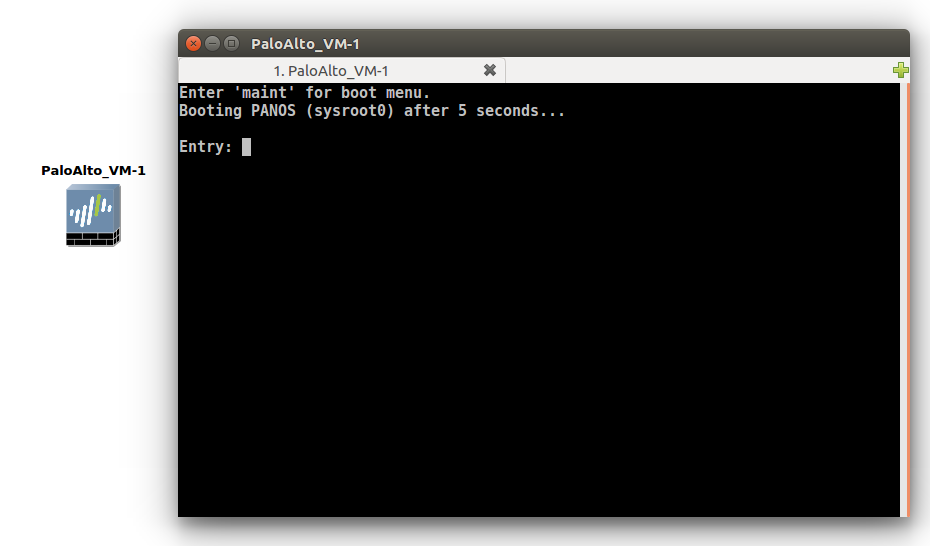
Once, you applied you the changes, you will find that a new Palo Alto Firewall is ready along with your already installed appliances. Just drag down the firewall in the Project area. Right-click on this and choose the start option. Once, you start the VM, you will get the console of the Firewall, which is in the booting process.
Step 4: Configuring the Management Interface of Palo Alto KVM (Virtual Firewall)
In the previous step, we successfully step the Palo Alto VM in the GNS3. Now, we need to double click the VM appliance we just deployed. You will find that the Virtual Palo Alto Firewall booting process is going on. Once the Palo Alto VM Firewall finished booting, you need to give the default credentials to the VM.
Note: The default username is admin and password is admin. Palo Alto Firewalls takes time to complete the boot process!
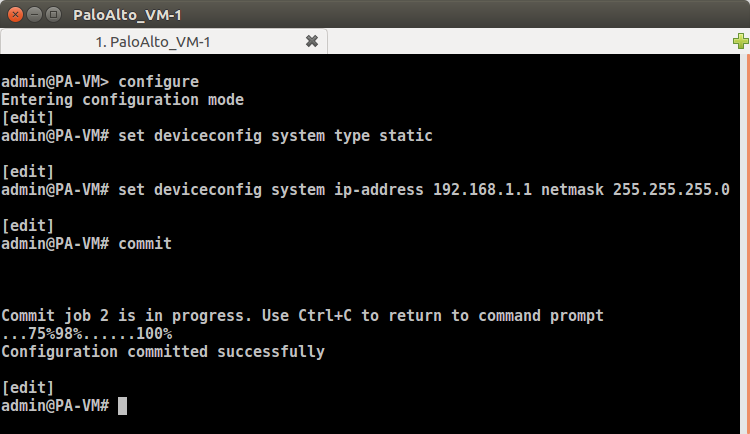
Now, we need to configure the management interface so that we can access the GUI of the Palo Alto VM. You need to follow the following commands to configure the IP address on the management interface.
To assign the IP address & services, you have to follow the given commands:
[terminal]configure[/terminal]
[terminal]set deviceconfig system type static[/terminal]
[terminal]set deviceconfig system ip-address 192.168.1.1 netmask 255.255.255.0[/terminal]
[terminal]commit[/terminal]
The snapshot of the whole configuration is given below:
Now, you are ready to get the GUI of the Firewall. So, just follow the next step to get the GUI of Palo Alto.
Step 5: Accessing the Palo Alto KVM Firewall from the End Machine
In the previous step, we have done all configuration which is used to get access to the Palo Alto VM. Here, I’ve windows 7, connected like below image:
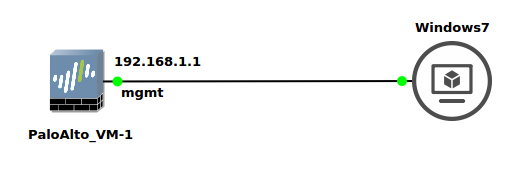
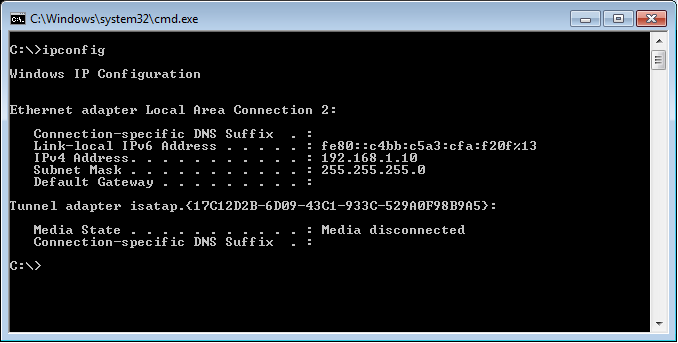
I need to provide the statically IP address in the same network on Windows 7. In our Palo Alto KVM Firewall, ethernet1 is configured with 192.168.1.1, so I’ll configure the 192.168.1.10 IP address on Windows7. So, my windows 7 IP configuration looks like this:
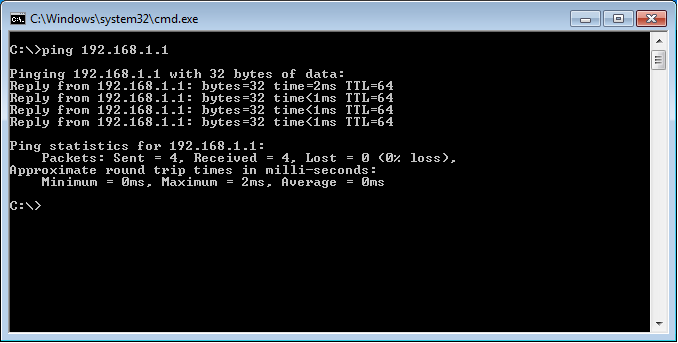
Now, test the connectivity with the Palo Alto KVM. Let’s initiate the ping to the Palo Alto VM IP address, i.e. 192.168.1.1.
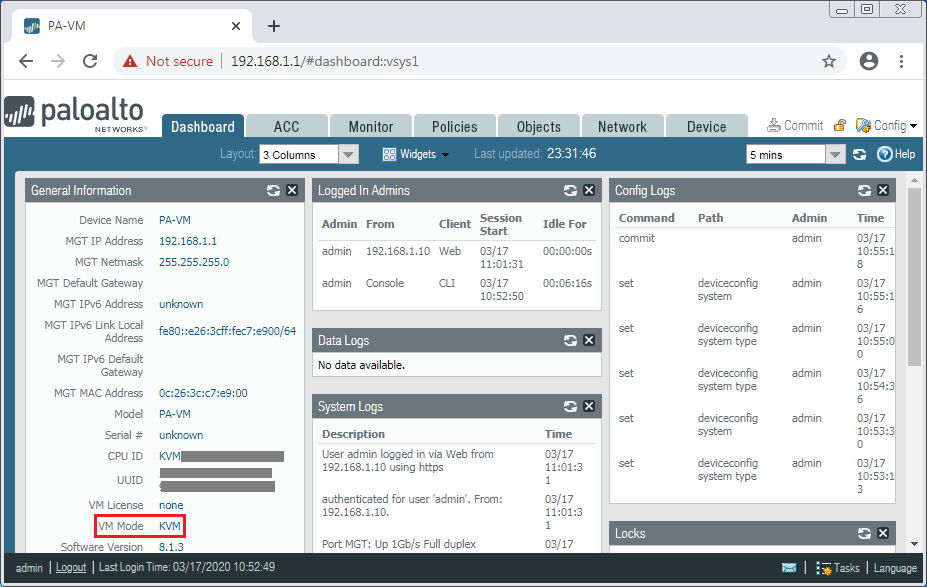
Now, Let’s open your favorite web browser and access the Palo Alto KVM using https://192.168.1.1. A certificate warning page will appear, you need to Proceed with it. If everything is perfect, you will get the GUI of the Firewall. The Fresh KVM Deskboard is looking like the below image:

That’s it! We have successfully deployed the Palo Alto KVM in the GNS3 Network Simulator.
Related Articles
- How to Install Palo Alto VM Firewall in VMWare
- IPSec VPN Between Cisco ASA and Palo Alto Firewall
- How to deploy FortiGate Virtual Firewall in GNS3
- How to configure the Captive Portal in Palo Alto Firewall
- IPSec VPN between Palo Alto and FortiGate Firewall
Summary
In this article, we configured the Palo Alto Virtual Firewall directly on GNS3 Network Simulator. First, we download the Palo Alto KVM Virtual Firewall from the Palo Alto support portal. Then, we successfully imported the Palo Alto Firewall on GNS3 Simulator. We configured 8 different Interfaces for different purposes on Palo Alto KVM. However, you can install many more Network Interfaces. We configured the management interface of the Palo Alto Firewall to gain access from the PC. Finally, we get the Palo Alto VM Firewall GUI on our end machine.
Did you like this artile? Please coment in comment box if you need further help!
Hi!
Great guide, I’m just missing the steps you took to install the windows 7 machine.
Thanks!
KR,
Kim
Hi Kim!
Glad to know this helps you. Windows 7 is installed in VMWare Workstation. So, I connected the Palo Alto Firewall and Windows 7 using U-bridge. However, you can also download .hda the file of Windows 7 to deploy it directly in GNS3.
Don’t forget to share us on Social Media 🙂
Hi, I have the VM up and running with the 8 interfaces, but it seems all the interfaces are missing. If I run a show interface all, I see nothing.
Please let me know the Virtualization platform, i.e. KVM or VMWare.
Hello sir,maybe stupid question but can i do all of these step on gns3 installed on windows 7 mashine,or it is just for gns3 on linux masnine.? Thank you in advance.
Hi Bojan, you can do it!
How do we get Windows 7 machine installed and setup? Not clear how you jumped from Palo setup to getting that working with Win 7 and GUI access
Need help with workstation setup in gns3 and the GUI access
Thank you for this simple and clear article.
But the 10.x.x images are not working with GNS3.
I tried 10.0.10 and 10.2.0 images (PA-VM-KVM-10.0.10.qcow2) and its booting but I am not able to login.
PA-VM-KVM-10.0.10.qcow2: stuck here
[ 2.554981] random: fast init done
[ 2.659932] APIC calibration not consistent with PM-Timer: 104ms instead of 100ms
[ 2.670935] APIC delta adjusted to PM-Timer: 6250253 (6562457)
[ 2.678596] Performance Events: Broken PMU hardware detected, using software events only.
[ 2.692798] Failed to access perfctr msr (MSR c2 is 0)
[ 2.703386] smpboot: Booting Node 0, Processors #1 OK
PA-VM-KVM-10.2.0.qcow2: unable to log in with admin/admin (also the prompt says PA-HDF login: )
File “/usr/local/bin/vm_license_check”, line 475, in main
cmds[cmd](vmhost, **func_args)
File “/usr/local/bin/vm_license_check”, line 409, in vm_license_boot_init
logit(log, “Exception %s in license boot init” %(str(e)))
UnboundLocalError: local variable ‘str’ referenced before assignment
[ OK ]
Masterd started successfully
vm login: admin
Password:
Login incorrect
PA-HDF login: admin
Password:
Login incorrect
PA-HDF login:
any guess ?
look like the command outputs are scrambled !
Please see it here: https://gist.github.com/ginigangadharan/1b91f2eb3b206b6dc5dab002546ac4a2
Hello, Gineesh Palo Alto Firewall takes approx 5 minutes to come up properly even after the login prompt. Could you please wait for some more time and try to log in again.
Thank you for the reply.
Yeah, I tried with waiting for several minutes and still the result is same.
Not sure I am using correct VM image but tried with almost 15 images 🙁