
A firewall is a network security system that controls and monitors incoming and outgoing network traffic. Firewalls have two types, the first one is Hardware Firewalls and another one is Software firewalls. Hardware firewalls have separate hardware with their Operating System, CPU, RAM, and different types of interfaces (ports). Software Firewall is software that can be installed in other operating systems like Windows, Linux, and MAC.
However, we have to write policies on both of them. Firewall behaviors always depend upon written policies. In firewalls, we have to write Inbound and Outbound rules, every packet that tries to cross the boundary (Inbound to Outbound or Outbound to inbound), is first checked by the written policies. If the packet is marked as allowed in the firewall policies list then it can cross the Firewall, otherwise, the firewall drops that packet.
IP Address and Domain Name
To know the firewall in detail, we must first understand how networking works. The IP address plays a vital role in networking. We have two types of IP addresses one is IPv4 the other is IPv6. In this world, every small computer, networking device, and server has a unique IP address. We have DNS (Domain Name Server), which converts, IP addresses to Domain Name. Human beings, usually use domain names instead of IP addresses, because they can easily remember and understand domain names like “https://www.gns3network.com“, in comparison to IP address 104.31.89.207.
Network Port and Protocols
Ports and protocols, both play an essential role in networking. In computer Networking, Ports are a virtual path from source to destination. So, whenever, a user requests services from servers, their system itself adds a source port number and destination port number. Ports have three types Well Knows, Registered, and Private. Internet Assigned Numbers Authority manages all port numbers and protocols.
- Well Known: From 0-1023 ( used by commonly used protocols. )
- Registered: 1024 to 49151
- Private: 49152 to 65 535 ( Also, known as dynamic Ports )
Protocols are the set of rules, which follow by every computer, to communicate with another computer. For example, we have protocols like FTP, DNS, HTTP, TELNET, SSH, HTTPS, etc. All these protocols use ports from Well Known Ports.
Now, if we have to block a service then we have to directly block the access to that protocol port. Some common Protocols and their Port numbers are mentioned below :
[table id=1 responsive=true/]
Firewall Zones [Inside, Outside, and DMZ]
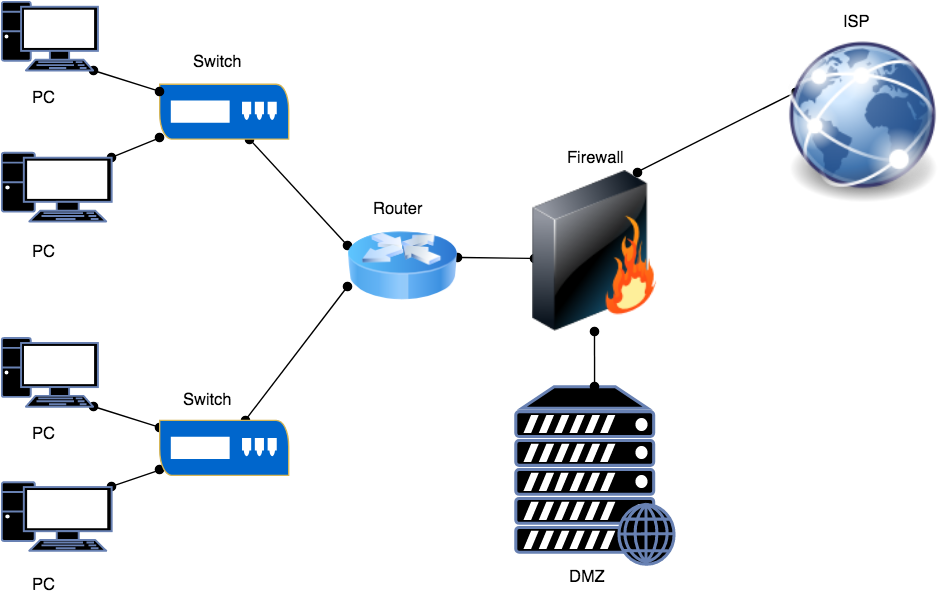
Firewall interfaces (ports) are always kept in various zones. Just, for example, most of the time, network designers called them Inside, Outside, and Demilitarized Zone. In the Inside zone, we have various switches and routers. Most of the end-users are there and working for an organization. In the Outside Zone, there is the Global Internet. This zone is also known as the “World of Hackers”. In the Demilitarized zone, we have our servers like Web Server and FTP Server. This zone is commonly known as DMZ. People from outside the internet can access our DMZ Servers like Web Server. In the Cisco ASA firewall, we have to define a security level for each interface. The higher the security level, the higher the trust on that side network.
In this picture, the Router is Inside, the Web Server is in DMZ, and the ISP is in the Outside zone.
Firewall Configuration
Although, firewalls are manufactured by many vendors. So, their configurations are also different. In this session, we are going to configure our Cisco ASA firewall using Telnet. First, we have to configure a management port with an IP address as shown below configuration:
|
1 2 3 4 5 6 7 8 9 |
ciscoasa# configure terminal ciscoasa(config)# interface management 0/0 ciscoasa(config-if)# ip address 192.168.1.1 255.255.255.0 ciscoasa(config-if)# nameif management ciscoasa(config-if)# security-level 100 ciscoasa(config-if)# no shut ciscoasa(config-if)# exit ciscoasa(config)# telnet 0 0 management ciscoasa(config)# aaa authentication telnet console LOCAL |
Now, we open the terminal/cmd in our PC and connect to the ASA Firewall using telnet. An output of the command is shown below :
|
1 2 3 4 5 6 7 8 9 10 11 12 |
telnet 192.168.1.1 Trying 192.168.1.1... Connected to 192.168.1.1. Escape character is '^]'. User Access Verification Username: vicky Password: ***** Type help or '?' for a list of available commands. ciscoasa> en ciscoasa> enable Password: ciscoasa# |
Now, we have to configure different interfaces of the firewall. Here, I will configure two interfaces, one is in the inside zone and another one is in the outside zone. Also, the name of both of the interfaces will be inside and outside. The security level on both of the interfaces will be “100” and “0” respectively. If we give the zone name “inside” to any interface, the firewall sets the security level “100” by default. Also, if any interface is in the “outside” zone, then the firewall sets the security level “0” by default. One interesting thing is that if we are not given any subnet mask after the IP address, the firewall by default sets it to the default subnet mask of that class.
Firewall Interface Configuration
Inside Interface Configuration
|
1 2 3 4 5 6 7 8 |
ciscoasa# configure terminal ciscoasa(config)# interface GigabitEthernet 0/0 ciscoasa(config-if)# ip address 192.168.20.1 255.255.255.0 ciscoasa(config-if)# nameif inside INFO: Security level for "inside" set to 100 by default. ciscoasa(config-if)# security-level 100 ciscoasa(config-if)# no shutdown ciscoasa(config-if)# |
Outside Interface Configuration
|
1 2 3 4 5 6 7 8 9 |
ciscoasa(config)# configure terminal ciscoasa(config)# interface GigabitEthernet 0/1 ciscoasa(config-if)# ip address 101.1.1.1 255.255.255.248 ciscoasa(config-if)# nameif outside INFO: Security level for "outside" set to 0 by default. ciscoasa(config-if)# security-level 0 ciscoasa(config-if)# no shut ciscoasa(config-if)# no shutdown ciscoasa(config-if)# exit |
Traffic, which is from Higher Security Levels to Lower Security Levels is by default allowed in CISCO ASA Firewall. However, the network traffic from the Lower Security Level to the Higher Security level is set to deny by default. So, if we have to allow traffic from the Lower Security Level to the Higher Security level, then we can write ACL (Access Control List).
By default, the hostname is set to “ciscoasa” in CISCO ASA Firewall, we can change it by using the following commands:
|
1 2 3 |
ciscoasa# configure terminal ciscoasa(config)# hostname networking-firewall networking-firewall(config)# |
You can add the credentials of users with a unique username and password with their Privilege Levels (0 to 15 ) in Cisco ASA. You can follow the following guide to add user credentials to the Firewall:
|
1 2 |
ciscoasa# configure terminal ciscoasa(config)# username networking password firewall privilege 15 |
How to set ASDM on CISCO ASA
ASDM (Adaptive Security Device Manager) is a GUI (Graphical User Interface) application, which is used to configure Cisco ASA in a /graphical way instant of Command-Line. To access ASA in graphical mode, you need to install Java Webstart on your PC. You can access ASDM using the below command guide.
|
1 2 3 4 |
networking-firewall# configure terminal networking-firewall(config)# http server enable networking-firewall(config)# http 0 0 Management networking-firewall(config)# aaa authentication http console LOCAL |
In the above configuration, I have enabled the HTTP Server(Web Server) on the Cisco ASA Firewall. Then we have to provide access to this HTTP Server to users who are part of the Management Network (using wildcard bits). At last, in the configuration line, I enable the authentication for the HTTP console. Every user who is part of the “LOCAL” database can access the ASDM of the CISCO ASA firewall using their local credentials.
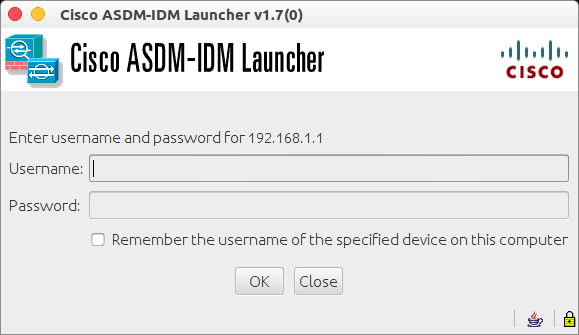
After, the above configuration, you can open your web browser and hit the address of the Cisco ASA firewall (https://192.168.1.1) in this case. Also, if you are using a Linux Operating System then you can execute the following command in the terminal to open ASDM :
|
1 |
javaws https://192.168.1.1/admin/public/asdm.jnlp |
Summary
Guys, In this article, we learn about Firewalls. First of all, we learn the basics of IP addresses and Domain Names. We also studied Network Ports and Protocols. After that, we studied Firewall Zones. Finally, we took an example of a Cisco ASA Firewall and configured it from the beginning.
Related Articles
- OSI Model – 7 Layers Explained in detail
- How to configure IPSec VPN Between Cisco ASA and Palo Alto Firewall
- IPSec Tunnel between Cisco ASA Firewall and Cisco Router
- Best Network Simulation Tools for Network & Network Security [2024]
- Palo Alto Firewall Training
- FortiGate Firewall Training
References
Feel free to ask your queries. Share us on social media like facebook and shows us some love 🙂