
In this article, we will discuss, how you can configure IPSec Tunnel between Cisco Routers at different locations. IPsec Tunnel allows you to communicate securely to the remote office over the Internet. All the traffic through the IPSec tunnel will be encrypted by the various Encryption and Hashing algorithms. You must need static routable IP addresses, to establish the IPSec connectivity. So, let’s get started!
Scenario – How to Configure IPSec VPN between Cisco Routers
Here, we have two different Cisco Routers at different locations. Router R1 connected with the ISP using public IP 1.1.1.1, and the LAN subnet is 192.168.1.0/24. On the other hand, Router R2 connected with the ISP using public IP 2.2.2.2 and the LAN subnet is 192.168.2.0/24. You must verify the connectivity between R1 and R2.
[terminal]R1#ping 2.2.2.2
Type escape sequence to abort.
Sending 5, 100-byte ICMP Echos to 2.2.2.2, timeout is 2 seconds:
!!!!!
Success rate is 100 percent (5/5), round-trip min/avg/max = 24/31/40 ms[/terminal]

Requirements for IPSec VPN
As earlier discussed, we must have static routable IP addresses to establish an IPSec tunnel. Along with the IP addresses, we also have to configure ISAKMP Phase 1 and ISAKMP Phase 2 ( IPSec). Also, we need to provide a Pre-Shared Key during Phase1 Configuration. So, the summary of the requirements are:
- Static Routeable IP address
- Phase 1 configuration
- Phase 2 configuration
- Pre-Shared Key
- Crypto Map and ACL Configuration
How to Configure IPSec VPN on Cisco Routers
First, we will configure all the configurations on Router1. After that, we will move on router two and configure all the required configuration.
Configuring the IPSec Tunnel on Cisco Router 1
Configuring the Phase 1 on the Cisco Router R1
I assumed that you have reachability to the Remote Network. Now, we will configure the Phase 1 Parameters on Router1. You need to access the global configuration mode of the Cisco Router and configure the below parameters. For ISAKMP Phase1, we will use the following parameters:
- Encryption: 3des (It is used to encrypt the Phase1 traffic).
- Hash: md5 ( md5 is a hashing algorithm. It authenticates our data using Hash)
- Group: 2 (Diffie Hellman Group 2)
- Authentication: In this example, we are using the pre-shared key as authentication)
- Lifetime: 86400 ( Default lifetime for the Phase1)
[terminal]R1#configure terminal
Enter configuration commands, one per line. End with CNTL/Z.
R1(config)#crypto isakmp policy 1
R1(config-isakmp)#encryption 3des
R1(config-isakmp)#hash md5
R1(config-isakmp)#authentication pre-share
R1(config-isakmp)#group 2
R1(config-isakmp)#lifetime 86400[/terminal]
Now, we need to define a pre-shared key. Access the global configuration mode of the router and define the Pre-Shared key. I am using Gns3Network as a Pre-Shared Key.
- Pre-Shared Key: Gns3Network
- Remote Site Router IP Address: 2.2.2.2
[terminal]R1(config)#crypto isakmp key Gns3Network address 2.2.2.2[/terminal]
Configuring the Phase 2 on the Cisco Router R1
Now, we need to configure the IPSec VPN Phase 2 Parameters. Here, you need to define the IPSec Protocol i.e. AH (Authentication Header) or ESP (Encapsulation Security Payload). Along with the Protocol, we also need to define the Encryption and Hashing algorithms. In this example, I am using the below parameters:
- IPSec Protocol: ESP (Encapsulation Security Payload)
- Encryption: 3DES
- Hashing: md5
[terminal]R1(config)#crypto ipsec transform-set TSET esp-3des esp-md5-hmac[/terminal]
Configuring the Extended ACL and Crypto MAP
Now, we need to configure the Extended ACL and Crypto MAP to match the traffic.
[terminal]R1(config)#ip access-list extended IPSEC_List
R1(config-ext-nacl)#permit ip 192.168.1.0 0.0.0.255 192.168.2.0 0.0.0.255[/terminal]
This ACL (Access Control List) will match the traffic of our Local LAN and we will use this ACL in Crypto MAP Configuration.
[terminal]R1(cfg-crypto-trans)#crypto map CMAP 1 ipsec-isakmp
% NOTE: This new crypto map will remain disabled until a peer
and a valid access list have been configured.
R1(config-crypto-map)#set peer 2.2.2.2
R1(config-crypto-map)#set transform-set TSET
R1(config-crypto-map)#match address IPSEC_List[/terminal]
Now, we need to apply this crypto Map to the Outgoing Interface.
[terminal]R1(config)#interface FastEthernet 0/0
R1(config-if)#crypto map CMAP[/terminal]
Excluding the IPSec VPN Traffic from the NAT (Optional)
Now, we need to exclude the VPN Traffic from the NAT. NAT stands for Network Address Translation which is commonly used for providing Internet Connectivity to the Internal Hosts. If NAT is not configured in your environment, you can skip this step.
Here, we have to create an extended ACL that denies only the IPSec traffic and permit Internet traffic.
[terminal]R1(config)#access-list 100 deny ip 192.168.1.0 0.0.0.255 192.168.2.0 0.0.0.255
R1(config)#access-list 100 permit ip 192.168.1.0 0.0.0.255 any [/terminal]
Now, just configure the NAT using this extended List.
[terminal]R1(config)#ip nat inside source list 100 interface FastEthernet 0/0 overload
*Jan 12 16:20:19.555: %LINEPROTO-5-UPDOWN: Line protocol on Interface NVI0, changed state to up
R1(config)#in FastEthernet0/0
R1(config-if)#ip nat outside
R1(config-if)#in FastEthernet1/0
R1(config-if)#ip nat inside[/terminal]
Configuring the IPSec Tunnel on Cisco Router 2
Now, we already described all the parameters used in the IPSec tunnel. We will configure all the configurations on the remote router R2.
Configuring the Phase 1 on the Cisco Router R2
[terminal]R2#configure terminal
Enter configuration commands, one per line. End with CNTL/Z.
R2(config)#crypto isakmp policy 1
R2(config-isakmp)# encryption 3des
R2(config-isakmp)# hash md5
R2(config-isakmp)# authentication pre-share
R2(config-isakmp)# group 2
R2(config-isakmp)# lifetime 86400[/terminal]
[terminal]R2(config)#crypto isakmp key Gns3Network address 1.1.1.1[/terminal]
Phase 2 configuration on the Cisco Router R2
[terminal]R2(config)#crypto ipsec transform-set TSET esp-3des esp-md5-hmac[/terminal]
Configuring the Extended ACL and Crypto MAP
[terminal]R2(cfg-crypto-trans)#ip access-list extended IPSEC_List
R2(config-ext-nacl)#permit ip 192.168.2.0 0.0.0.255 192.168.1.0 0.0.0.255[/terminal]
[terminal]R2(config-ext-nacl)#crypto map CMAP 1 ipsec-isakmp
% NOTE: This new crypto map will remain disabled until a peer
and a valid access list have been configured.R2(config-crypto-map)#set peer 1.1.1.1
R2(config-crypto-map)#set transform-set TSET
R2(config-crypto-map)#match address IPSEC_List[/terminal]
[terminal]R2(config)#interface FastEthernet 0/0
R2(config-if)#crypto map CMAP
*Jan 12 16:26:41.991: %CRYPTO-6-ISAKMP_ON_OFF: ISAKMP is ON[/terminal]
Excluding the IPSec VPN Traffic from the NAT (Optional)
[terminal]R2(config)#access-list 100 deny ip 192.168.2.0 0.0.0.255 192.168.1.0 0.0.0.255
R2(config)#access-list 100 permit ip 192.168.2.0 0.0.0.255 any [/terminal]
Now, just configure the NAT using this extended List.
[terminal]R2(config)#ip nat inside source list 100 interface FastEthernet 0/0 overload
*Jan 12 16:20:19.555: %LINEPROTO-5-UPDOWN: Line protocol on Interface NVI0, changed state to up
R2(config)#in FastEthernet0/0
R2(config-if)#ip nat outside
R2(config-if)#in FastEthernet1/0
R2(config-if)#ip nat inside[/terminal]
Testing the Configuration of IPSec Tunnel
We have done the configuration on both the Cisco Routers. However, we need to initiate the traffic towards the remote networks to make the tunnel up and run. So, just initiate the traffic towards the remote subnet.
[terminal]R1#ping 192.168.2.1 source 192.168.1.1
Type escape sequence to abort.
Sending 5, 100-byte ICMP Echos to 192.168.2.1, timeout is 2 seconds:
Packet sent with a source address of 192.168.1.1
.!!!!
The success rate is 80 percent (4/5), round-trip min/avg/max = 20/28/48 ms[/terminal]
The first packet is dropped due to the ARP request and response. However, no further drops after the ARP Packet.
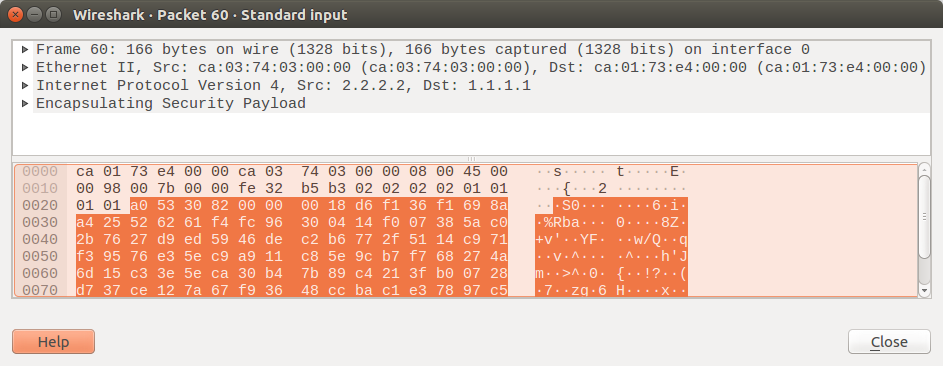
Analyzing IPSec Tunnel traffic using the Wireshark
As in Phase2 configuration, we chose IPSec ESP Protocol as well as some Encryption and Authentication. So, all the traffic towards the remote network will be encrypted and you will only find ESP Packets.
Related Articles
- How to configure IPSec VPN between Palo Alto and FortiGate Firewall
- How to configure GRE Tunnel between Cisco Routers
References
https://en.wikipedia.org/wiki/IPsec
Summary
Hey! In this article, we configured IPSec VPN on Cisco Routers. We discussed the requirements for the IPSec VPN. After, we configure Phase1 and Phase2 on Cisco Router R1. The same configuration is done on the Cisco Router R2. You must need the static routable IP address to establish an IPSec Tunnel between both the routers.
Hope you like this article! Please let us know your questions in the comment box below!
Hello,
Thank you for your awesome guideline. I followed and it worked like magic for me.
I have a challenge doing configs using IPsec profiles.
Once I have applied the IPsec profile to a tunnel interface, the tunnels go down and a new int (NVI0 ) is added.
Could you please share insight on the configs, I am currently following the ENCOR OCG Chapter 16.
Thanks.