
In this article, we will deploy the FortiGate Next-Generation Virtual Firewall directly in GNS3. In the previous article, we deploy the FortiGate Firewall in VMWare Workstation. As you already know that the GNS3 Simulator allows you to directly run KVM machines. So, we will download the FortiGate KVM Image from the support portal and deploy it in GNS3. So, let’s get started.
How to deploy the FortiGate Firewall in GNS3
As we already discussed, we need to download the FortiGate KVM Firewall from the support portal. KVM stands for (Kernel-Based Virtualization Machine). KVM allows you to run the .qcow file format directly on it. You need to follow the following steps to deploy the FortiGate KVM on GNS3:
Step 1: Download the FortiGate KVM Virtual Firewall from the Support Portal
First of all, you need to download the FortiGate KVM Firewall from the FortiGate support portal. Visit the support portal by clicking here. Now, navigate to Download > VM Images > Select Product: FortiGate > Select Platform: KVM. In this example, I am downloading the FortiGate version 6.0.9. Now, just click on Download Button.
Note: Make sure that Download the KVM for New deployment of FortiGate.
You can refer to the below image for downloading the FortiGate KVM.
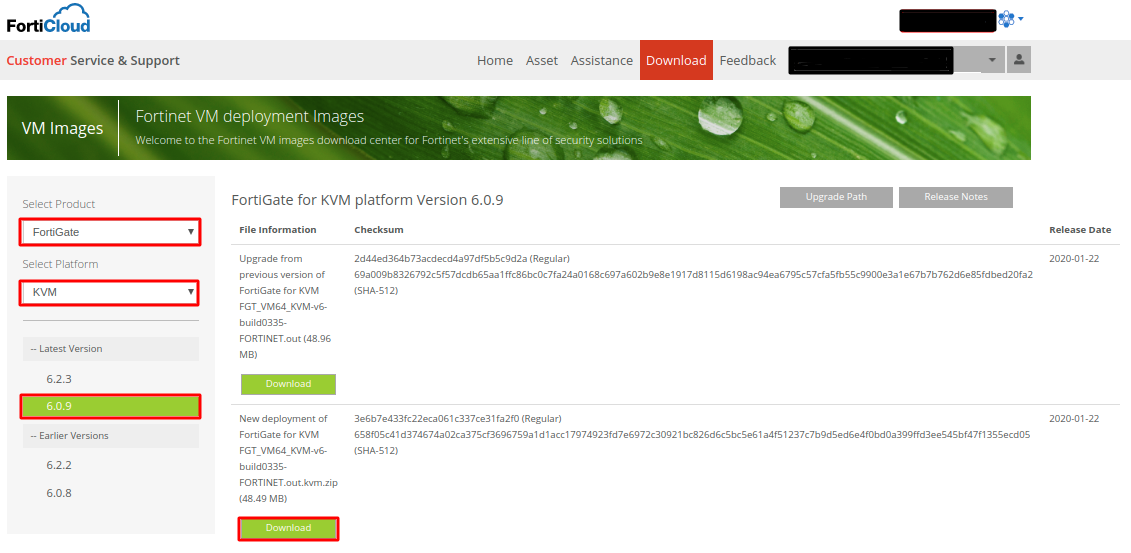
Image Source: Fortinet
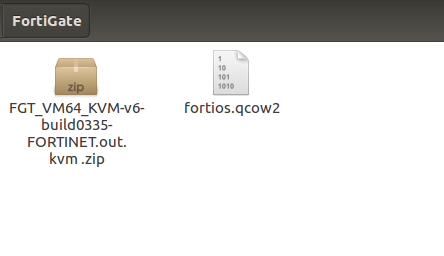
After downloading the .zip file of FortiGate KVM Firewall, you need to extract that file to a folder. After extracting, you will get a .qcow2 FortiGate KVM Firewall file as shown below:
Step 2: Download the GNS3 on your machine
I hope you already aware or you already install the GNS3 on your machine. If not, you can refer to the following links to understand & download the GNS3 Network Simulator for Windows or Linux machines. Basically, GNS3 is a Great Network Simulator tool on which you can run many Network & Network Security appliances.
Step 3: Deploying the FortiGate VM Image in GNS3
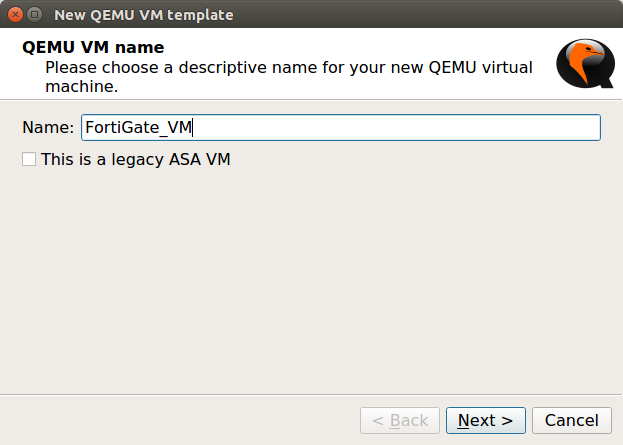
Now, we are ready to deploy the FortiGate KVM Image in the GNS3 simulator. Currently, I’m using GNS3 2.1.21, although, the KVM deployment is the same on other GNS3 versions too. Open the GNS3 and, Navigate to Edit >> Preferences >> QEMU >> Qemu VMs and click on New. Now, give the friendly name to this VM, i.e. FortiGate_VM, and click on Next.
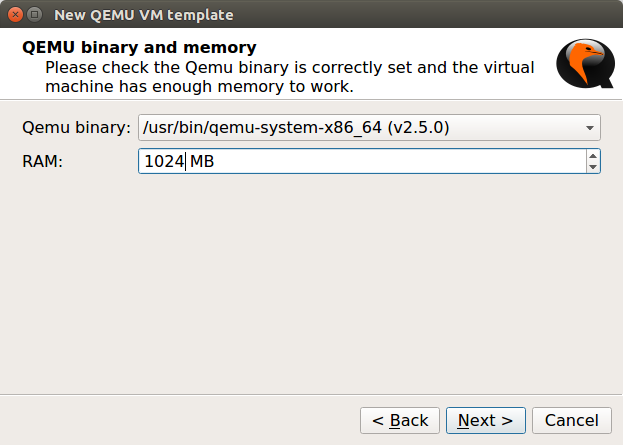
Now, give the RAM to the FortiGate VM Firewall. In this example, I’ve given 1024 MB RAM to the VM Image and Click on Next.
Note: The Default 15 Days Licenced VM supports only 1 CPU Core & 1024 MB of RAM.
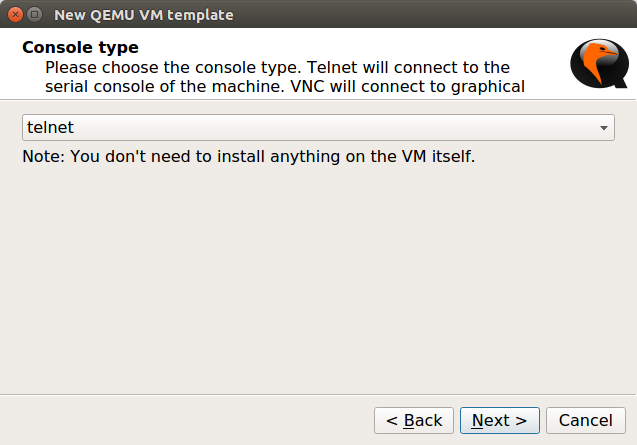
Now, you need to select the Console Type. In KVM we can get the Firewall CLI just by double-clicking. So, here, I’m selecting telnet. However, if you have a vnc application installed on your machine, you can select the vnc and click on Next.
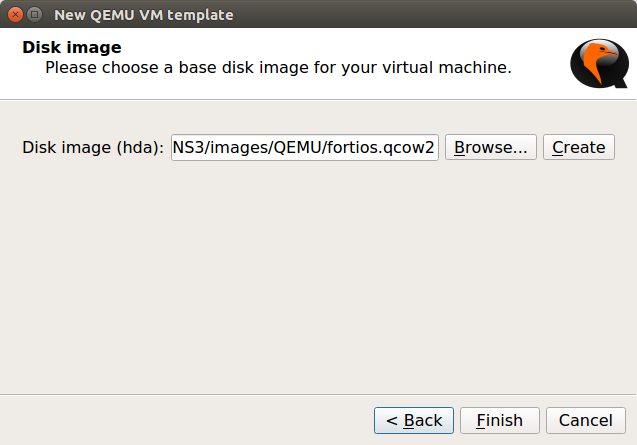
Now, In the last step, you need to select the image file you downloaded in Step 1. It will prompt you to copy that file in the GNS3 default directory, so you can copy it on the gns3 default directory, it’s recommended. Now, click on Finish.
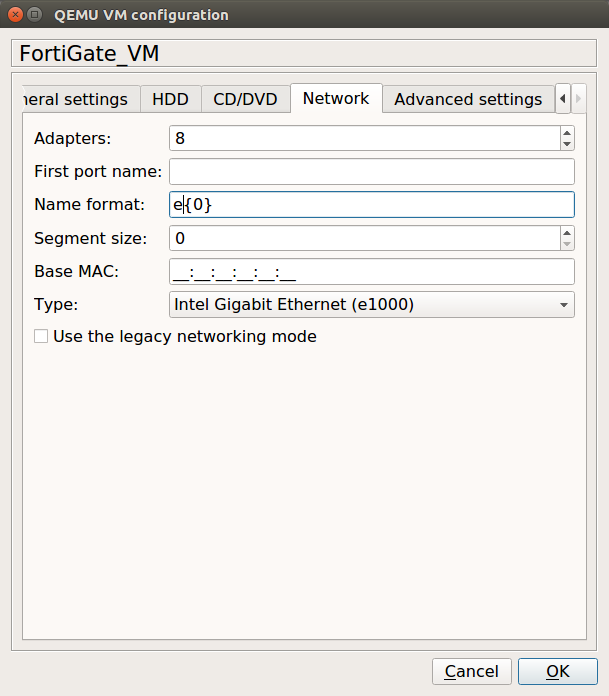
Now, before applying your changes, you need to change the Interfaces of the VM Firewall. In this example, I am using 8 different Interfaces on the VM Firewall. However, you can change it according to your requirements. To change it, navigate to Edit >> Network (you can refer to the given image). Optionally, you can select a FortiNet icon, for this VM Image. I’ve one .svg file for the Fortinet, so I am choosing the same here.
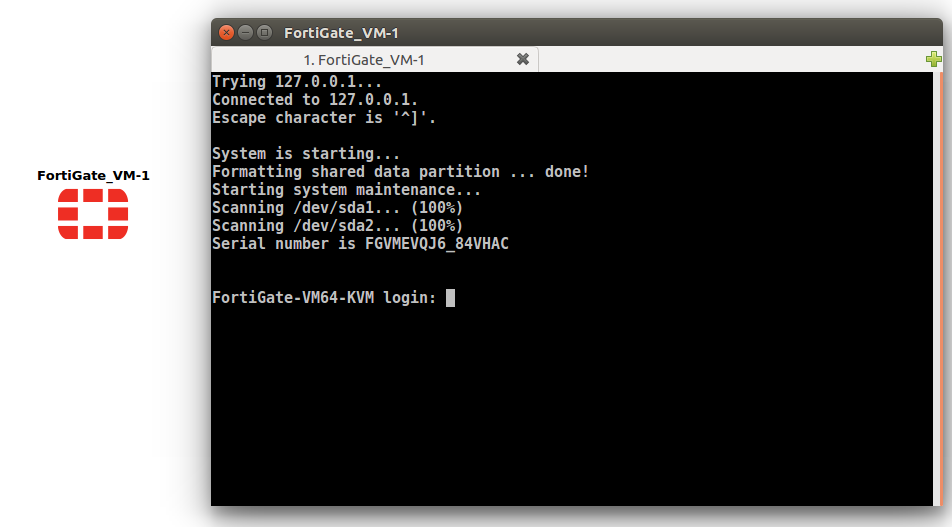
Once, you applied the changes, you will find that a new FortiGate Firewall is ready along with your already installed appliances. Just drop down the firewall in the Project area. Right-click on this and choose the start option. Once, you start the VM, you will get the console of the Firewall, which is in the booting process.
Step 4: Configuring the Interface of FortiGate KVM (Virtual Firewall) for Management
In the previous step, we successfully step the FortiGate VM in the GNS3. Now, we need to double click the VM appliance we just deployed. You will find that the Virtual FortiGate Firewall booting process is going on. Once the FortiGate VM Firewall is finished booting, you need to give the default credentials to the VM.
Note: The default username is admin and password is [blank].
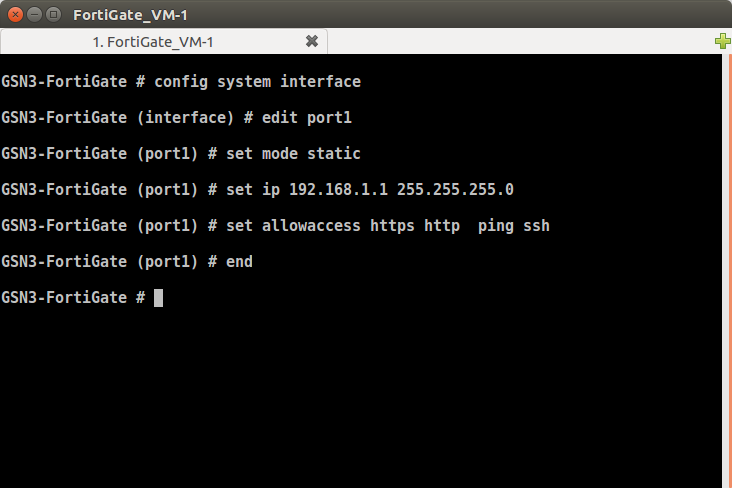
Now, we need to configure one of the Interfaces so that you can access the GUI of the FortiGate VM. However, in the FortiGate VM Firewall, you didn’t have any dedicated Management Port. So, in this example, I’ll configure the ethernet1/1 port. You need to follow the following commands to configure the IP address on the ethernet1 port. We also need to provide the specific services along with the IP address on the Interface, so that we can access the GUI (Graphical User Interface) of the firewall.
To assign the IP address & services, you have to follow the given commands:
[terminal]config system interface[/terminal]
[terminal]edit port1[/terminal]
[terminal]set mode static[/terminal]
[terminal]set ip 192.168.1.1 255.255.255.0[/terminal]
[terminal]set allowaccess https http ping ssh[/terminal]
[terminal]end[/terminal]
The snapshot of the whole configuration is given below:
If you need to change the Hostname of the FortiGate KVM Firewall, you can follow the following commands:
[terminal]config system global[/terminal]
[terminal]set hostname GSN3-FortiGate[/terminal]
[terminal]end[/terminal]
Hey! Now, you are ready to get the GUI of the Firewall. So, just follow the next step to get the GUI of FortiGate.
Step 5: Accessing the FortiGate KVM Firewall from the End Machine
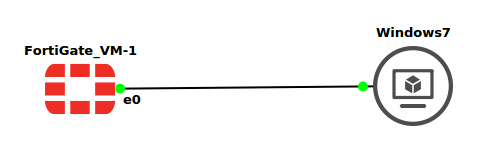
In the previous step, we have done all configuration which is used to get access to the FortiGate VM. In this example, I’ve windows 7, connected like the below image:
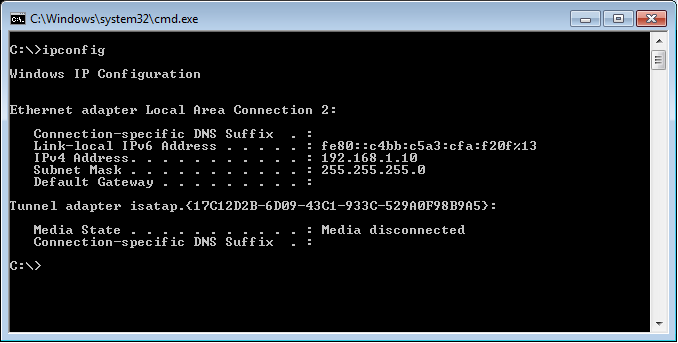
I need to provide the statically IP address in the same network on Windows 7. In our FortiGate KVM Firewall, ethernet1 is configured with 192.168.1.1, so I’ll configure the 192.168.1.10 IP address on Windows7. So, my windows 7 IP configuration looks like this:
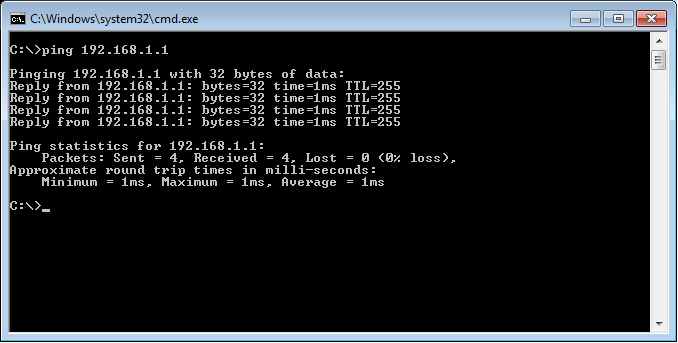
Now, test the connectivity with the FortiGate KVM. Let’s initiate the ping to the FortiGate VM IP address, i.e. 192.168.1.1.
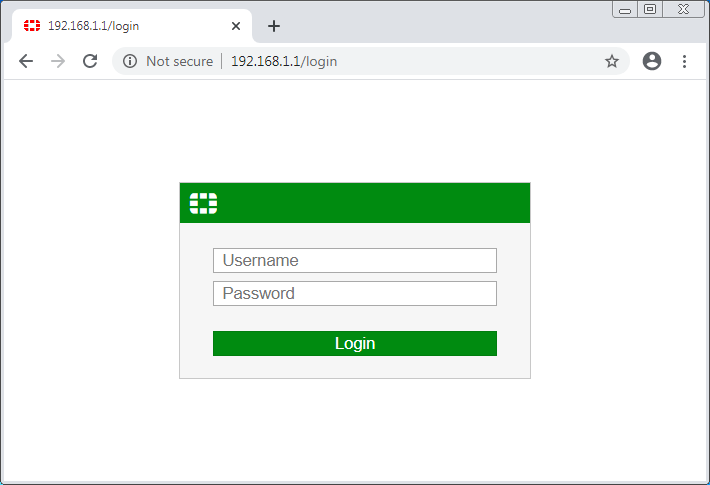
Now, Let’s open your favorite web browser and access the FortiGate KVM using http://192.168.1.1. If everything is perfect, you will get the GUI of the Firewall. The Fresh KVM Deskboard is looking like the below image:

That’s it! We have successfully deployed the FortiGate KVM in the GNS3 Network Simulator.
Related Articles
- How to deploy FortiGate Firewall in VMWare Workstation
- How to Install Palo Alto VM Firewall in VMWare
- IPSec VPN between Palo Alto and FortiGate Firewall
Summary
In this article, we configured the FortiGate Virtual Firewall directly on GNS3 Network Simulator. First, we download the FortiGate KVM Virtual Firewall from the Fortinet support portal. Then, we successfully imported the FortiGate Firewall on GNS3 Simulator. We configured 8 different Interfaces for different purposes on FortiGate KVM. However, you can install many more Network Interfaces. The FortiGate firewall by default comes with 15 days of license with limited features. After 15 days, you must buy it to continue work on the same image. We also configured one of the FortiGate VM firewalls using the CLI to gain the GUI/CLI access of the end machine. Finally, we get the FortiGate VM Firewall GUI on our end machine.
Did you like this artile? Please coment in comment box if you need further help!
That’s awesome.. Thanks a lot for the article.
I was stuck with some items and all clear now 🙂
Thanks, Gini! Glad to know this helps you.
Hello All,
I have followed the same to deploy the Fortigate.
Additionally, I have add wan interface in Fortigate for Internet.
After that, Internet is working from Fortigate but not from end machine.
I have configured routes and policies for that end machine but policy is not matching.
I have run the debug commands, below is the output repeatably
GNS3-RemoteFGT # 2020-08-17 13:07:46 id=20085 trace_id=131 func=print_pkt_detail line=5605 msg=”vd-root:0 received a packet(proto=1, 10.20.1.10:1->8.8.8.8:2048) from port3. type=8, code=0, id=1, seq=472.”
2020-08-17 13:07:46 id=20085 trace_id=131 func=init_ip_session_common line=5771 msg=”allocate a new session-00000b97″
2020-08-17 13:07:46 id=20085 trace_id=131 func=iprope_dnat_check line=4973 msg=”in-[port3], out-[]”
2020-08-17 13:07:46 id=20085 trace_id=131 func=iprope_dnat_check line=4986 msg=”result: skb_flags-02000000, vid-0, ret-no-match, act-accept, flag-00000000″
2020-08-17 13:07:46 id=20085 trace_id=131 func=vf_ip_route_input_common line=2580 msg=”Match policy routing id=1: to 8.8.8.8 via ifindex-7″
2020-08-17 13:07:46 id=20085 trace_id=131 func=vf_ip_route_input_common line=2598 msg=”find a route: flag=04000000 gw-192.168.217.2 via port4″
2020-08-17 13:07:51 id=20085 trace_id=132 func=print_pkt_detail line=5605 msg=”vd-root:0 received a packet(proto=1, 10.20.1.10:1->8.8.8.8:2048) from port3. type=8, code=0, id=1, seq=473.”
2020-08-17 13:07:51 id=20085 trace_id=132 func=init_ip_session_common line=5771 msg=”allocate a new session-00000b98″
2020-08-17 13:07:51 id=20085 trace_id=132 func=iprope_dnat_check line=4973 msg=”in-[port3], out-[]”
Anyone help me on this ?
HAXM acceleration support is not installed on this host this error is coming how can I resolve
Go to GNS3 –> Edit –> Preferences –> QEMU in Local settings, remote the check in the checkbox “Require hardware acceleration (KVM/HAXM)”. –> Apply. Done!
Great article . It helped me get the Fortigate firewall on GNS3, however I can’t bring up the GUI.
I am using a lap top, running Windows 10, connecting to a wireless router connected via wired ethernet to my ISP. At “cmd” and ipconfig my host system gateway (router)is 192.168.1.1 which is the same IP address in your step 4 instructions.
Changed the VM to 192.168.1. 10, successful ping from cmd but no access to VM GUI.
Any suggestions ?
Thanks,
Hello everyone,
I need Fortigate setup for GNS3. Please help. If anyone have share me on kapilsingh741@gmail.com.
Dont’ understand how you connect your windows with a virtual appliance in GNS3….?????
i have frontinet image run on gns3 and i want to connect to frontinet from my host ,by the way gns3 server run from vmware workstation
thank you
Hi Omer Mohammed,
Did you tried to configure the FortiGate Firewall Port. Also, make sure you allow HTTP SSH PING HTTPS on that particular interface. I have already included all commands in this article.