
In this article, we will configure the IPSec Tunnel Between Palo Alto & SonicWall Next-Gen Firewall. In this example, I’m using PANOS 8.1 on Palo Alto Networks Firewall. Also, in SonicWall, the SonicOS is 6.5.0.2. However, the configuration is almost similar to other versions too. A basic understanding of IPSec VPN is a plus for this article. So, let’s start configuring IPSec Tunnel between Palo Alto and SonicWall.
How to configure IPSec tunnel between SonicWall and Palo Alto Firewall
To configure the IPSec tunnel, you must have routable IP access the devices i.e. You need the connectivity between both the devices. We also, need to configure authentication, either using Pre-Shared Key or using Certificates. However, In this example, we will use the Pre-Shared Key as the authentication method. In IPSec VPN, we have two different Phases, called IKE Phase 1 & IKE Phase 2. We have to configure different Encryption & Authentication parameters, in both phases along with the time range. All the things will be more clear in the next few steps. So, let’s start the configuration.
Scenario – IPSec tunnel between Palo Alto and SonicWall
Before moving to the configuration part, let’s understand the topology used in our LAB. We have two different firewalls i.e. Palo Alto and SonicWall. On both SonicWall & Palo Alto, we configured two networks, i.e. LAN & Internet. The Internet subnet is 1.1.1.1/30 & 2.2.2.2/30 on Palo Alto & SonicWall respectively. The LAN subnet is 192.168.1.0/24 & 192.168.2.0/24 on Palo Alto & SonicWall respectively. Let’s take a look at the below topology for more understanding.

Both Firewalls can communicate with each other over the Internet. So, let’s configure the IPSec tunnel on both firewalls step by step.
Steps to configure IPSec Tunnel on Palo Alto Firewall
First, we will configure the IPSec tunnel on Palo Alto Next-Generation Firewall. As you already know, we have configured two different networks, i.e. Internet & LAN. So, let’s configured IPSec Tunnel.
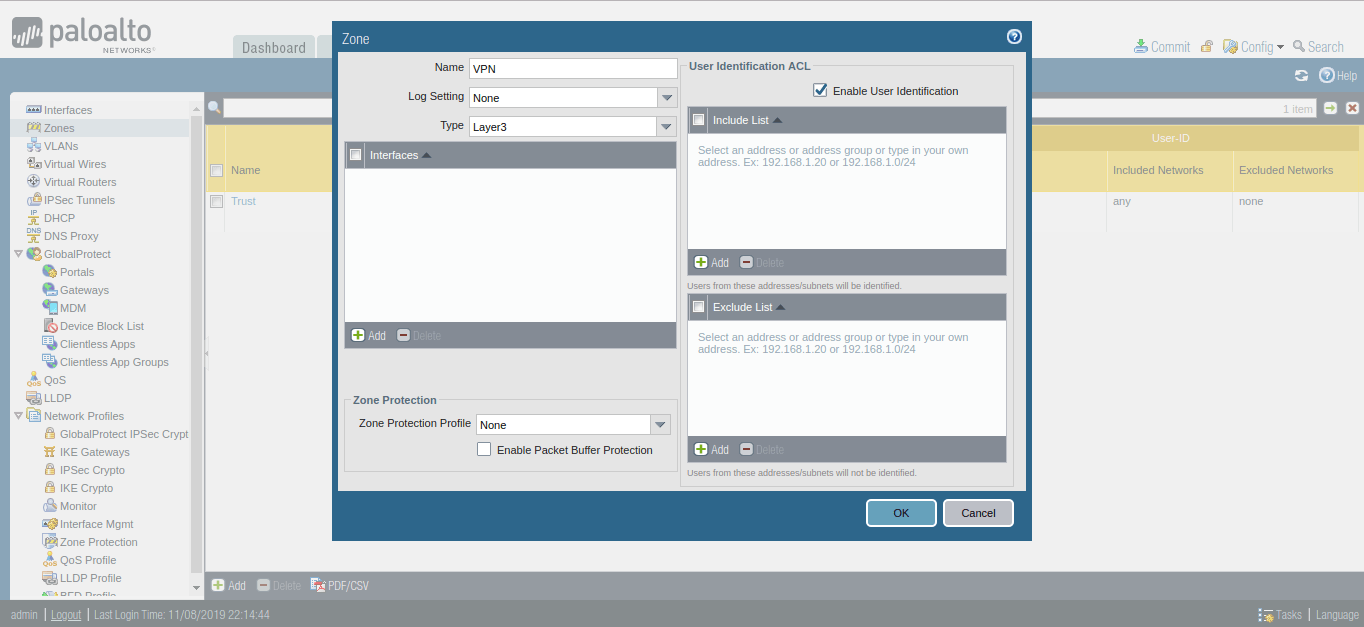
Step 1: Creating a Security Zone on Palo Alto Firewall
First, we need to create a separate security zone on Palo Alto Firewall. To configure the security zone, you need to go Network >> Zones >> Add. Here, you need to provide the Name for the Security Zone. You can provide any name as per your convenience.
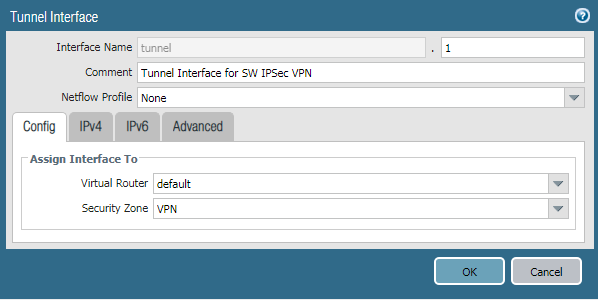
Step 2: Creating a Tunnel Interface on Palo Alto Firewall
You need to define a separate virtual tunnel interface for IPSec Tunnel. To define the tunnel interface, Go to Network >> Interfaces >> Tunnel. Select the Virtual Router, the default in my case. Also, in Security Zone filed, you need to select the security zone as defined in Step 1. Although, you do not need to provide IPv4 or IPv6 IP address for this interface. Also, you can attach Management Profile in Advanced Tab if you need it.
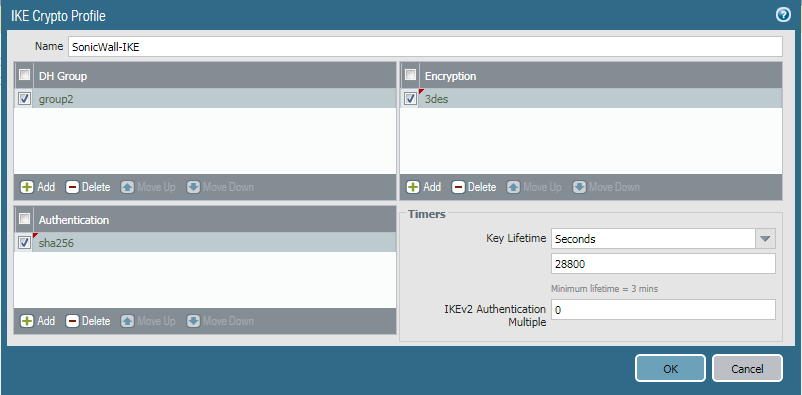
Step 3: Defining the IKE Crypto Profile [Phase 1 of IPSec Tunnel]
Now, you need to define Phase 1 of the IPSec Tunnel. You need to go Network >> Network Profiles >> IKE Crypto >> Add. Here, you need to give a friendly name for the IKE Crypto profile. Then, define the DH Group, Encryption and Authentication Method. By default, Key lifetime is 8 Hours. You can change it as per your requirement.
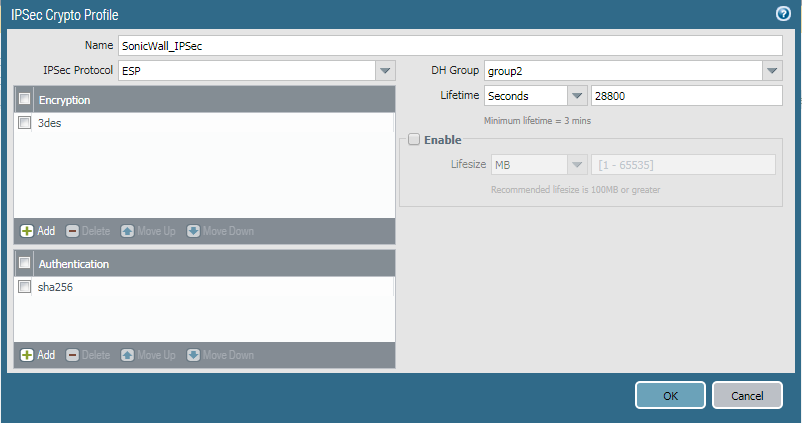
Step 4: Defining the IPSec Crypto Profile [Phase 2 of IPSec Tunnel]
Now, you need to define Phase 2 of the IPSec Tunnel. You need to go Network >> Network Profiles >> IPSec Crypto >> Add. Here, you need to give a friendly name for the IPSec Crypto profile. Select the IPsec Protocol as per your requirement. You have ESP (Encapsulation Security Protocol) and AH (Authentication Heade) protocol for IPSec. Then, define the DH Group, Encryption and Authentication Method. By default, Key lifetime is 1 Hour. You can change it as per your requirement.
Step 5: Defining the IKE Gateway Profile
Now, you need to go Network >> Network Profiles >> IKE Gateways >> Add. In General Tab, You need to define the name of the IKE Gateway Profile. In Interface filed, you need to define your Internet-facing Interface, In my case, ethernet 1/1, which has 1.1.1.1 IP Address. Define the Peer IP Address Type IP. Define the peer address, in my case 2.2.2.2. Select the Authentication Method, i.e. Pre Shared Key or Certificate. In this scenario, I’m using the Pre-shared Key. Define the Pre Shared key next and note down the key because you need it to define in SonicWall Firewall. Define the Local and Peer IP address in the Local Identification and Peer Identification field.
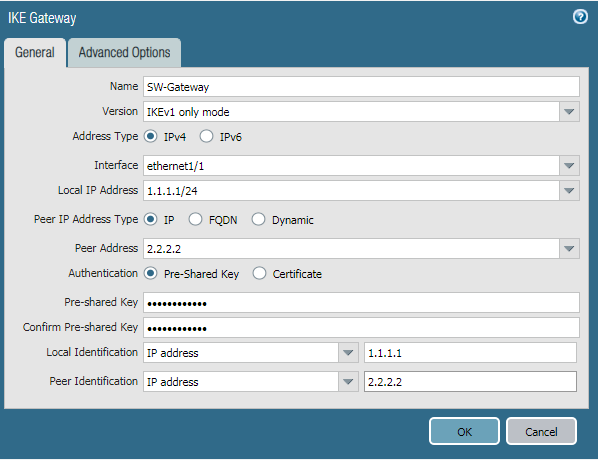
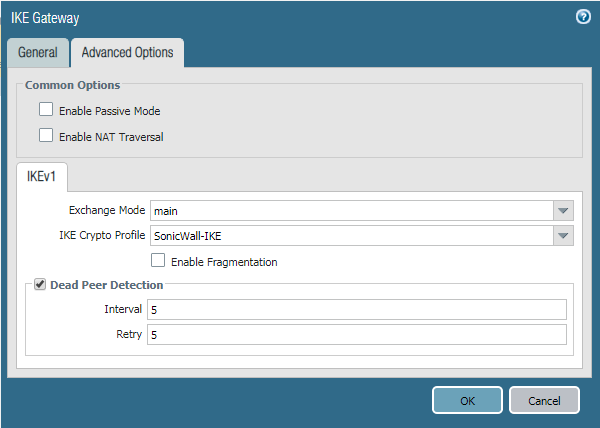
Click on Advanced Option, In IKEv1, select IKE Crypto Profile, which defines in Step 3.
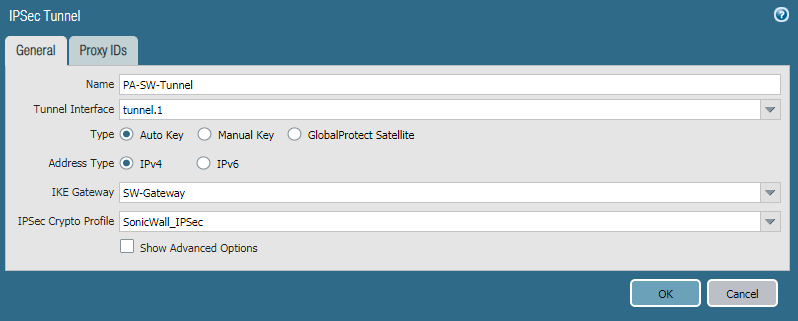
Step 6: Creating the IPSec Tunnel
We have defined IKE Gateway and IPSec Crypto profile for our IPSec Tunnel. Now, we have to define the IPSec Tunnel. Go to Network >> IPSec Tunnels >> Add. Define the user-friendly name for IPSec Tunnel. Next, select the tunnel interface, which defined in Step 2. Select the profiles for IKE Gateway and IPSec Crypto Profile, which defined in Step 3 and Step 5 respectively.
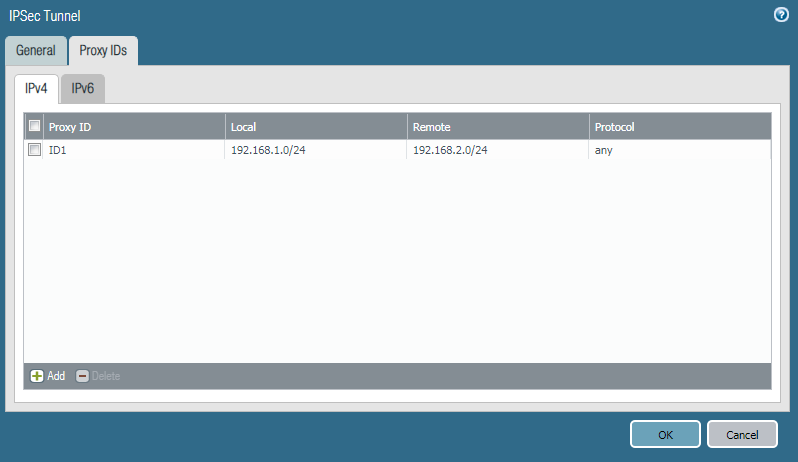
Go to the Proxy IDs Tab, and define Local and Remote Networks. In this scenario, I’m using 192.168.1.0/24 and 192.168.2.0/24 in LAN Networks.
Step 7: Creating the Security Policy for IPSec Tunnel Traffic
Now, you need to create a security profile that allows the traffic from VPN Zone to Trust Zone. You need to Go Policies >> Security >> Add to define a new Policy.

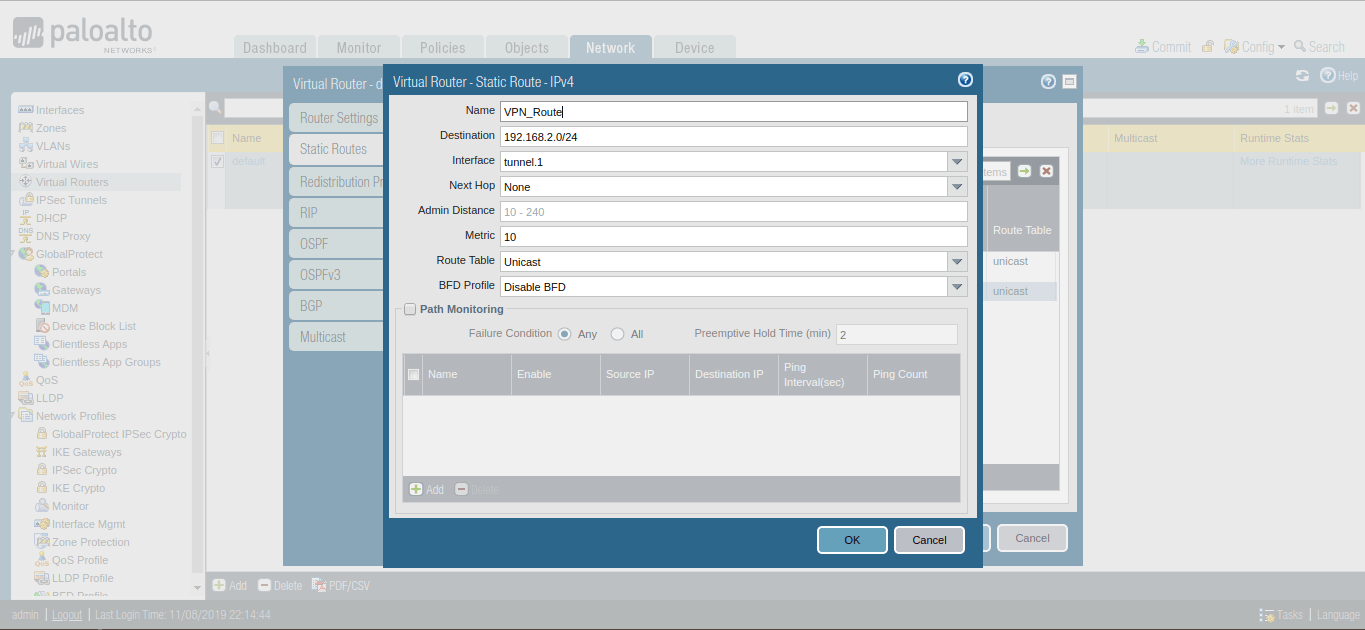
Step 8: Configuring Route for Peer end Private Network
Now, you need to provide a static route for Peer end Private Network. Just go to Network >> Virtual Routers >> Default >> Static Routes >> Add. Give the Name for this Route and define the destination network for this route, i.e. 192.168.2.0/24 in this example. Select the Next Hop to Tunnel Interface which is defined in Step 2.
Step 9: Commit the Changes on Palo Alto Firewall
We finished the configuration of the IPSec tunnel in the Palo Alto firewall. Let’s perform a commit on the Palo Alto Firewall to activate the changes.
Steps to configure IPSec Tunnel on SonicWall Firewall
Now, we will configure the IPSec tunnel on the SonicWall Next-Gen Firewall. Make sure that Encryption & Authentication Methods, Key Life Time and DH Group should be the same. Let’s start our configuration.
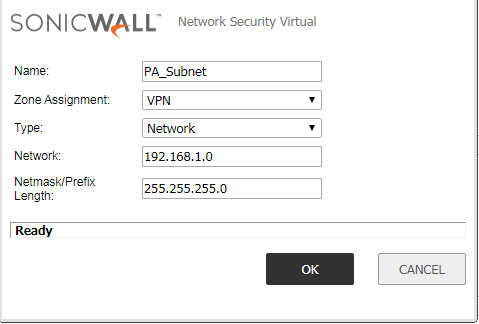
Step 1: Create the Network Address Object for IPSec Tunnel
First, we need to create the Network Object for the Destination Subnet, you want to access through the IPSec tunnel. In my case, my destination subnet is 192.168.1.0/24 which is connected to the Palo Alto Side. Navigate to Network >> Address Object and click on Add. You can refer to the below image, to create an address object.
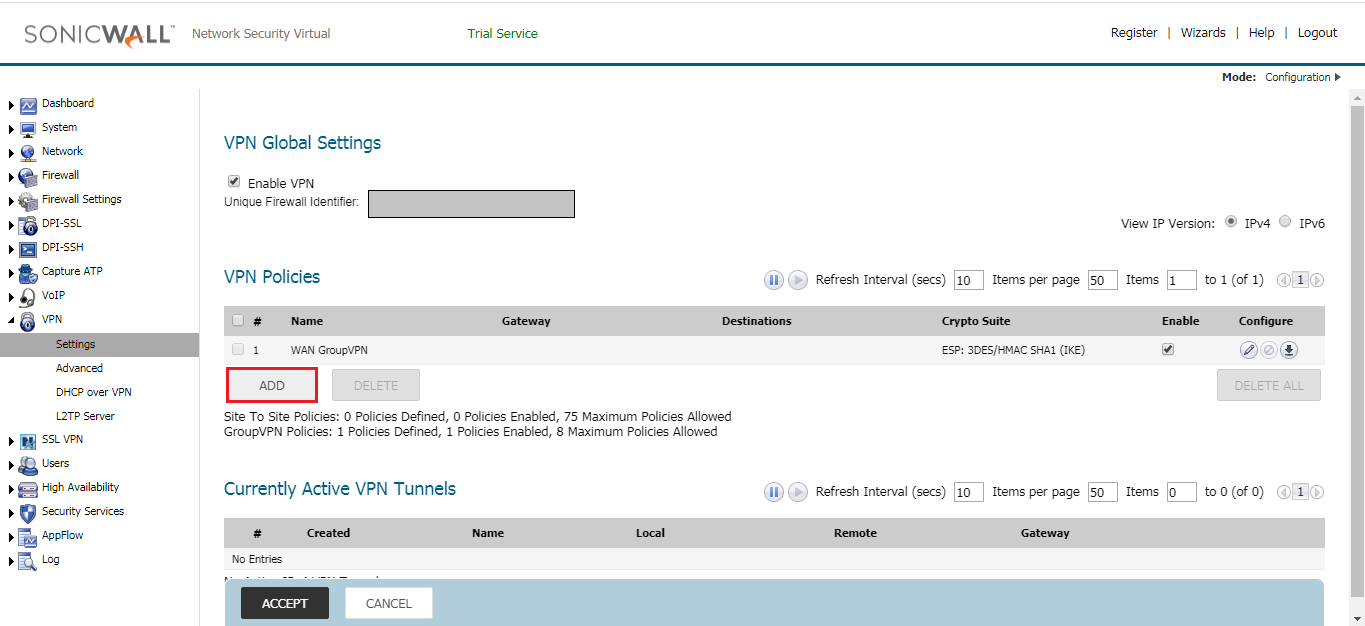
Step 2: Configuring the VPN Policies for IPSec Tunnel on the SonicWall Firewall
In this step, we need to define the VPN Policy for the IPSec tunnel. Here, you need to create a tunnel with Network, Phase 1 & Phase 2 parameter for IPSec tunnel. Navigate to VPN >> Settings >> VPN Policies and click on Add. Once, you click on Add, and another pop-up window will open.
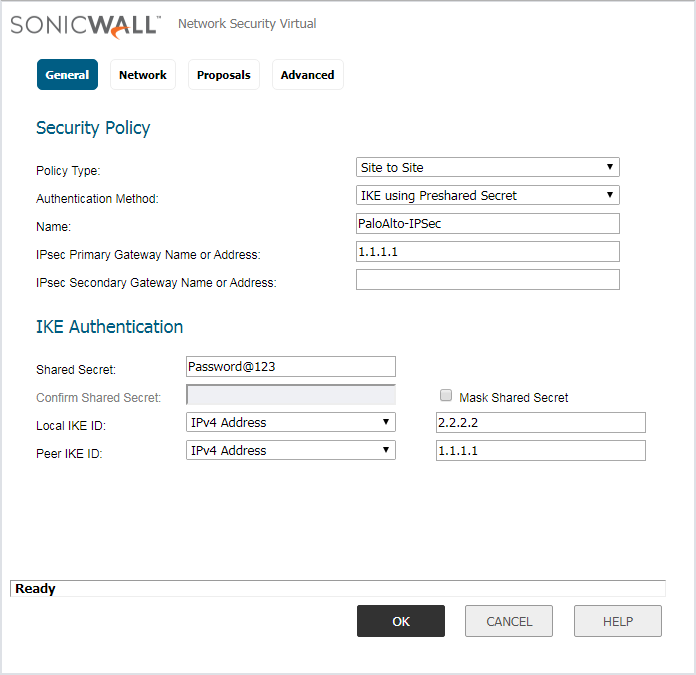
In the General tab, select the Policy Type: Site to Site and Authentication Method: IKE using Preshared Secret. In the Name field, give the name of IPSec Tunnel, i.e. PaloAlto-IPSec. You can define primary and secondary Name/IP for the Gateway. In this example, I’ll use only the primary IP. So, the IPsec Primary Gateway Name or Address will be 1.1.1.1 in this example.
In IKE Authentication, provide the Pre-Shared key, we used in Palo Alto side. This key must be the same on both the appliance. In Local & Peer IKE ID, give the public IP of SonicWall and Palo Alto respectively.
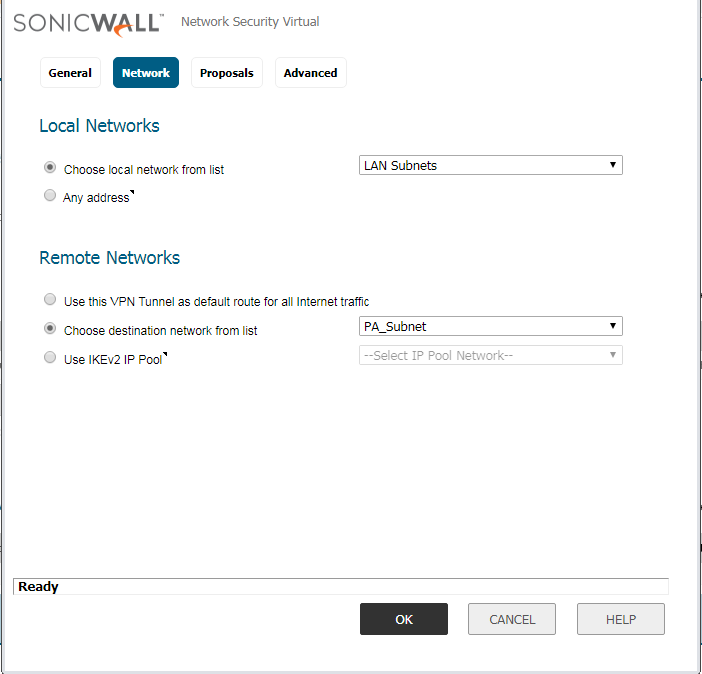
Access the Network tab, here you need to configure the Local and Remote Network. In this example, these are the LAN Subnet of both the location. In the Local Network field, select the LAN Subnet. Now, in the Remote Network field, you need to define the Network Object we created in Step 1.
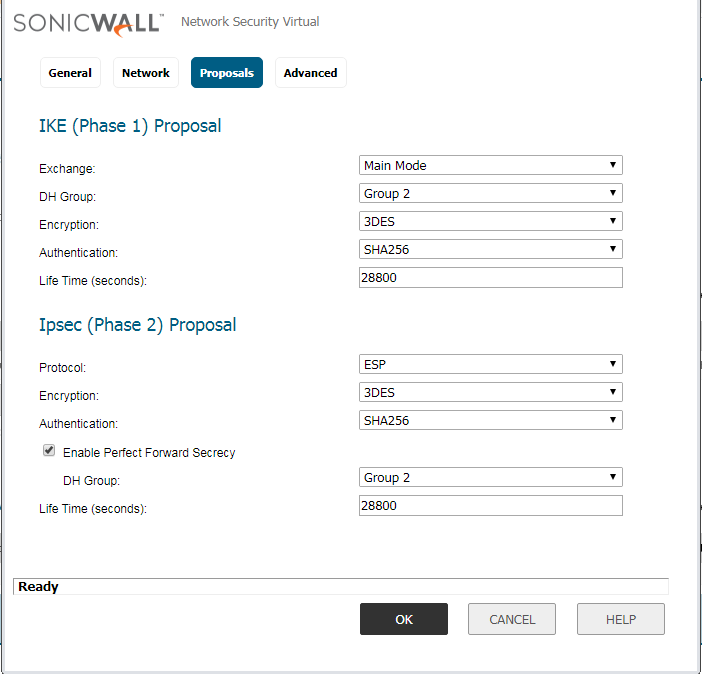
Access the Proposal tab, and configure the Encryption, Authentication, DH-Group and Key-lifetime value.
Note: Make Sure, Encryption, Authentication, DH-Group & Key-Lifetime value must be the same on both the appliances.
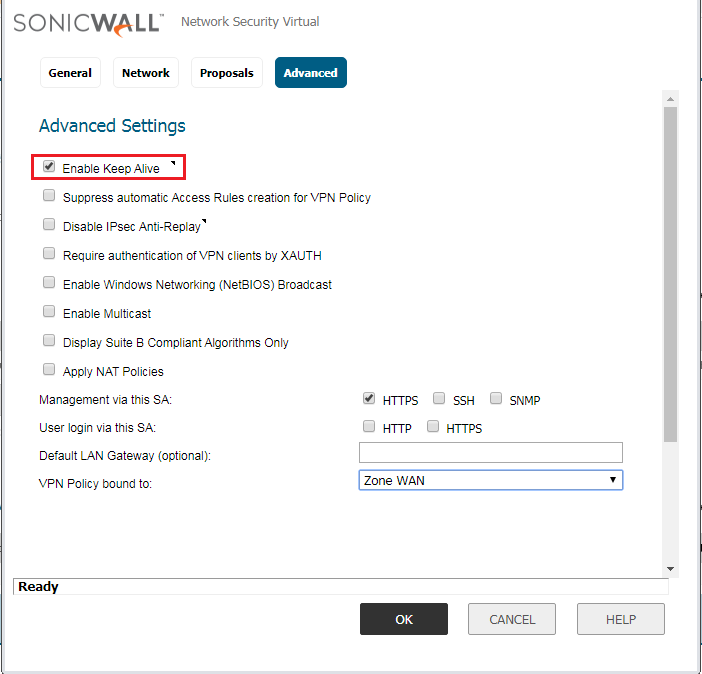
In the Advanced Tab, Enable the Keep-Alive. However, you also need to enable HTTPS/SSH in Management via this SA filed, if you need management access of the SonicWall appliance. Refer to the below image for more the configuration.
Step 3: Configuring the Access Rule for the IPSec Tunnel
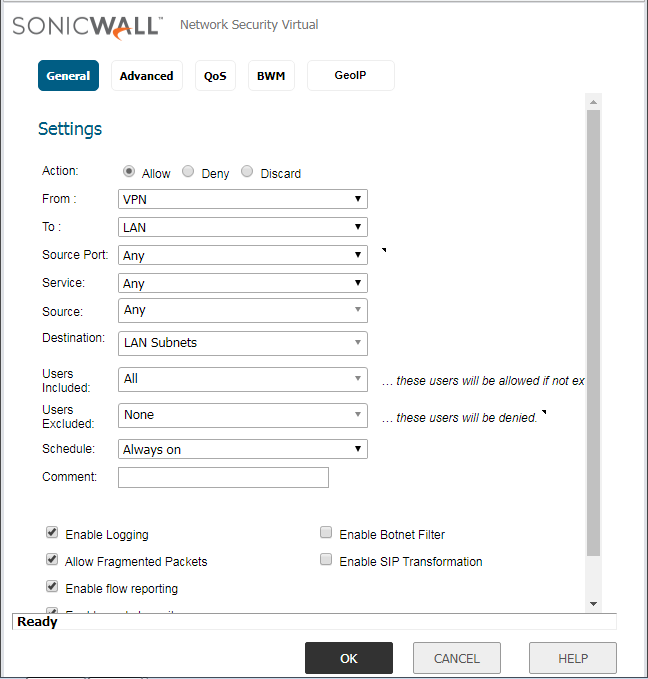
By default, an access rule created, from VPN–LAN. However, for bi-directional communication, we need to create an additional rule on the SonicWall Firewall. Navigate to, Firewall >> Access Rules and click on Add. Add a policy from LAN–VPN. You need to define the services on the same policy. However, in this example, I’m using All Services. You can refer to the below image for the policy configuration.
We successfully configured the IPSec tunnel on both SonicWall & Palo Alto Firewall. In the next step, we will test our configuration by initiating some traffic from SonicWall LAN Subnet to the Palo Alto LAN Subnet.
Verify the IPSec tunnel on Both Palo Alto and SonicWall Firewall
Here, we will verify our configuration by initiating traffic from SonicWall LAN Subnet to Palo Alto LAN Subnet. But, first, we will initiate the IPSec tunnel from the Palo Alto Firewall. Later, we will check the tunnel status on both the appliances.
Access the Palo Alto CLI, and run the following commands to initiate the IPSec tunnel.
[terminal]test vpn like-sa gateway SW-Gateway[/terminal]
[terminal]test vpn ipsec-sa tunnel PA-SW-Tunnel:ID1[/terminal]
Once, you run the above commands, the IPSec tunnel should come up. To verify it, let’s go to Network >> IPSec Tunnel on Palo Alto Firewall. You will find that the tunnel comes up successfully.

Now, in SonicWall Firewall, access the VPN >> VPN Settings >> Currently Active VPN Tunnels. You will notice that the IPSec tunnel we just configured, it’s activated.
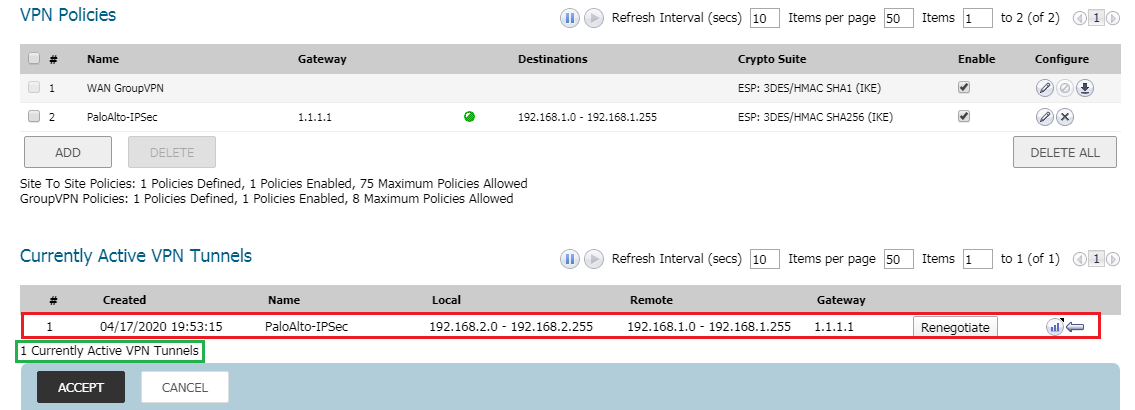
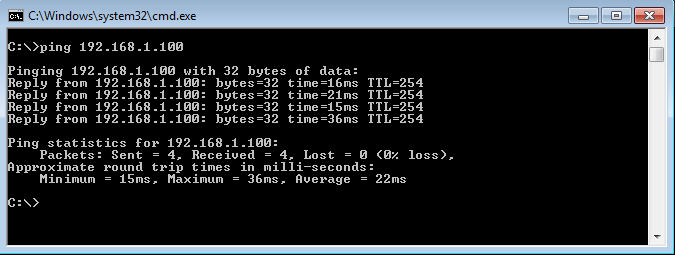
Now, I’m initiating some traffic towards the Router, connect behind the Palo Alto Firewall. You will notice that I’m able to access the Route.
So, we successfully configured the IPSec tunnel between the Palo Alto & SonicWall Firewall.
Related Articles
- How to configure Global VPN Client (GVC) on SonicWall Next-Gen Firewall
- How to configure SSL VPN on SonicWall Next-Gen Firewall | NetExtender
- GlobalProtect VPN on Palo Alto Firewall
- How to Install Palo Alto VM Firewall in VMWare
- How to deploy SonicWall Next-Gen Firewall in VMWare Workstation
References
Summary
In this article, we configured the IPSec tunnel between Palo Alto and SonicWall Next-Generation Firewall. First, we configured the IPSec tunnel on Palo Alto Firewall. After, we configured the IPSec tunnel on the SonicWall firewall. After the configuration, we initiate the IPSec tunnel on Palo Alto using some commands. Later, we tested the IPSec tunnel and we initiate the traffic as well.
Did you like this article? Please share this article on social platform and show your love towards me.
How you create the Internet Cloud that simulate two different subnet?
Thanks!
Thank you i have been working on getting this tunnel up during my holiday weekend at an hotel…the wife is not happy. Luckly i found this article. i was using IKEv2 on the SonicWall and IKEv1 on the Paloalto :(. its working now thanks to you.