
In this article, we will configure the SSL VPN on the SonicWall Next-Gen Firewall. SSL VPN, allows you to access the internal resources securely over the public Internet. You must have reachability to the SonicWall to connect to the SonicWall Firewall. For SSL VPN, you can either access applications on web browsers directly or you can install NetExtender. NetExtender is the SSL VPN client, proprietary of SonicWall Firewall. So, let’s start!
Scenario – How to configure SSL VPN on SonicWall Firewall
Let’s first discuss the topology before we start the configuration. In this example, I’ve configured two interfaces on the SonicWall firewall. The X1 is the WAN and X0 is LAN. X1 has IP address 1.1.1.1/30 & The LAN Subnet is 192.168.1.0/24. I’ve Windows 7 PC for the testing. Windows 7 PC has the reachability to the SonicWall Firewall X1 interface.

How to configure SSL VPN on SonicWall Firewall
Here, we will configure the SSL VPN from beginner to advance level. I’ve already checked the reachability to the SonicWall Firewall. As we already discussed, SonicWall Firewall allows us to access the application either directly on the web browser or we can download the SonicWall official SSL VPN Client i.e. Net Extender. Also, we will use the Local Users Database for the authentication. However, you can also configure LDAP, Radius, etc.
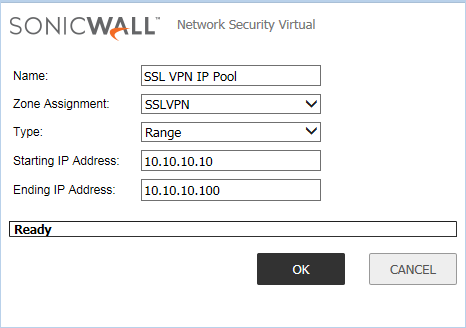
Step 1: Creating Network Object on SonicWall for SSL VPN
First, we need to configure the Network Object on SonicWall. It will be used during the SSL VPN Client configuration. Login to the SonicWall firewall and navigate to Network >> Address Objects and click on Add. Here, you need to define the Network Object which is used by SSL VPN Clients. Just, define the user-friendly name to this object, i.e. SSL VPN IP Pool. In the Zone Assignment, select SSLVPN. Now, in the Type field, you can either use a Network or a Range of IP Address. However, I’ll use a Range in this example. You can refer to the below image for your reference.
Step 2: Configuring the SSL VPN Server Settings on SonicWall
Now, we need to configure the SSL VPN Server Settings. Navigate to SSL VPN >> Server Settings. By default, you will find the Red Color Indicator on WAN Zone. That means the SSL VPN is not activated yet.

Now, click on the WAN Zone, the red Indicator will turn to Green. It means, the SSL VPN is successfully activated to the WAN Zone.
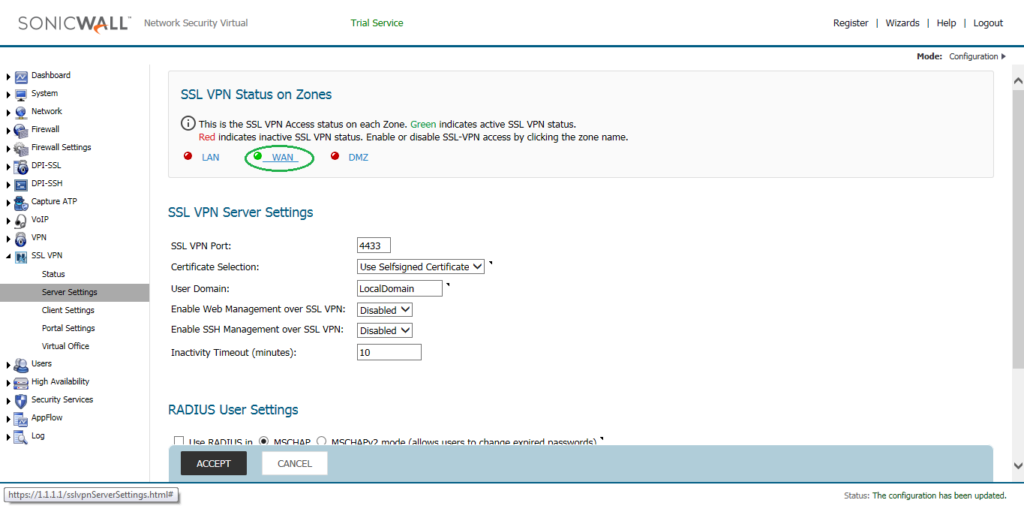
In, SSL VPN Server Settings, you can define several other options. By default, the SSL VPN on SonicWall Firewall works on 4433. You can modify it, but I’ll use the same SSL VPN Port. You can also use another than Selfsiged Certificate. However, here, we will continue with the SelfSSigned Certificate. User Domain is the domain field, in which you can choose the Domain. Later, on NetExtender client, you need to put the same Domain Name. I’ll continue with the default, Domain Name.
Optionally, if you want to Management of the SonicWall Firewall over the SSL VPN, you can choose Enable Web Management over SSL VPN & Enable SSH Management over SSL VPN as per your requirement. However, you will also need to configure the Access Rule for the same. Optionally, you can define the Inactivity Timeout in (minutes). I’ll continue with the default options. You can refer to the below image.
Step 3: Configuring the SSL VPN Client settings on SonicWall
Now, we need to configure the Sonicwall Client Settings. Navigate to SSL VPN >> Client Settings and click on the configure icon of Default Device Profile. However, you can also define a new SSL VPN Client.
In the Settings Tab, Select SSLVPN on the Zone IP V4 field. In, Network Address IP V4, select the Address Object we created in Step 1, i.e. SSL VPN IP Pool.

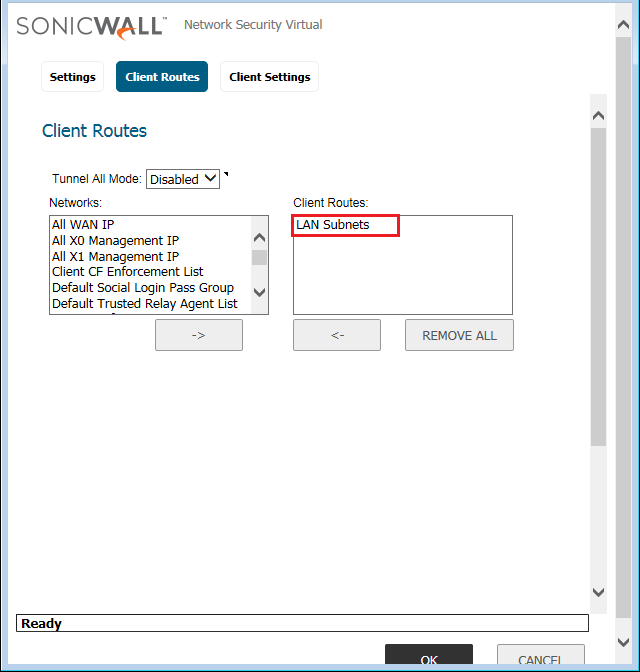
In the Client Route Tab, select the Routes you want to access from the SSL VPN. The SSL VPN only populates the defined routes only. Here, I want to access the whole LAN subnet from the SSL VPN. So, I’ll add the LAN Subnet in Client Routes.
Note: You must define VPN Access Routes during Users Configuation!
Now, finally in the Client Settings tab, if your applications need any domain lookup, you can define the DNS Servers.
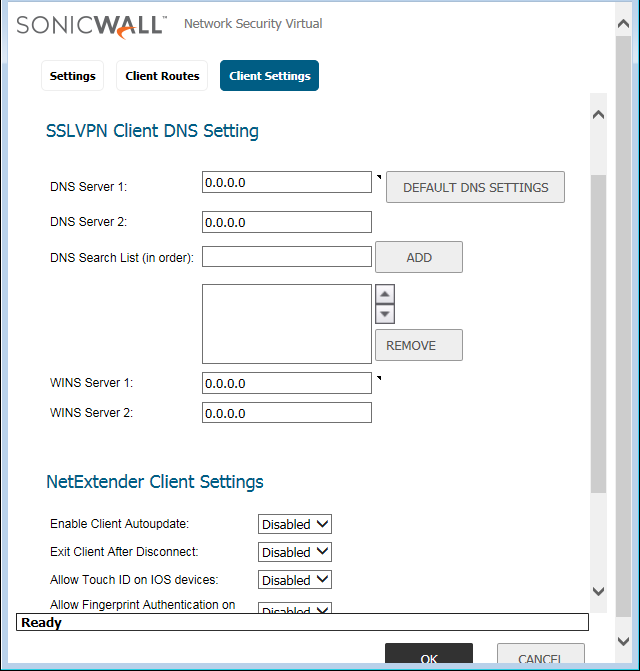
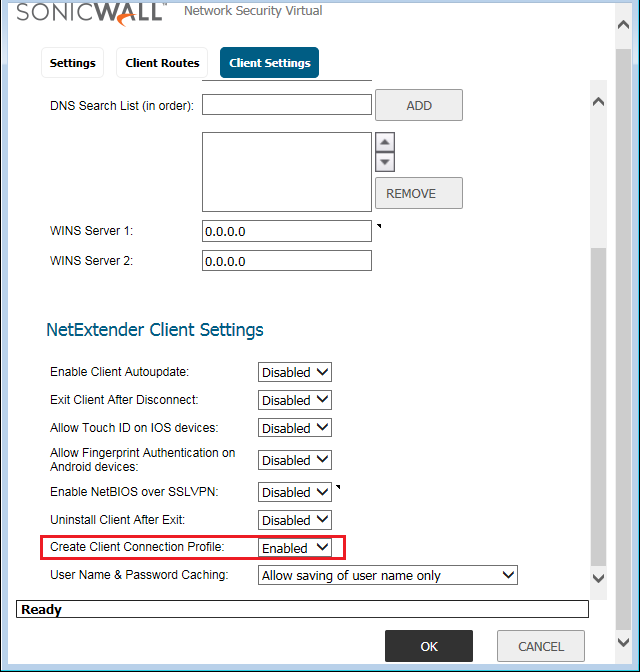
In, NetExtender Client Settings, Enable the Create Client Connection Profile option so that we can Create the Client Connection Profiles on NetExtender Client.
Step 4: Configuring the Bookmarks on SonicWall SSL VPN to access Application Directly on Web Browsers
Now, we will define the Bookmarks, so that we can test our applications by accessing directly on Web Browsers. Sonicwall firewall Support RDP & SSHv2, Telnet & VNC over HTML5. We will configure the RDP services, so that we can access our one of the Server placed in LAN Zone directly on Web Browser, over the SSL VPN. Navigate to SSL VPN >> Virtual Office >> Virtual Office Bookmarks and click on Add. Now, you need to define the Name and IP Address of the Server.
Note: You can also define the FQDN of the Server.
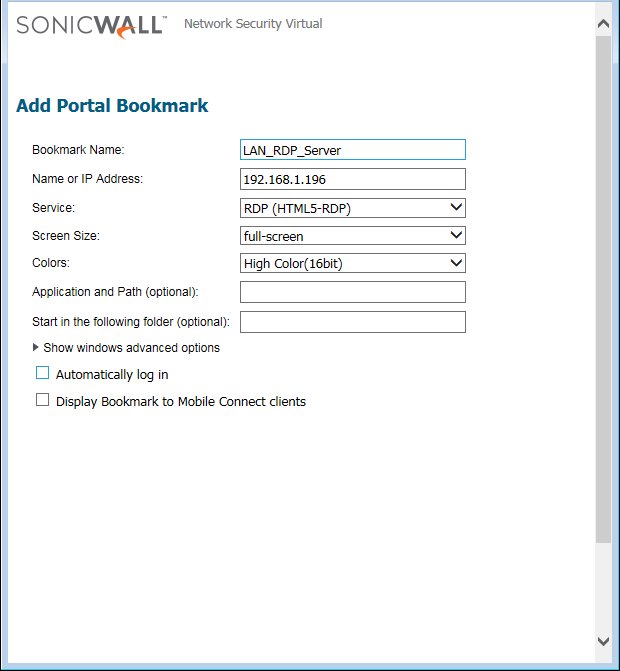
Select the Service you want to configure. I’m configuring the RDP. You can also, configure the other settings like Authentication & Color Quality (Based on Network Speed). I’ll continue with default configurations. You can refer to the below image for your configuration.
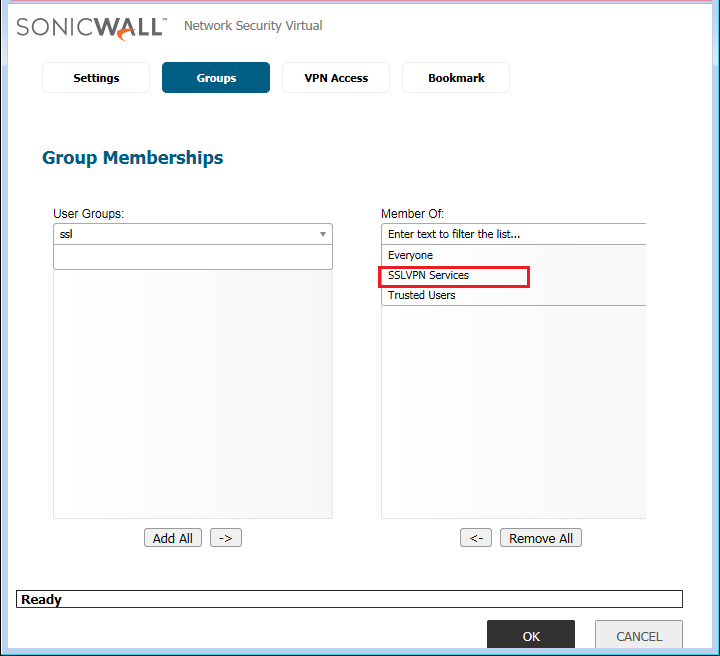
Step 5: Creating the Users for SSL VPN on SonicWall Next-Gen Firewall
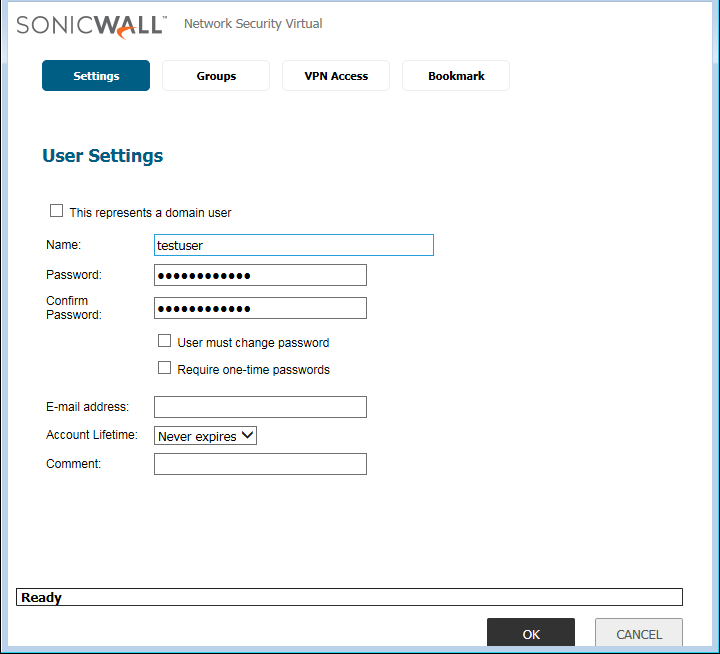
Now, we will create users to allow access to Internal Resources over the SSL VPN. We will create local users for authentication on SSL VPN. However, you can use LDAP, Radius for the user’s authentication. Navigate to Users >> Local Users & Group >> Local Users and click on Add. A new popup window will appear. Here, you need to define the Name and Password for the User.
Note: In this example, I’m using a user with Username testuser & Password Password@123.
In the Groups Tab, make sure the User must be a member of the SSL VPN Services Group.
Now, in the VPN Routes Tab, add the route, you want to Access over the SonicWall SSL VPN.

Leave the Bookmark settings to default, and click on OK.
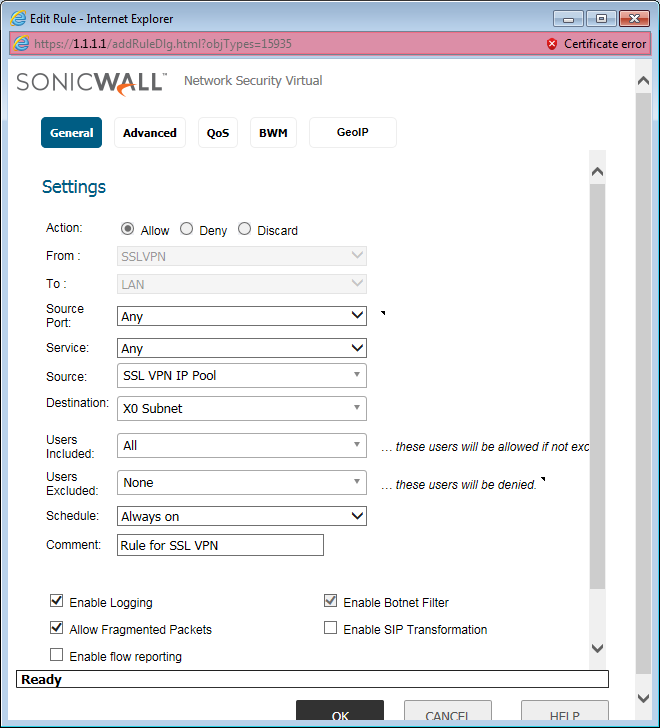
Step 6: Configuring the Access Rule to Allow traffic from SSL VPN to Internal Resources
When we configured the SSL VPN, the SonicWall firewall automatically adds some Default access rules. However, it is always recommended to either modify the default rule or you can create a New Access Rule. Navigate to Firewall >> Access Rules and click on Add. However, In this example, I’ll configure the rule for SSLVPN to LAN. I’m configuring the Services and Destination addresses to All. You can refer to the below image for your reference.
We have successfully configured the SSL VPN on the SonicWall Firewall. You can follow the next two steps to verify the connectivity to the Internal Servers using Bookmarks and NetExtender.
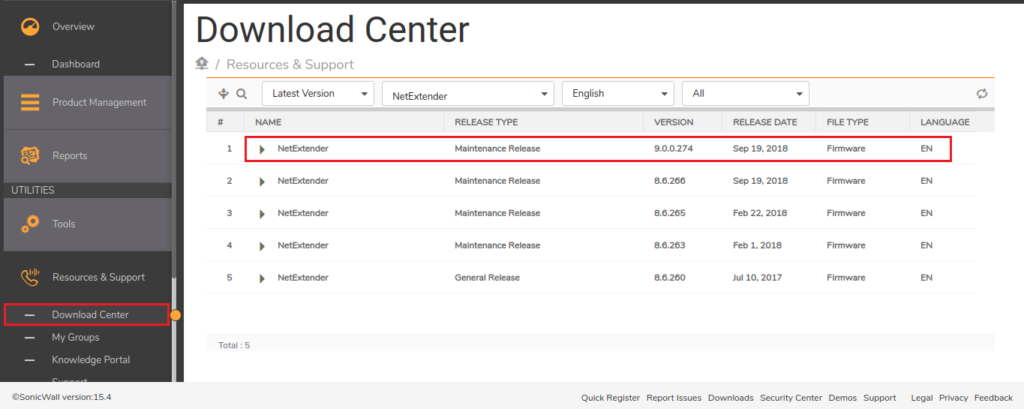
Step 7: Download and Install SonicWall NetExtender SSL VPN Client
As we already discussed, we will verify the configuration on both the Bookmark and NetExtender Client. So, we need to download and Install the SonicWall NetExtender client. Visit MySonicWall Portal and Download the NetExtender Windows Client. Upon successfully download, install the NetExtender client on the system. It will look like the below image:
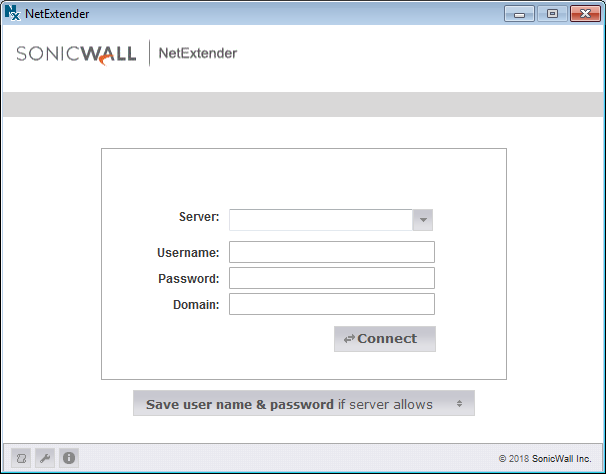
Once, you successfully installed the NetExtender Client, it will be looks like the below image.
Step 8: Verifying the Connectivity of SonicWall SSL VPN using Bookmarks
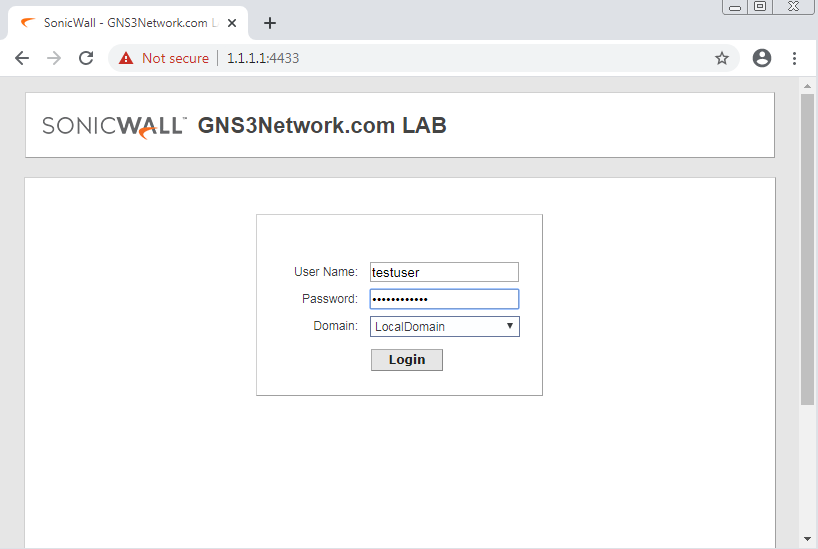
In this step, we will test the connectivity to the Destination Server using Bookmarks. As we already discussed, Bookmarks help us to access several applications over the Web Browser itself. You need to login to your SSL VPN Client from the Web Browser. You can either Login by directly accessing the SSL VPN using IP address and Port, otherwise, you can hit the public IP of the SonicWall and click on SSL VPN Login. In this example, my X1 IP address is 1.1.1.1. So, we can directly login to https://1.1.1.1:4433.

Now, you need to login to the SSL VPN with the credentials we created earlier.
Upon successful authentication, you will find your configured Bookmarks and NetExtender Notification as shown below.
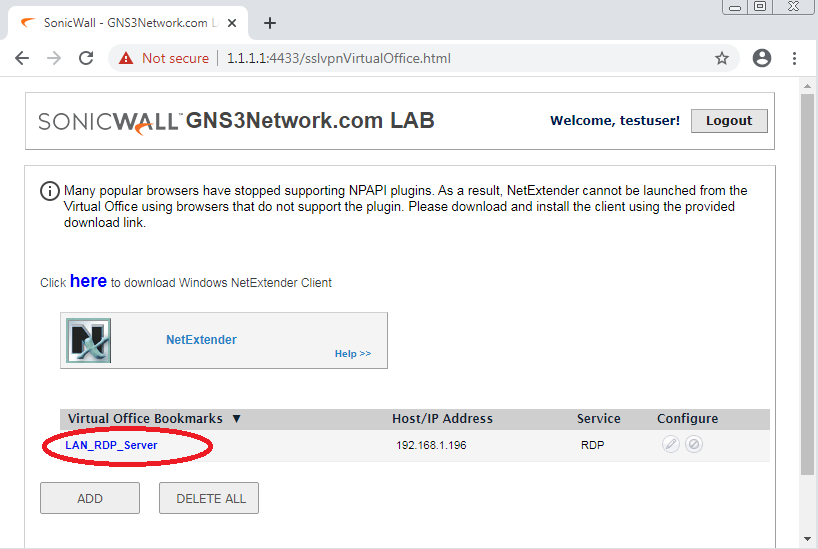
Once, you click on the LAN_RDP_Server, you can access the RDP of Server 192.168.1.196 over the HTML5, as shown below.
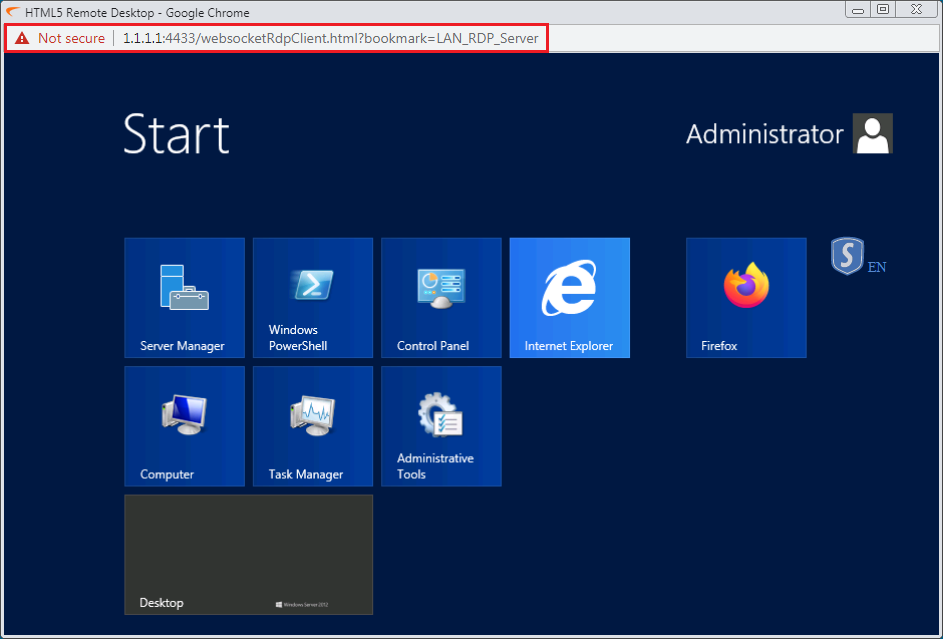
So, In this way, we successfully verified the SonicWall Firewall SSL VPN Bookmark feature.
Step 9: Verifying the Connectivity of SonicWall SSL VPN using NetExtender SSL VPN Client
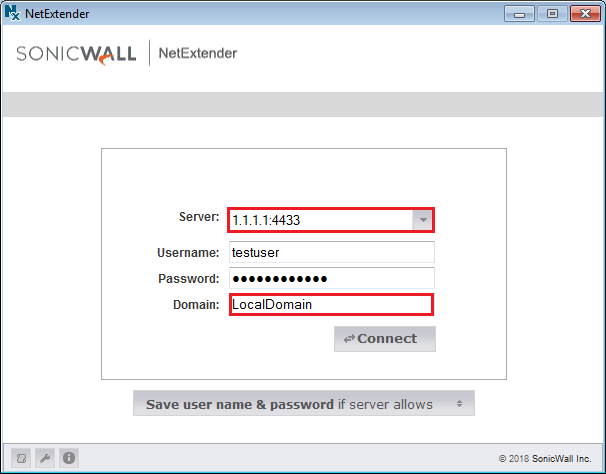
In the previous step, we successfully verified the SonicWall Bookmarks feature for the SSL VPN. Now, we will test our configuration on the SonicWall NetExtender Client. In Step 7, we have successfully installed the NetExtender on our test machine. Now, connect to the SonicWall Firewall SSL VPN using SonicWall IP: Port and user credentials. The Domain Name is the domain Name we configured in Step 2. You can refer to the below image for your Connection Profile.
Now, click to Connect Option. Once, you hit the Connect Option, it will be successfully connected. Also, your Connection Profile will be automatically saved.
Note: We will get the IP Address from the SSL VPN Pool!
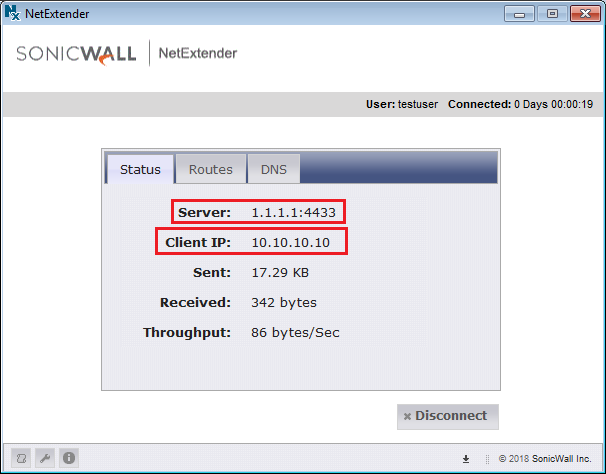
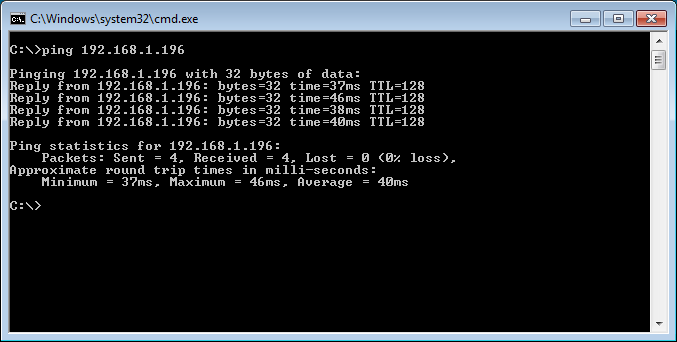
Now, we have successfully connected to the SonicWall Firewall using NetExtender. I’m initiating a ping to the server which is hosted in the LAN Submit. You can check that, w successfully reached to the Destination Server.
Related Articles
- How to configure Global VPN Client (GVC) on SonicWall Next-Gen Firewall
- How to deploy SonicWall Next-Gen Firewall in VMWare Workstation
- IPSec VPN between Palo Alto and FortiGate Firewall
References
Summary
In this article, we configured the SSL VPN on the SonicWall Next-Gen Firewall. SonicWall firewall allows you to access your resources using SSL VPN security over the public Internet. First, we created the Object for the SSL VPN Network. Then, we configured the SSL VPN Server & Client Settings under the VPN menu. Latter, we define the RDP bookmark to access the RDP Server directly on a web browser. At last, we tested the SSL VPN using SonicWall NetExtender SSL VPN Client.
Did you like this article? Please comment in the comment box!