
In this article, we will generate a Self-Signed Root CA SSL certificate in Palo Alto Firewall. Later, we will test this certificate by deploying it on Windows and Linux machines. By default, Palo Alto firewalls come with a default certificate. Although, you can generate a self-signed certificate in PA Firewall. So, let’s started!

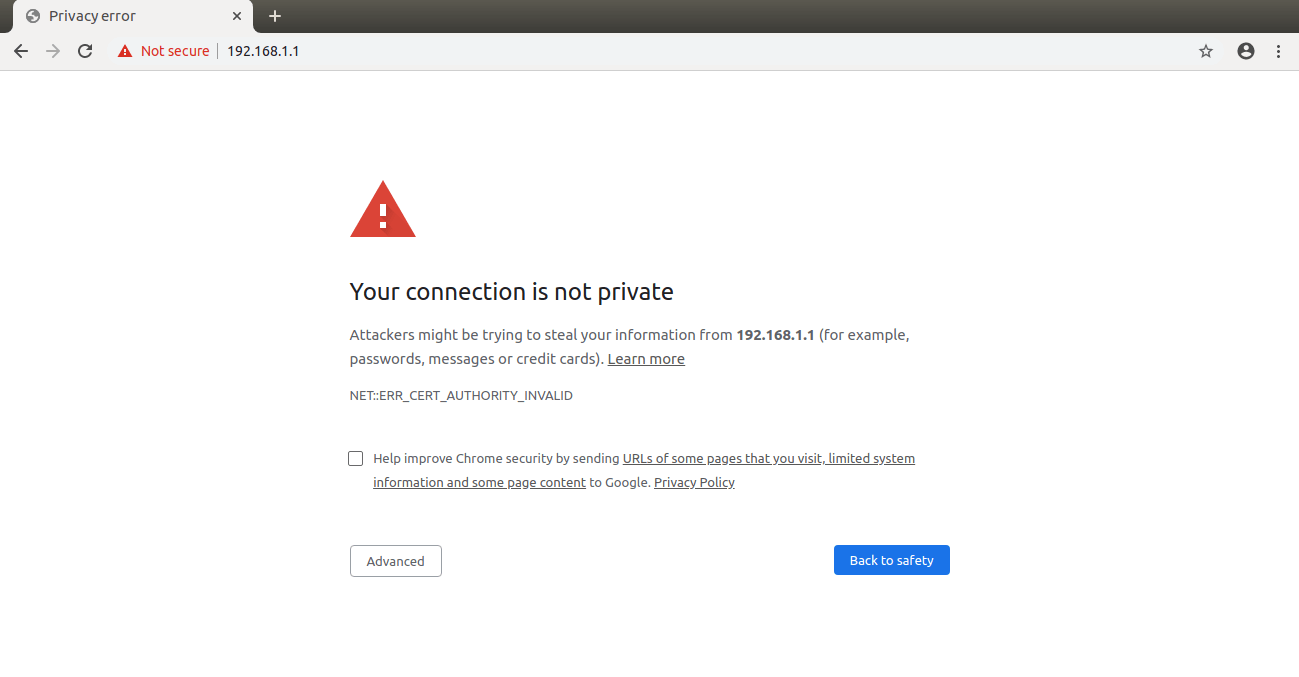
Getting Warning / Error Page while accessing Palo Alto Firewall?
When accessing the Palo Alto firewall, An administrator system must have a trusted root certificate, otherwise, the web browser will show a warning page. So, to prevent this warning/block page, you need to generate a self-signed certificate and install it on the administrator machine.
Steps To Generate and Install Self Signed Certificates in Windows and Linux Machines
In this example, I am generating two different certificates. The first certificate will be the Root CA Certificate i.e. Root Certificate, and another one will be the SSL certificate signed by the Root CA certificate, i.e. Server Certificate. So, we need to create a certificate hierarchy.
Step 1: Generate a Self-Signed Root CA Certificate in Palo Alto Firewall
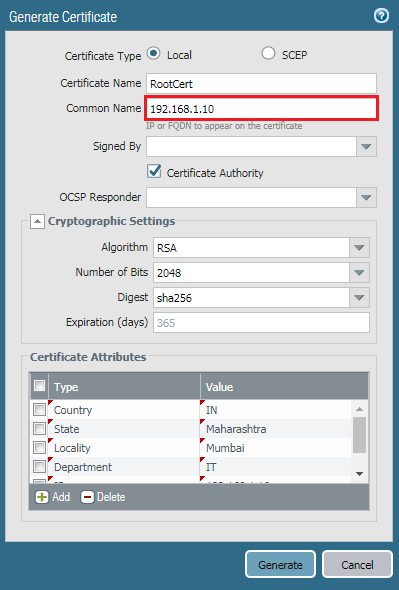
First, we will create a Root CA Certificate. Later, we will use this certificate to sign the Server Certificate. Navigate to Device >> Certificate Management and click on Generate. Choose the Certificate Type Local. Enter the Name of the certificate, i.e. RootCert. In the common name field, you need to define the FQDN or the IP Address different than the Interface IP on which you are accessing the Firewall or/and other services.
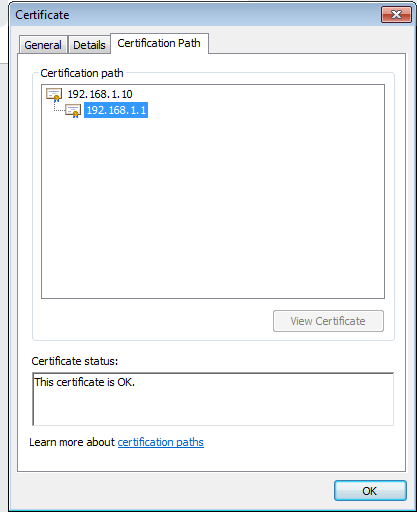
In this example, my Mgmt Interface IP is 192.168.1.1, so I will use 192.168.1.10 for the Root CA Certificate.
Click on the checkbox of the Certificate Authority. You can modify the cryptographic settings, but for now, I am continuing with default settings. Insert the certificate Attributes. Use the Hostname IP/FQDN of RootCert for IP and Host Name attribute field.
Now, click on the Name of the certificate RootCert and Mark the certificate as a Trusted Root Certificate.

Step 2: How to Generate an SSL Server Certificate signed by Root Certificate for Palo Alto Management traffic
In the previous step, we configured a Trusted Root CA certificate. In this step, we will generate an SSL Server Certificate which is signed by the Root CA Certificate created in the previous step. Navigate to Device >> Certificate Management and click on Generate. Choose the Certificate Type Local. Enter the Name of the certificate, i.e. ServCert. In the common name field, you need to define the FQDN or IP Address of the Interface on which you are accessing the Firewall or/and other services. Here, I am defining the certificate for 192.168.1.1.
In Signed By field, you need to select the trusted Root CA certificate created in the previous step, i.e. RootCert. Again, you can modify the cryptographic settings, but for now, I am continuing with default settings. Insert the certificate Attributes. Use the Hostname IP/FQDN of RootCert for IP and Host Name attribute field.

Step 3: Creating an SSL TLS Service Profile using a Self-Signed Certificate
Now, we need to create an SSL/TLS Service Profile using the self-signed Server Certificate. Also, we need to define the Minimum and Maximum version of TLS. Go to the Device >> Certificate Management >> SSL/TLS Service Profile and click on Add.
Step 4: Attaching the SSL/TLS Service Profile to the Palo Alto Firewall Management
Now, we need to attach this SSL/TLS profile to the firewall Management. Access the Device >> Steup >> Management >> General Settings and click on gear icon. In SSL/TLS Service Profile, select the SSL/TLS Profile we created in the previous step.
Step 5: Commit the Changes on Palo Alto Firewall
Now, click on the Commit Link on Right Top corner to commit all the changes. If you getting any warning or error page, you need to check your configuration again!
Step 6: Export the Root CA Certificate and SSL Server Certificate from Palo Alto Firewall
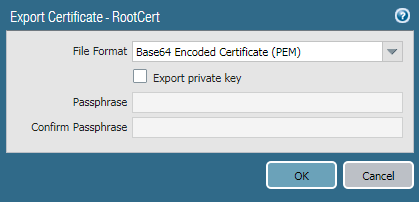
Now, we will export the certificates, so we can import these certificates to machines/browsers. To export the self-signed certificate, navigate to Device >> Certificate Management >> Certificate and select the RootCert and click on Export. Choose Base64 Encoded Certificate (PEM) in the File Format field.
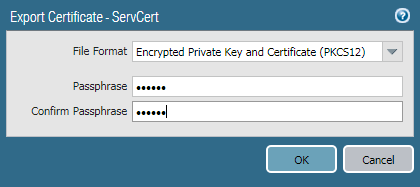
We also need to export the Server Certificate, signed by the Root certificate. To Export Server Certificate, select the ServCert and click on Export. Choose Encrypted Private Key and Certificate (PKCS12) in the File Format field and select the at-least six-digit password.
Step 7: Install the Palo Alto Self-Signed Certificates in the system
As we have successfully exported both of the self-signed certificates. Now, we will install/import these certificates in Windows Machine. I’ve my Windows 7, so I’ll import the certificates on this Windows Machine. You need to Import both certificates on All Browsers on which you want to access the Firewall Services.
You need to provide password when installing Private Certificate i.e. PKCS12!
Step9: Accessing Firewall on Windows and Linux Machine
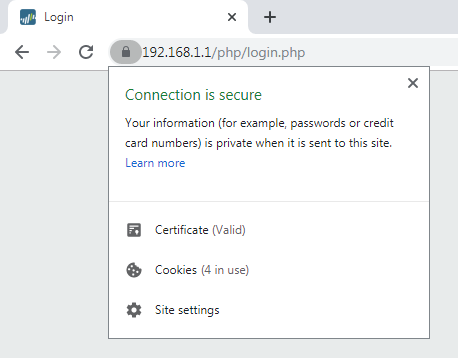
Now, we will test our self-signed certificate by accessing the firewall from the Linux and Windows machines. If you did your configuration properly, you will no longer see any warning page while accessing the firewall or any associated service on your web browser.
References
Related Articles
- How to configure Clientless VPN on Palo Alto Firewall
- How to configure GlobalProtect VPN on Palo Alto Firewall
Summary
In this article, we discussed how you can Generate the Self-Signed Root CA certificate in Palo Alto Next-Generation Firewall. Later, we installed them in Windows and Linux machines. In modern web browsers, we need to install both the Root CA certificate and SSL Server certificate to avoid warning messages in a web browser.
Did you like this article? Please comment in the comment box!
Maybe I’m missing something, but why do we need to export and install the Server certificate into your Windows machine?
That certificate represents the firewall and you wouldn’t want to export the key if you didn’t need to.
If you want to do mutual/client authentication, then maybe you’d make a separate cert signed by the Root, and export that one into your Windows machine, but you really only need to export the Root CA cert into your Trusted Root store – so you don’t get the ‘site is untrusted’ messages anymore.